Introduction
This is the Redox OS book, which will go through (almost) everything about Redox: design, philosophy, how it works, how you can contribute, how to deploy Redox, and much more.
Please keep in mind that this book is work-in-progress and sometimes can be outdated, any help to improve it is important.
If you want to skip straight to trying out Redox, see the Getting started page.
If you want to contribute to Redox, read the following guides: CONTRIBUTING and Developing for Redox.
Conventions
Notices
The following notices are commonly used throughout the book to convey noteworthy information:
| Notice | Meaning |
|---|---|
| 🛈 Info | Provides neutral information to deliver key facts. |
| 📝 Note | Provides information to enhance understanding. |
| 💡 Tip | Offers suggestions to optimize an experience. |
| ⚠️ Warning | Highlights potential risks or mistakes. |
What is Redox?
Redox OS is a general-purpose operating system written in Rust. Our aim is to provide a fully functioning Unix-like microkernel-based operating system, that is secure, reliable and free.
We have modest compatibility with POSIX, allowing Redox to run many programs without porting.
We take inspiration from Plan 9, Minix, seL4, Linux, OpenBSD and FreeBSD. Redox aims to synthesize years of research and hard won experience into a system that feels modern and familiar.
This book is written in a way that you doesn't require any prior knowledge of Rust or OS development.
Origin Story
Redox OS was created in 2015 before the first stable version (1.0) of the Rust compiler and was one of the first operating systems written in Rust. It started as an unikernel (without a hypervisor) and gathered the contributions of many Rust developers.
As the project progressed, Jeremy Soller decided that the OS should be focused on stability and security. To achieve that, Redox was redesigned to adopt a microkernel architecture and a unified system API for resources.
Minix and Plan 9 were the main inspirations for the system design in the beginning.
Introducing Redox OS
Redox OS is microkernel-based operating system, with a large number of supported programs and components, to create a full-featured user and application environment. In this chapter, we will discuss the goals, philosophy and scope of Redox.
Our Goals
Redox is an attempt to make a complete, fully-functioning, general-purpose operating system with a focus on safety, freedom, stabillity, correctness, and pragmatism.
We want to be able to use it, without obstructions, as a complete alternative to Linux/BSD in our computers. It should be able to run most Linux/BSD programs with minimal modifications.
We're aiming towards a complete, stable, and safe Rust ecosystem. This is a design choice, which hopefully improves correctness and security (see the Why Rust page).
We want to improve the security design when compared to other Unix-like operating systems by using safe defaults and limiting insecure configurations where possible.
The non-goals of Redox
We are not a Linux/BSD clone, or POSIX-compliant, nor crazy scientists, who wish to redesign everything. Generally, we stick to well-tested and proven correct designs. If it ain't broken don't fix it.
This means that a large number of programs and libraries will be compatible with Redox. Some things that do not align with our design decisions will have to be ported.
The key here is the trade off between correctness and compatibility. Ideally, you should be able to achieve both, but unfortunately, you can't always do so.
Our Philosophy
Redox OS is predominately MIT X11-style licensed, including all software, documentation, and fonts. There are only a few exceptions to this, which are all licensed under other compatible open-source licenses.
The MIT X11-style license has the following properties:
- It gives you, the user of the software, complete and unrestrained access to the software, such that you may inspect, modify, and redistribute your changes
- Inspection Anyone may inspect the software for security vulnerabilities
- Modification Anyone may modify the software to fix security vulnerabilities
- Redistribution Anyone may redistribute the software to patch the security vulnerabilities
- It is compatible with GPL licenses - Projects licensed as GPL can be distributed with Redox OS
- It allows for the incorporation of GPL-incompatible free software, such as OpenZFS, which is CDDL licensed
The license does not restrict the software that may run on Redox, however -- and thanks to the microkernel architecture, even traditionally tightly-coupled components such as drivers can be distributed separately, so maintainers are free to choose whatever license they like for their projects.
This license was chosen to allow Redox to be used everywhere with minimum restrictions.
Redox intends to be free forever, because we aim to be a foundational piece in creating secure and resilient systems.
Why a New OS?
The essential goal of the Redox project is to build a robust, reliable and safe general-purpose operating system. To that end, the following key design choices have been made.
Written in Rust
Wherever possible, Redox code is written in Rust. Rust enforces a set of rules and checks on the use, sharing and deallocation of memory references. This almost entirely eliminates the potential for memory leaks, buffer overruns, use after free, and other memory errors that arise during development. The vast majority of security vulnerabilities in operating systems originate from memory errors. The Rust compiler prevents this type of error before the developer attempts to add it to the code base.
It allows us to unlock the full Rust potential by dropping legacy C and C++ code.
Benefits
The following items summarize the Rust benefits:
-
Memory-Safety
All memory allocations are verified by the compiler to prevent bugs.
-
Thread-Safety
Concurrent code in programs is immune to data races.
-
NULL-Safety
NULLs can't cause undefined behavior.
Microkernel Architecture
The Microkernel Architecture moves as much components as possible out of the operating system kernel. Drivers, subsystems and other operating system functionality run as independent processes on user-space (daemons). The kernel's main responsibility is the coordination of these processes, and the management of system resources to the processes.
Most kernels, other than some real-time operating systems, use an event-handler design. Hardware interrupts and application system calls, each one trigger an event invoking the appropriate handler. The kernel runs in supervisor-mode, with access to all the system's resources. In Monolithic Kernels, the operating system's entire response to an event must be completed in supervisor mode. An error in the kernel, or even a misbehaving piece of hardware, can cause the system to enter a state where it is unable to respond to any event. And because of the large amount of code in the kernel, the potential for vulnerabilities while in supervisor mode is vastly greater than for a microkernel design.
In Redox, drivers and many system services can run in user-mode, similar to user programs, and the system can restrict them so they can only access the resources that they require for their designated purpose. If a driver fails or panics, it can be ignored or restarted with no impact on the rest of the system. A misbehaving piece of hardware might impact system performance or cause the loss of a service, but the kernel will continue to function and to provide whatever services remain available.
Thus Redox is an unique opportunity to show the microkernel potential for the mainstream operating systems universe.
Benefits
The following items summarize the microkernel benefits:
-
More stable and secure
The very small size of the kernel allow the system to be more stable and secure because most system components are isolated in user-space, reducing the chance of a kernel panic and the severity of security bugs.
-
Bug isolation
Most system components run in user-space on a microkernel system. Because of this some types of bugs in most system components and drivers can't spread to other system components or drivers.
-
More stable long execution
When an operating system is left running for a long time (days, months or even years) it will activate many bugs and it's hard to know when they were activated, at some point these bugs can cause security issues, data corruption or crash the system.
In a microkernel most system components are isolated and some bug types can't spread to other system components, thus the long execution tend to enable less bugs reducing the security issues, data corruption and downtime on servers.
Also some system components can be restarted on-the-fly (without a full system restart) to disable the bugs of a long execution.
-
Restartless design
A mature microkernel changes very little (except for bug fixes), so you won't need to restart your system very often to update it.
Since most system components are in userspace they can be restarted/updated on-the-fly, reducing the downtime of servers a lot.
-
Easy to develop and debug
Most system components run in userspace, simplifying the testing and debugging.
-
Easy and quick to expand
New system components and drivers are easily and quickly added as userspace daemons.
-
True modularity
You can enable/disable/update most system components without a system restart, similar to but safer than some modules on monolithic kernels and livepatching.
You can read more about the above benefits on the Microkernels page.
Advanced Filesystem
Redox provides an advanced filesystem, RedoxFS. It includes many of the features in ZFS, but in a more modular design.
More details on RedoxFS can be found on the RedoxFS page.
Unix-like Tools and API
Redox provides a Unix-like command interface, with many everyday tools written in Rust but with familiar names and options. As well, Redox system services include a programming interface that is a subset of the POSIX API, via relibc. This means that many Linux/POSIX programs can run on Redox with only recompilation. While the Redox team has a strong preference for having essential programs written in Rust, we are agnostic about the programming language for programs of the user's choice. This means an easy migration path for systems and programs previously developed for a Unix-like platform.
Redox Use Cases
Redox is a general-purpose operating system that can be used in many situations. Some of the key use cases for Redox are as follows.
Server
Redox has the potential to be a secure server platform for cloud services and web hosting. The improved safety and reliability that Redox can provide, as it matures, makes it an excellent fit for the server world. Work remains to be done on support for important server technologies such as databases and web servers, as well as compatibility with high-end server hardware.
Redox has plans underway for virtualization support. Although running an instance of Linux in a container on Redox will lose some of the benefits of Redox, it can limit the scope of vulnerabilities. Redox-on-Redox and Linux-on-Redox virtualization have the potential to be much more secure than Linux-on-Linux. These capabilities are still a ways off, but are among the goals of the Redox team.
Desktop
The development of Redox for the desktop is well underway. Although support for accelerated graphics is limited at this time, Redox does include a graphical user interface, and support on Rust-written GUI libraries like winit, Iced and Slint.
A demo version of Redox is available with several games and programs to try. However, the most important objective for desktop is to host the development of Redox. We are working through issues with some of our build tools, and other developer tools such as editors have not been tested under daily use, but we continue to make this a priority.
Due to a fairly limited list of currently supported hardware, once self-hosted development is available the development can be done inside of Redox with more quick testing. We are adding more hardware compatibility as quickly as we can, and we hope to be able to support the development on a wide array of desktops and notebooks in the near future.
Infrastructure
Redox's modular architecture make it ideal for many telecom infrastructure applications, such as routers, telecom components, edge servers, etc., especially as more functionality is added to these devices. There are no specific plans for remote management yet, but Redox's potential for security and reliability make it ideal for this type of application.
Embedded and IoT
For embedded systems with complex user interfaces and broad feature sets, Redox has the potential to be an ideal fit. As everyday appliances become Internet-connected devices with sensors, microphones and cameras, they have the potential for attacks that violate the privacy of consumers in the sanctity of their homes. Redox can provide a full-featured, reliable operating system while limiting the likelihood of attacks. At this time, Redox does not yet have touchscreen support, video capture, or support for sensors and buttons, but these are well-understood technologies and can be added as it becomes a priority.
Mission-Critical Applications
Although there are no current plans to create a version of Redox for mission-critical applications such as satellites or air safety systems, it's not beyond the realm of possibility. As tools for correctness proofs of Rust software improve, it may be possible to create a version of Redox that is proven correct, within some practical limits.
How Redox Compares to Other Operating Systems
We share quite a lot with other operating systems.
System Calls
The Redox userspace API is Unix-like. For example, we have the open, pipe, pipe2, lseek, read, write, brk, execv POSIX functions, and so on. Currently, we implement userspace analogues of most Unix-like system calls (on monolithic kernels). The kernel syscall interface itself is unstable and may not be similar at all, but is closely related to the higher-level POSIX APIs built on top of them, at the moment.
However, Redox does not necessarily implement them as system calls directly. Much of the machinery for these functions (typically the man(2) functions) is provided in userspace through an interface library, relibc.
For example, the open POSIX function is called SYS_OPEN on relibc.
"Everything is a File"
In a model largely inspired by Plan 9, in Redox, resources can be socket-like or file-like, providing a more unified system API. Resources are named using paths, similar to what you would find in Linux or another Unix system. But when referring to a resource that is being managed by a particular resource manager, you can address it using a scheme-rooted path. We will explain this later, in the Schemes and Resources page.
The kernel
Redox's kernel is a microkernel. The architecture is largely inspired by MINIX and seL4.
In contrast to Linux or BSD, Redox has around 50,000 lines of kernel code, a number that is often decreasing. Most system services are provided in userspace, either in an interface library, or as daemons.
Having vastly smaller amount of code in the kernel makes it easier to find and fix bugs/security issues in an efficient way. Andrew Tanenbaum (author of MINIX) stated that for every 1,000 lines of properly written C code, there is a bug. This means that for a monolithic kernel with nearly 25,000,000 lines of C code, there could be nearly 25,000 bugs. A microkernel with only 50,000 lines of C code would mean that around 50 bugs exist (Tanenbaum Law).
It should be noted that in a microkernel the high amount of code (present in a monolithic kernel) is not removed, it's just moved to user-space daemons to make it less dangerous.
The main idea is to have system components and drivers that would be inside a monolithic kernel exist in user-space and follow the Principle of Least Authority (POLA). This is where every individual component is:
- Completely isolated in memory as separated user processes (daemons)
- The failure of one component does not crash other components
- Foreign and untrusted code does not expose the entire system
- Bugs and malware cannot spread to other components
- Has restricted communication with other components
- Doesn't have Admin/Super-User privileges
- Bugs are moved to user-space which reduces their power
All of this increases the reliability of the system significantly. This is important for users that want minimal issues with their computers or mission-critical applications.
Why Rust?
Why we wrote an operating system in Rust? Why even write in Rust?
Rust has enormous advantages, because for operating systems, security and stability matters a lot.
Since operating systems are such an integrated part of computing, they are the most important piece of software.
There have been numerous bugs and vulnerabilities in Linux, BSD, glibc, Bash, X11, etc. throughout time, simply due to the lack of memory allocation and type safety. Rust does this right, by enforcing memory safety statically.
Design does matter, but so does implementation. Rust attempts to avoid these unexpected memory unsafe conditions (which are a major source of security critical bugs). Design is a very transparent source of issues. You know what is going on, you know what was intended and what was not.
The basic design of the kernel/user-space separation is fairly similar to Unix-like systems, at this point. The idea is roughly the same: you separate kernel and user-space, through strict enforcement by the kernel, which manages system resources.
However, we have an advantage: enforced memory and type safety. This is Rust's strong side, a large number of "unexpected bugs" (for example, undefined behavior) are eliminated at compile-time.
The design of Linux and BSD is secure. The implementation is not. Many bugs in Linux originate in unsafe conditions (which Rust effectively eliminates) like buffer overflows, not the overall design.
We hope that using Rust we will produce a more secure and stable operating system in the end.
Unsafes
unsafe is a way to tell Rust that "I know what I'm doing!", which is often necessary when writing low-level code, providing safe abstractions. You cannot write a kernel without unsafe.
In that light, a kernel cannot be 100% verified by the Rust compiler, however the unsafe parts have to be marked with an unsafe, which keeps the unsafe parts segregated from the safe code. We seek to eliminate the unsafes where we can, and when we use unsafes, we are extremely careful.
This contrasts with kernels written in C, which cannot make guarantees about security without costly formal analysis.
You can find out more about how unsafe works in the relevant section of the Rust book.
Benefits
The following sections explain the Rust benefits.
Less likely to have bugs
The restrictive syntax and compiler requirements to build the code reduce the probability of bugs a lot.
Less vulnerable to data corruption
The Rust compiler helps the programmer to avoid memory errors and race conditions, which reduces the probability of data corruption bugs.
No need for C/C++ exploit mitigations
The microkernel design written in Rust protects against memory defects that one might see in software written in C/C++.
By isolating the system components from the kernel, the attack surface is very limited.
Improved security and reliability without significant performance impact
As the kernel is small, it uses less memory to do its work. The limited kernel code size helps us work towards a bug-free status (KISS).
Rust's safe and fast language design, combined with the small kernel code size, helps ensure a reliable, performant and easy to maintain core.
Thread-safety
The C/C++ support for thread-safety is quite fragile. As such, it is very easy to write a program that looks safe to run across multiple threads, but which introduces subtle bugs or security holes. If one thread accesses a piece of state at the same time that another thread is changing it, the whole program can exhibit some truly confusing and bizarre bugs.
You can see this example of a serious class of security bugs that thread-safety fixes.
In Rust, this kind of bug is easy to avoid: the same type system that keeps us from writing memory unsafety prevents us from writing dangerous concurrent access patterns
Rust-written Drivers
Drivers written in Rust are likely to have fewer bugs and are therefore more stable and secure.
Side Projects
Redox is a complete Rust operating system. In addition to the Redox kernel, our team is developing several side projects, including:
- RedoxFS - Redox file system inspired by ZFS.
- Ion - The Redox shell.
- Orbital - The desktop environment/display server of Redox.
- pkgutils - Redox package manager, with a command-line frontend and library.
- relibc - Redox C library.
- audiod - Redox audio server.
- bootloader - Redox boot loader.
- init - Redox init system.
- installer - Redox buildsystem builder.
- netstack - Redox network stack.
- redoxer - A tool to run/test Rust programs inside of a Redox VM.
- sodium - A Vi-like editor.
- games - A collection of mini-games for Redox (alike BSD-games).
- OrbTK - Cross-platform Rust-written GUI toolkit (in maintenance mode).
- and a few other exciting projects you can explore on the redox-os group.
We also have some in-house tools, which are collections of small, useful command-line programs:
- extrautils - Extra utilities such as reminders, calendars, spellcheck, and so on.
- binutils - Utilities for working with binary files.
We also actively contribute to third-party projects that are heavily used in Redox.
- uutils/coreutils - Cross-platform Rust rewrite of the GNU Coreutils.
- smoltcp - The TCP/IP stack used by Redox.
What tools are fitting for the Redox distribution?
The necessary tools for a usable system, we offer variants with fewer programs.
The listed tools fall into three categories:
- Critical, which are needed for a full functioning and usable system.
- Ecosystem-friendly, which are there for establishing consistency within the ecosystem.
- Fun, which are "nice" to have and are inherently simple.
The first category should be obvious: an OS without certain core tools is a useless OS. The second category contains the tools which are likely to be non-default in the future, but nonetheless are in the official distribution right now, for the charm. The third category is there for convenience: namely for making sure that the Redox infrastructure is consistent and integrated.
Influences
This page explains how Redox was influenced by other operating systems.
(The list is ordered by influence level)
Minix
The most influential Unix-like system with a microkernel. It has advanced features such as system modularity, kernel panic resistence, driver reincarnation, protection against bad drivers and secure interfaces for process comunication.
Redox is largely influenced by Minix - it has a similar architecture but with a feature set written in Rust.
seL4
The most performant and simplest microkernel of the world.
Redox follow the same principle, trying to make the kernel-space small as possible (moving components to user-space and reducing the number of system calls, passing the complexity to user-space) and keeping the overall performance good (reducing the context switch cost).
Plan 9
This Bell Labs OS brings the concept of "Everything is a File" to the highest level, doing all the system communication from the filesystem.
Linux
The most advanced monolithic kernel and biggest open-source project of the world. It brought several improvements and optimizations to the Unix-like world.
Redox tries to implement the Linux performance improvements in a microkernel design.
BSD
This Unix family included several improvements on Unix systems and the open-source variants of BSD added many improvements to the original system (like Linux did).
-
FreeBSD - The Capsicum (a capability-based system) and jails (a sandbox technology) influenced the Redox namespaces implementation.
-
OpenBSD - The system call, filesystem, display server and audio server sandbox and others influenced the Redox security.
Hardware Support
There are billions of devices with hundreds of models and architectures in the world. We try to write drivers for the most used devices to support more people. Support depends on the specific hardware, since some drivers are device-specific and others are architecture-specific.
Have a look at the HARDWARE.md document to see all tested computers.
I have a low-end computer, would Redox work on it?
A CPU is the most complex machine of the world: even the oldest processors are powerful for some tasks but not for others.
The main problem with old computers is the amount of RAM available (they were sold in a era where RAM chips were expensive) and the lack of SSE/AVX extensions (programs use them to speed up the algorithms). Because of this some modern programs may not work or require a lot of RAM to perform complex tasks.
Redox itself will work normally if the processor architecture is supported by the system, but the performance and stability may vary per program.
Why CPUs older than i686 aren't supported?
- i686 (essentially Pentium II) introduced a wide range of features that are critical for the Redox kernel.
- It would be possible to go all the way back to i486, but that would make us lose nice functions like
fxsave/fxrstorand we would need to build userspace without any SSE code. - i386 has no atomics (at all) which makes it not likely as a target.
Compatibility Table
| Category | Items |
|---|---|
| CPU | - Intel 64-bit (x86_64) - Intel 32-bit (i686) from Pentium II and after with limitations - AMD 32/64-bit - ARM 64-bit (Aarch64) with limitations |
| Hardware Interfaces | - ACPI, PCI, USB |
| Storage | - IDE (PATA), SATA (AHCI), NVMe |
| Video | - BIOS VESA, UEFI GOP |
| Sound | - Intel, Realtek chipsets |
| Input | - PS/2 keyboards, mouse and touchpad - USB keyboards, mouse and touchpad |
| Ethernet | - Intel Gigabit and 10 Gigabit ethernet - Realtek ethernet |
Important Programs
This page covers important programs and libraries supported by Redox.
Redox is designed to be source-compatible with most Unix, Linux and POSIX-compliant applications, only requiring compilation.
Currently, most GUI applications require porting, as we don't support X11 or Wayland yet.
Some important software that Redox supports:
- GCC
- LLVM
- FFMPEG
- OpenSSL
- Mesa3D
- SDL2
- Git
- RustPython
- GNU Bash
You can see all Redox components and ported programs on the build server list.
Getting started
Redox is still at experimental/alpha stage, but there are many things that you can do with it, and it's fun to try it out. You can start by downloading and running the latest release. Read the instructions for running in a virtual machine or running on real hardware.
The Building Redox page has information about configuring your system to build Redox, which is necessary if you want to contribute to the development. The Advanced Podman Build page gives a look under the hood of the build process to help you maintain your build environment.
By reading the Build System page you can have a complete understanding of the build system.
Running Redox in a Virtual Machine
Download the bootable images
This section will guide you to download the Redox images.
(You need to use the harddrive.img image variant for QEMU or VirtualBox)
Stable Releases
The bootable images for the 0.9.0 release are located on the build server release folder. To try Redox using a virtual machine such as QEMU or VirtualBox, download the demo variant, check the SHA256 sum to ensure it has downloaded correctly.
sha256sum $HOME/Downloads/redox_demo_x86_64_*_harddrive.img.zst
If you have more than one demo image in the Downloads directory, you may need to replace the * symbol with the date of your file.
If the demo variant doesn't boot on your computer, try the desktop and server variants.
Even if the desktop and server variants doesn't work, use the daily images below.
Daily Images
If you want to test the latest Redox changes you can use our bootable images created each day by opening the build server images and downloading your preferred variant. Once the download is complete, check the SHA256 sum.
(Sometimes our daily images can be one week old or more because of breaking changes)
Decompression
The Redox images are compressed using the Zstd algorithm, to decompress follow the steps below:
Linux
GUI
- Install GNOME File Roller or KDE Ark (both can be installed from Flathub)
- Open the Redox image and click on the "Extract" button
If you are using the GNOME Nautilus or KDE Dolphin file manager, right-click the file and select the option to extract the file.
Terminal
Install the Zstd tool and run:
zstd -d $HOME/Downloads/redox_*_x86_64_*_harddrive.img.zst
Windows
GUI
- Install 7-Zip
- Right-click the Redox image, hover the 7-Zip section and click on the option to extract the file or open the file on 7-Zip and extract
VirtualBox Instructions
To run Redox in a VirtualBox virtual machine you need to do the following steps:
- Create a VM with 2048 MB of RAM memory (or less if using a simpler Redox image variant) and 32MB of VRAM (video memory)
- Enable Nested Paging
- Change the keyboard and mouse interface to PS/2
- Change the audio controller to Intel HDA
- Disable USB support
- Go to the network settings of the VM and change the NIC model to 82540EM
- Go to the storage settings of the VM, create an IDE controller and add the Redox bootable image on it
- Start the VM!
If you want to install Redox on the VM create a VDI disk of 5GB (or less if you are using a simplier Redox image variant).
Command for the pre-installed image
If you want to do this using the command-line, run the following commands:
-
VBoxManage createvm --name Redox --register -
VBoxManage modifyvm Redox --memory 2048 --vram 32 --nic1 nat --nictype1 82540EM \ --cableconnected1 on --usb off --keyboard ps2 --mouse ps2 --audiocontroller hda \ --audioout on --nestedpaging on -
VBoxManage convertfromraw $HOME/Downloads/redox_demo_x86_64_*_harddrive.img harddrive.vdi -
VBoxManage storagectl Redox --name SATA --add sata --bootable on --portcount 1 -
VBoxManage storageattach Redox --storagectl SATA --port 0 --device 0 --type hdd --medium harddrive.vdi -
VBoxManage startvm Redox
Command for the Live ISO image
If you want to use the Live ISO run the following commands:
-
VBoxManage createvm --name Redox --register -
VBoxManage modifyvm Redox --memory 2048 --vram 32 --nic1 nat --nictype1 82540EM \ --cableconnected1 on --usb off --keyboard ps2 --mouse ps2 --audiocontroller hda \ --audioout on --nestedpaging on -
VBoxManage storagectl Redox --name SATA --add sata --bootable on --portcount 1 -
VBoxManage storageattach Redox --storagectl SATA --port 0 --device 0 --type dvddrive --medium $HOME/Downloads/redox_demo_x86_64_*_livedisk.iso -
VBoxManage startvm Redox
QEMU Instructions
Linux
You can then run the image in your preferred emulator. If you don't have an emulator installed, use the following command (Pop!_OS/Ubuntu/Debian) to install QEMU:
sudo apt-get install qemu-system-x86
This command will run QEMU with various Redox-compatible features enabled:
SDL_VIDEO_X11_DGAMOUSE=0 qemu-system-x86_64 -d cpu_reset,guest_errors -smp 4 -m 2048 \
    -chardev stdio,id=debug,signal=off,mux=on,"" -serial chardev:debug -mon chardev=debug \
    -machine q35 -device ich9-intel-hda -device hda-duplex -netdev user,id=net0 \
    -device e1000,netdev=net0 -device nec-usb-xhci,id=xhci -enable-kvm -cpu host \
    -drive file=`echo $HOME/Downloads/redox_demo_x86_64_*_harddrive.img`,format=raw
💡 Tip: if you encounter an error with the file name, verify that the name passed into the previous command (i.e.,
$HOME/Downloads/redox_demo_x86_64_*_harddrive.img) matches the file you downloaded.
MacOSX Instructions (Intel)
To install QEMU on MacOSX, use the following command:
brew install qemu
📝 Note: The
brewcommand is part of the Homebrew package manager for macOS.
This command will run QEMU with various Redox-compatible features enabled:
SDL_VIDEO_X11_DGAMOUSE=0 qemu-system-x86_64 -d cpu_reset,guest_errors -smp 4 -m 2048 \
    -chardev stdio,id=debug,signal=off,mux=on,"" -serial chardev:debug -mon chardev=debug \
    -machine q35 -device ich9-intel-hda -device hda-duplex -netdev user,id=net0 \
    -device e1000,netdev=net0 -device nec-usb-xhci,id=xhci -cpu max \
    -drive file=`echo $HOME/Downloads/redox_demo_x86_64_*_harddrive.img`,format=raw
💡 Tip: if you encounter an error with the file name, verify that the name passed into the previous command (i.e.,
$HOME/Downloads/redox_demo_x86_64_*_harddrive.img) matches the file you downloaded.
Windows
To install QEMU on Windows, follow the instructions here. The installation of QEMU will probably not update your command path, so the necessary QEMU command needs to be specified using its full path. Or, you can add the installation folder to your PATH environment variable if you will be using it regularly.
Following the instructions for Linux above, download the same redox_demo image. Then, in a Command window, cd to the location of the downloaded Redox image and run the following very long command:
"C:\Program Files\qemu\qemu-system-x86_64.exe" -d cpu_reset,guest_errors -smp 4 -m 2048 -chardev stdio,id=debug,signal=off,mux=on,"" -serial chardev:debug -mon chardev=debug -machine q35 -device ich9-intel-hda -device hda-duplex -netdev user,id=net0 -device e1000,netdev=net0 -device nec-usb-xhci,id=xhci -drive file=redox_demo_x86_64_2022-11-23_638_harddrive.img,format=raw
💡 Tip: if you get a filename error, change
redox_demo_x86_64_*_harddrive.imgto the name of the file you downloaded.
💡 Tip: if necessary, change
"C:\Program Files\qemu\qemu-system-x86_64.exe"to reflect where QEMU was installed. The quotes are needed if the path contains spaces.
Using the QEMU emulation
As the system boots, it will ask you for a screen resolution to use, for example 1024x768. After selecting a screen size, the system will complete the boot, start the Orbital GUI, and display a Redox login screen. Login as user user with no password. The password for root is password. Use Ctrl+Alt+G to toggle the mouse behavior if you need to zoom out or exit the emulation. If your emulated cursor is out of alignment with your mouse position, type Ctrl+Alt+G to regain full cursor control, then click on your emulated cursor. Ctrl+Alt+F toggles between full screen and window views.
See Trying Out Redox for things to try.
If you want to try Redox in server mode, add -nographic -vga none to the command line above. You may wish to switch to the redox_server edition. There are also i686 editions available, although these are not part of the release.
Running Redox on Real Hardware
(You need to use the *livedisk.iso image variant for real hardware)
Since version 0.8.0, Redox can now be installed on certain hard drives and internal SSDs, including some vintage systems. USB devices are not yet supported during run-time, although they can be used for installation and livedisk boot. Check the release notes for additional details on supported hardware. Systems with unsupported devices can still use the livedisk method described below. Ensure you backup your data before trying Redox on your hardware.
Hardware support is limited at the moment, so your milage may vary. Only USB input devices (HID) work. There is a PS/2 driver, which works with the keyboards and touchpads in many (but not all) laptops. For networking, the Realtek and Intel ethernet controllers are currently supported.
On some computers, hardware incompatibilities, e.g. disk driver issues, can slow down Redox performance. This is not reflective of Redox in general, so if you find that Redox is slow on your computer, please try it on a different model for a better experience.
The current ISO image uses a bootloader to load the filesystem into memory (livedisk) and emulates a hard drive. You can use the system in this mode without installing. Although its use of memory is inefficient, it is fully functional and does not require changes to your device. The ISO image is a great way to try out Redox on real hardware.
Creating a Bootable USB Drive
Download an Compressed ISO Image
You can obtain a livedisk ISO image either by downloading the latest release, or by building one. The demo ISO is recommended for most laptops. After downloading completes, check the SHA256 sum:
sha256sum $HOME/Downloads/redox_demo_x86_64_*_livedisk.iso.zst
If you have more than one demo image in the Downloads directory, you may need to replace the * symbol with the date of your file.
If the demo variant doesn't boot on your computer, try the desktop and server variants.
If even the desktop and server variants don't work, use the daily images below.
Daily Images
If you want to test the latest Redox changes you can use our bootable images created each day by opening the build server images and downloading your preferred variant.
(Sometimes our daily images can be one week old or more because of breaking changes) Once the download is complete, check the SHA256 sum.
Decompress the ISO Image
Downloaded Redox images are compressed using the Zstd algorithm. To decompress an image, follow the appropriate steps below for your system:
Linux (GUI)
- Install GNOME File Roller or KDE Ark (both can be installed from Flathub)
- Open the Redox image and click on the "Extract" button
If you are using the GNOME Nautilus or KDE Dolphin file manager, right-click the file and select the option to extract the file.
Linux (Terminal)
Install the Zstd tool and run:
zstd -d $HOME/Downloads/redox_*_x86_64_*_livedisk.iso.zst
Windows (GUI)
- Install 7-Zip
- Right-click the Redox image, hover the 7-Zip section and click on the option to extract the file or open the file on 7-Zip and extract
Flash the ISO Image
Linux Instructions
We recommend using the Popsicle tool to flash ISO images to USB devices on Linux. To flash an image, follow the steps below:
- Open the Releases section to open the Popsicle releases page and download the
.AppImagefile. - Open your file manager, click with the right-button of your mouse on the
.AppImagefile and open the "Properties", find the "Permissions" section and mark it as executable. - Open the Popsicle
.AppImagefile, select the downloaded Redox image and your USB device. - Confirm the flash process and wait until the progress bar reach 100%. If the flashing process completes with no errors, the flash was successful.
You can now restart your Linux machine and boot into Redox.
Windows Instructions
We recommend using the balenaEtcher tool on Windows to flash your USB device, follow the steps below:
- Open the balenaEtcher website, click on the "Download Etcher" button and download the "Etcher for Windows" asset.
- Install and open balenaEtcher, select the ISO image of Redox, select the USB device and click on "Flash!"
- Confirm the permission to erase the data of your device and wait until the progress bar reach 100%
Now you can now restart your Windows system and boot into Redox.
Booting the System
Some computers don't come with USB booting enabled, to enable it press the keyboard key to open your UEFI or BIOS setup and allow the booting from USB devices (the name varies from firmware to firmware).
If you don't know the keyboard keys to open your UEFI/BIOS setup or boot menu, press the Esc or F keys (from 1 until 12), if you press the wrong key or got the wrong timing, don't stop your operating system boot process to try again, as it could corrupt your data.
Once the ISO image boots, the system will display the Orbital GUI. Log in as the user named user with no password. The password for root is password.
See Trying Out Redox for things to try.
To switch between Orbital and the console, use the following keys:
- F1: Display the console log messages
- F2: Open a text-only terminal
- F3: Return to the Orbital GUI
If you want to be able to boot Redox from your HDD or SSD, follow the Installation instructions.
Redox isn't currently going to replace your existing operating system, but testing is important to help us fix bugs and add features: boot Redox on your computer, and see what works.
Installing Redox on a Drive
Once you have downloaded or built your ISO image, you can install it to your internal HDD or SSD. Please back up your system before attempting to install. Note that at this time (Release 0.8.0), you can't install onto a USB device, or use a USB device for your Redox filesystem, but you can install from it.
After starting your livedisk system from a USB device or from CD/DVD, log in as the user named user with an empty password. Open a terminal window and type:
sudo redox_installer_tui
If Redox recognizes your device, it will prompt you to select a device to install on. Choose carefully, as it will erase all the data on that device. Note that if your device is not recognized, it may offer you the option to install on disk/live (the in-memory livedisk). Don't do this, as it will crash Redox.
You will be prompted for a redoxfs password. This is for a encrypted filesystem. Leave the password empty and press Enter if an encrypted filesystem is not required.
Once the installation completes, power off your computer, remove the USB device, power on your computer and you are ready to start using Redox!
Trying Out Redox
There are several programs, games, demos and other things to try on Redox. Most of these are not included in the regular Redox build, so you will need to run the demo variant from the list of available Redox images. Currently, Redox does not have Wi-Fi support, so if you need Wi-Fi for some of the things you want to do, you are best to use an Ethernet cable or run Redox in a virtual machine. Most of the suggestions below do not require Internet access.
On the demo variant, click on the Redox symbol in the bottom left corner of the screen. This brings up a menu, which, for the demo variant, includes some games. Feel free to give them a try!
Many of the available commands are in the folders /usr/bin and /ui/bin, which are included in your command path. Open a Terminal window and type ls /usr/bin (or ls /scheme/file/usr/bin) to see some of the available commands.
💡 Note: some of the games listed below are installed in the
/usr/gamesdirectory, which is not detected in the terminal shell by default. To run these games from the terminal, you may have to specify the path of their executables.
Programs
FFMPEG
The most advanced multimedia library of the world.
- Run the following command to play an audio file:
ffplay music-name.mp3
(Change the audio format according to your file)
- Run the following command to play a video file:
ffplay video-name.mp4
(Change the video format according to your file)
COSMIC Files
An advanced file manager written in Rust, similar to GNOME Nautilus or Files.
COSMIC Editor
An advanced text editor written in Rust, similar to KDE KWrite.
Git
Git is a tool used for source code management.
- Run the following command to download a Git repository:
git clone repository-link
(Replace the "repository-link" part with your repository URL)
RustPython
RustPython is a Python 3.11+ interpreter written in Rust.
- Run the following command to run your Python script:
rustpython script-name.py
(The PyPI dependency manager is supported)
Periodic Table
The Periodic Table /usr/bin/periodictable is a demonstration of the OrbTk user interface toolkit.
Sodium
Sodium is Redox's Vi-like editor. To try it out, run the sodium command from a terminal.
A short list of the Sodium defaults:
| Keys | Function |
|---|---|
h, j, k, l | Navigation keys |
i, a | Enter "Insert" mode |
; | Enter "Prompt" mode |
shift-space | Enter "Normal" mode |
For a more extensive list, run :help from within Sodium.
Rusthello
Rusthello is an advanced Reversi AI, made by HenryTheCat. It is highly concurrent, so this acts as a demonstration of Redox's multithreading capabilities. It supports various AIs, such as brute force, minimax, local optimizations, and hybrid AIs.
In a Terminal window, type rusthello.
Then you will get prompted for various things, such as difficulty, AI setup, and so on. When this is done, Rusthello interactively starts the battle between you and an AI or an AI and an AI.
Games
Freedoom
Freedoom is a first-person shooter in the form of content for a Doom engine. For Redox, we have included the PrBoom engine to run Freedoom. You can read more about Freedoom on the Freedoom website. PrBoom can be found on the PrBoom website.
Freedoom can be run by selecting its entry from the "Games" section of the Orbital system menu, or by running either /usr/games/freedoom1 or /usr/games/freedoom2 from a terminal.
Hit Esc and use the arrow keys to select Options->Setup->Key Bindings for keyboard help.
Neverball and Nevergolf
Neverball and Nevergolf are 3D pinball and golf games, respectively. Both can be run from the Orbital system menu, under "Games".
Sopwith
Sopwith is a game which allows players to pilot a small, virtual plane. The original game was written in 1984 and used PC graphics, but it is now presented to users using the SDL library. To play it, run the sopwith command from a terminal.
| Control Key | Description |
|---|---|
Comma (,) | Pull back |
Slash (/) | Push forward |
Dot (.) | Flip aircraft |
| Space | Fire gun |
b | Drop bomb |
Syobon Action
Syobon Action is 2D side-scrolling platformer that you won't enjoy. To play it, run syobonaction from a terminal window. It's recommended that you read the GitHub page so you don't blame us.
Terminal Games Written in Rust
Also check out some games that have been written in Rust, and use the Terminal Window for simple graphics. In a Terminal window, enter one of the following commands:
baduk- Baduk/Godem- Democracyflappy- Flappy Bird cloneice- Ice Sliding Puzzleminesweeper- Minesweeper but it wrapsreblox- Tetris-like falling blocksredoku- Sudokusnake- Snake
Building Redox
Congrats on making it this far! Now you will build Redox. This process is for x86-64 machines (Intel/AMD). There are also similar processes for i686 and AArch64/ARM64.
The build process fetches files from the Redox Gitlab server. From time to time, errors may occur which may result in you being asked to provide a username and password during the build process. If this happens, first check for typos in the git URL. If that doesn't solve the problem and you don't have a Redox GitLab login, try again later, and if it continues to happen, you can let us know through the chat.
To avoid bugs from different build environments (operating systems) we are using Rootless Podman for major parts of the build. Podman is invoked automatically and transparently within the Makefiles.
The TL;DR version is here. More details are available in the Advanced Podman Build page.
You can find out more about Podman on the Podman documentation.
(Don't forget to read the Build System page to know our build system organization and how it works)
Podman Build Overview
Podman is a container manager that creates containers to execute a Linux distribution image. In our case, we are creating an Debian image, with a Rust installation and all the dependencies needed to build the system and programs.
The build process is performed in your normal working directory, e.g., ~/tryredox/redox. Compilation of the Redox components is performed in the container, but the final Redox image (build/$ARCH/$CONFIG/harddrive.img or build/$ARCH/$CONFIG/livedisk.iso) is constructed using FUSE running directly on your host machine.
Setting PODMAN_BUILD to 1 in .config, on the make command line (e.g., make PODMAN_BUILD=1 all) or in the environment (e.g., export PODMAN_BUILD=1; make all) will enable Podman.
First, a base image called redox_base will be constructed, with all the necessary packages for the build system. A "home" directory will also be created in build/podman. This is the home directory of your container alter ego, poduser. It will contain the rustup install, and the .bashrc. This takes some time, but is only done when necessary. The tag file build/container.tag is also created at this time to prevent unnecessary image builds.
Then, various make commands are executed in containers built from the base image. The files are constructed in your working directory tree, just as they would for a non-Podman build. In fact, if all necessary packages are installed on your host system, you can switch Podman on and off relatively seamlessly, although there is no benefit of doing so.
The build process is using Podman's keep-id feature, which allows your regular User ID to be mapped to poduser in the container. The first time a container is built, it takes some time to set up this mapping. After the first container is built, new containers can be built almost instantly.
TL;DR - New or Existing Working Directory
New Working Directory
If you have already read the Building Redox instructions, but you wish to use Podman Build, follow these steps:
-
Ensure you have the
curlprogram installed. e.g., for Pop!_OS/Ubuntu/Debian:which curl || sudo apt-get install curl -
Create a new directory and run
podman_bootstrap.shinside of it. This will clone the repository and install Podman.mkdir -p ~/tryredoxcd ~/tryredoxcurl -sf https://gitlab.redox-os.org/redox-os/redox/raw/master/podman_bootstrap.sh -o podman_bootstrap.shtime bash -e podman_bootstrap.shYou may be asked which QEMU installation you want. Please select
full.You may be asked which Podman container runtime you want to use,
crunorrunc. Choosecrun, butruncwill also work. -
Update your path to include
cargoand the Rust compiler.source ~/.cargo/env -
Navigate to the
redoxdirectory.cd ~/tryredox/redox -
Build the system. This will take some time.
time make all
- If the command ask your to choose an image repository select the first item, it will give an error and you need to run the
time make allcommand again
Existing Working Directory
If you already have the build system, simply perform the following steps:
-
Change to your working directory
cd ~/tryredox/redox -
Update the build system and wipe all binaries
make pull clean -
Install Podman. If your Linux distribution is not supported, check the installation instructions to determine which dependencies are needed. Or, run the following in your
redoxbase` directory:./podman_bootstrap.sh -d -
Enable Podman.
nano .configPODMAN_BUILD?=1📝 Note: the initial container setup for the Podman build can take 15 minutes or more, but it is comparable in speed to native build after that.
-
Build the Redox image.
make all
Run in a virtual machine
You can immediately run the new image (build/x86_64/desktop/harddrive.img) in a virtual machine with the following command:
make qemu
📝 Note: if you are building the system using
build.shto change the CPU architecture or filesystem contents, you can also provide theqemuoption to run the virtual machine:./build.sh -a i686 -c demo qemuThis will build
build/i686/demo/harddrive.img(if it doesn't already exist) and run it in the QEMU emulator.
The emulator will display the Redox GUI (Orbital). See Using the emulation for general instructions and Trying out Redox for things to try.
Run without a GUI
To run the virtual machine without a GUI, use:
make qemu gpu=no
If you want to capture the terminal output, read the Debug Methods section.
💡 Tip: if you encounter problems running the virtual machine, try turning off various virtualization features with
make qemu kvm=noormake qemu iommu=no. These same arguments can also be used withbuild.sh.
QEMU Tap For Network Testing
Expose Redox to other computers within a LAN. Configure QEMU with a "TAP" which will allow other computers to test Redox client/server/networking capabilities.
Please join the chat if this is something you are interested in pursuing.
Building A Redox Bootable Image
Read the Testing on Real Hardware section.
Contributor Note
If you intend to contribute to Redox or its subprojects, please read the CONTRIBUTING document to understand how the Redox build system works, and how to set up your repository fork appropriately. You can use ./bootstrap.sh -d in the redox folder to install the prerequisite packages if you have already done a git clone of the sources.
If you encounter any bugs, errors, obstructions, or other annoying things, please join the chat or report the issue to the build system repository or a proper repository for the component. Thanks!
build.sh
build.sh is a shell script for quickly invoking make for a specified variant, CPU architecture, and output file.
💡 Tip: for doing Redox development, such settings should usually be configured in the
.configfile (see the Configuration Settings page). But for users who are just trying things out, thebuild.shscript can be used to runmakefor you.
Example 1
The following builds the server variant of Redox for the i686 (32-bit Intel/AMD) CPU architecture (defined in config/i686/server.toml):
./build.sh -a i686 -c server live
The resulting image is build/i686/server/livedisk.iso, which can be used to install Redox from a USB device.
Example 2
The following builds the desktop variant of Redox for the aarch64 (64-bit ARM) CPU architecture (defined in config/aarch64/desktop.toml).
./build.sh -f config/aarch64/desktop.toml qemu
The resulting image is build/aarch64/desktop/harddrive.img, which is then run in the QEMU emulator upon completion of the build.
💡 Tip: if you are going to use
build.shrepeatedly, it's recommended that you do so consistently. The script's underlyingmakecommand doesn't keep any record of the build settings used betweenbuild.shruns.
Details of build.sh and other settings are described in the Configuration Settings page.
Native Build
This page explains how to build Redox in your operating system's native environment. Keep in mind that it's possible to encounter issues with the native build that don't occur with the Podman build, so this method is only recommended where Podman cannot be used.
📝 Note: be sure to read the Build System page for an explanation of the build system's organization and functionality.
Supported Unix-like Distributions and Podman Build
The following Unix-like systems are supported:
- Pop_OS!
- Ubuntu
- Debian
- Fedora
- Arch Linux
- OpenSUSE
- Gentoo (basic support)
- FreeBSD
- MacOSX (require workarounds)
- Nix (under development)
- Solus (basic support, not maintained)
If you encounter a weird or difficult-to-fix problem, test the Podman Build to determine if the problem occurs there as well.
Preparing the Build
Bootstrap Prerequisites and Fetch Sources
On supported Linux distributions, build system preparation can be performed automatically via the build system's bootstrap script:
-
Ensure you have the
curlprogram installed. e.g., for Pop!_OS/Ubuntu/Debian:which curl || sudo apt-get install curl -
Create a new directory and run the
native_bootstrap.shscript in it.mkdir -p ~/tryredoxcd ~/tryredoxcurl -sf https://gitlab.redox-os.org/redox-os/redox/raw/master/native_bootstrap.sh -o native_bootstrap.shtime bash -e native_bootstrap.shYou will be asked to confirm some steps: answer with
yor1.For an explanation of what the
native_bootstrap.shscript does, read this section.Note that
curl -sfoperates silently, so if there are errors, you may get an empty or incorrect version ofnative_bootstrap.sh. Check for typos in the command and try again. If you continue to have problems, join the chat and let us know.Please be patient. The bootstrapping process can take anywhere from 5 minutes to an hour depending on the hardware and network it's being run on.
-
After bootstrapping is completed, update the
PATHenvironment variable for the current shell:source ~/.cargo/env
Setting Configuration Values
The build system uses several configuration files, which contain settings that you may wish to change. These are detailed in the Configuration Settings page. By default the build system cross-compile to the x86_64 CPU architecture, using the desktop configuration (at config/x86_64/desktop.toml). Set the desired ARCH and CONFIG_FILE in .config.
The build.sh script also allows the user to specify the CPU architecture and filesystem contents to be used in the build, although these settings be re-specified every time the script is run.
Compiling Redox
At this point we have:
- Downloaded the sources
- Tweaked the settings to our liking
- Probably added our recipe to the filesystem
We are ready to build the Redox operating system image. Skip ahead to Configuration Settings if you want to build for a different CPU architecture or with different filesystem contents.
Build all system components and programs
To build all the components and packages to be included in the filesystem.
cd ~/tryredox/redox
time make all
This will build the target build/x86_64/desktop/harddrive.img, which can be run in a virtual machine.
Give it a while. Redox is big. Read the make all (first run) section for an explanation of what the make all command does.
💡 Tip: the filesystem parts are merged into the final system image using the FUSE library. The
bootstrap.shscript installslibfuseautomatically. If you encounter problems with the final Redox image, verifylibfuseis installed and that you are able to use it.
From Nothing To Hello World
This page describes the quickest way to test a program on Redox. This tutorial doesn't build Redox from source.
In this example we will use a "Hello World" program written in Rust.
-
Create the
tryredoxfolder.mkdir -p ~/tryredox -
Navigate to the
tryredoxfolder.cd ~/tryredox -
Download the script to bootstrap Podman and download the Redox build system.
curl -sf https://gitlab.redox-os.org/redox-os/redox/raw/master/podman_bootstrap.sh -o podman_bootstrap.sh -
Execute the downloaded script.
time bash -e podman_bootstrap.sh -
Enable the Rust toolchain in the current shell.
source ~/.cargo/env -
Navigate to the Redox build system directory.
cd ~/tryredox/redox -
Create the
.configfile and add theREPO_BINARYenvironment variable to enable the binary-mode.echo "REPO_BINARY?=1 \n CONFIG_NAME?=my_config" >> .config -
Create the
hello-worldrecipe folder.mkdir cookbook/recipes/other/hello-world -
Create the
sourcefolder for the recipe.mkdir cookbook/recipes/other/hello-world/source -
Navigate to the recipe's
sourcefolder.cd cookbook/recipes/other/hello-world/source -
Initialize a Cargo project with the "Hello World" string.
cargo init --name="hello-world" -
Create the
hello-worldrecipe configuration.cd ~/tryredox/redoxnano cookbook/recipes/other/hello-world/recipe.toml -
Add the following to the recipe configuration:
[build] template = "cargo" -
Create the
my_configfilesystem configuration.cp config/x86_64/desktop.toml config/x86_64/my_config.toml -
Open the
my_configfilesystem configuration file (i.e.,config/x86_64/my_config.toml) and add thehello-worldpackage to it.[packages] # Add the item below hello-world = "source" -
Build the Hello World program and the Redox image.
time make prefix r.hello-world image -
Start the Redox virtual machine without a GUI.
make qemu gpu=no -
At the Redox login screen, write "user" for the user name and press Enter.
-
Run the "Hello World" program.
helloworld -
Shut down the Redox virtual machine.
sudo shutdown
Configuration Settings
The Redox build system applies configuration settings from various places to determine the final Redox image. Most of these settings ultimately come from the build system's environment variables (or similarly-named Make variables) and the contents of the chosen filesystem configuration file.
Environment Variables
The default values for the build system's environment variables are mostly defined in the mk directory—particularly in mk/config.mk. Local changes from the default values, however, should be applied in the .config file, or temporarily on the make command line.
Three important variables of interest are ARCH, CONFIG_NAME, and FILESYSTEM_CONFIG, as they specify the system to be built. These, and other important environment variables, can be seen in the following table:
| Variable | Definition |
|---|---|
ARCH | Specifies the CPU architecture that the system is to be built for. The default is x86_64. |
CONFIG_NAME | Determines the name of the filesystem configuration, and is normally used to construct the FILESYSTEM_CONFIG name (the desktop variant is used by default). |
FILESYSTEM_CONFIG | Determines the filesystem configuration file location. See the Filesystem Configuration section below. The default is config/$ARCH/$CONFIG_NAME.toml, but this can be changed if the desired configuration file is in a different location. |
BOARD | For single board computers such as Raspberry Pi 3B+ that require special configuration, $ARCH/$BOARD is used in place of $ARCH. Defaults to empty. |
QEMU_MEM | Sets the QEMU RAM memory quantity, e.g., QEMU_MEM=2048. |
QEMU_SMP | Sets the QEMU CPU core quantity, e.g., QEMU_SMP=4. |
PREFIX_BINARY | If set to 0 (PREFIX_BINARY?=0), the build system will enable the toolchain compilation and will not download the toolchain binaries from the Redox build server. |
REPO_BINARY | If set to 1 (REPO_BINARY?=1), the build system will download/install pre-built packages from the Redox package server by default, rather than build them from source (i.e., recipes). |
FILESYSTEM_SIZE | The size in MB of the filesystem contained in the final Redox image. See the Filesystem Size section before changing it. |
REDOXFS_MKFS_FLAGS | Flags to the program that builds the Redox filesystem. The --encrypt option enables disk encryption. |
PODMAN_BUILD | If set to 0 (PODMAN_BUILD?=0), the build system will use the build environment from your Linux distribution or Unix-like system instead of Podman. See the Native Build page for more information. |
CONTAINERFILE | The Podman container configuration file. See the Podman Build page for more information. |
PREFER_STATIC | If set to 1 (PREFER_STATIC?=1), all packages will be statically linked. By default, a package will be dynamically linked if it supports it.💡 Tip: if this was previously unset, a full recompilation of the sysroot folder will be required. |
The Redox image that is built is typically named build/$ARCH/$CONFIG_NAME/harddrive.img or build/$ARCH/$CONFIG/livedisk.iso.
.config
The purpose of the .config file is to allow default configuration settings to be changed without explicitly setting those changes in every make command (or modifying the contents of the mk directory). The file is also included in the .gitignore list to ensure it won't be committed by accident.
To permanently override the settings in the mk/config.mk section, add a .config file to the redox base directory (i.e., where make commands are run) and set the overriding values in that file.
For example, the following configuration specifies the desktop-minimal image variant will be built for the i686 CPU architecture. These settings will be applied implictly to all subsequent make commands:
ARCH?=i686
CONFIG_NAME?=desktop-minimal
📝 Note: Any QEMU option can be inserted 📝 Note: if
podman_bootstrap.shwas run previously, the.configfile may already exist. 💡 Tip: when adding environment variables in the.configfile, don't forget the?symbol at the end of variable names. This allows the variable to be overridden on the command line or in the environment. In particular,PODMAN_BUILD?=1must include the question mark to function correctly.
Changing the QEMU CPU Core and Memory Quantity
For example, to change the CPU core and RAM memory quantities used when running the Redox image in QEMU, add the following environment variables to your .config file:
QEMU_SMP?=<number-of-threads>
QEMU_MEM?=<number-in-mb>
Command Line
The default settings in mk/config.mk can be manually overridden by explicitly setting them on the make command line.
For example, the following command builds the demo image variant and loads it into QEMU:
make CONFIG_NAME=demo qemu
Some environment variables can also be set for the lifetime of the current shell by setting them at the command line:
export ARCH=i686; make all
Overriding settings in this way is only temporary, however. Additionally, for those using the Podman Build, some settings may be ignored when using this method. For best results, use .config.
mk/config.mk
The Redox build system uses several Makefiles, most of which are in the mk directory. Most settings of interest have have been grouped together in mk/config.mk.
Feel free to open mk/config.mk in your favorite editor and have a look through it; just be sure not to apply any changes:
nano mk/config.mk
The mk/config.mk file should never be modified directly, especially if you are contributing to the Redox project, as doing so could create conflicts in the make pull command.
To apply lasting changes to environment variables, please refer to the .config section. To apply changes only temporarily, see the Command Line section.
build.sh
The build.sh script allows you to easily set ARCH, FILESYSTEM_CONFIG and CONFIG_NAME when running make. If you are not changing the values very often, it is recommended that you set the values in .config rather than use build.sh. But if you are testing against different CPU architectures or configurations, this script can help minimize effort, errors and confusion.
./build.sh [-a <ARCH>] [-c <CONFIG_NAME>] [-f <FILESYSTEM_CONFIG>] <TARGET> ...
The TARGET parameter may be any valid make target, although the recommended target is qemu. Additional variable settings may also be included, such as gpu=no
| Option | Description |
|---|---|
-a <ARCH> | The CPU architecture you are building for, x86_64, i686 or aarch64. Uppercase options -X, -6 and -A can be used as shorthands for -a x86_64, -a i686, and -a aarch64, respectively. |
-c <CONFIG_NAME> | The name of the filesystem configuration which appears in the name of the image being built. |
-f <FILESYSTEM_CONFIG> | Determines the filesystem configuration file location, which can be in any location but is normally in directory config/$ARCH.📝 Note: If you do specify -f <FILESYSTEM_CONFIG>, but not -a or -c, the file path determines the other values. Normally the file would be located at e.g., config/x86_64/desktop.toml. ARCH is determined from the second-to-last element of the path. If the second last element is not a known ARCH value, you must specify -a ARCH. CONFIG_NAME is determined from the basename of the file. |
The default value of FILESYSTEM_CONFIG is constructed from ARCH and CONFIG_NAME: config/$ARCH/$CONFIG_NAME.toml.
The default values for ARCH and CONFIG_NAME are x86_64 and desktop, respectively. These produce a default FILESYSTEM_CONFIG value of config/x86_64/desktop.toml.
Filesystem Configuration
The packages to be included in the final Redox image are determined by the chosen filesystem configuration file, which is a .toml file (e.g., config/x86_64/desktop.toml). Open desktop.toml and have a look through it:
nano config/x86_64/desktop.toml
For each supported CPU architecture, there are some filesystem configurations to choose from. For x86_64, there are desktop, demo and server configurations, as well as a few others. For i686, there are also some stripped down configurations for embedded devices or legacy systems with minimal RAM. Feel free to browse the config/x86_64 directory for more examples.
For more details on the filesystem configuration, and how to add additional packages to the build image, please see the Including Programs in Redox page.
Feel free to create your own filesystem configuration.
Architecture Names
The Redox build system supports cross-compilation to other CPU architectures. The CPU architecture that Redox is built for (specified by the ARCH environment variable) usually determines the filesystem configuration file that will be used by the build system.
See the currently supported CPU architectures by Redox below:
| CPU Architecture | Other Aliases |
|---|---|
i686 | x86 (32-bit), IA32 , x86 |
x86_64 | x86 (64-bit), x86-64, amd64, x64 |
aarch64 | ARM (64-bit), ARMv8, ARM64 |
riscv64gc | RISC-V (64-bit) |
The filesystem configurations for a given CPU architecture can be found in the config folder's correspondingly named sub-directory (e.g. config/x86_64).
Filesystem Size
The filesystem size is the total amount of storage space allocated for the filesystem that is built into the image, including all programs. It is specified in Megabytes (MB). The typical size is 512MB, although some configs (e.g., demo) are larger. The filesystem must be large enough to accommodate the packages included in the filesystem. For a livedisk system, the filesystem must not exceed the size of your system's RAM, and must also leave room for the package's installation and system execution.
The filesystem size is normally set from the filesystem configuration file, e.g. config/x86_64/demo.toml.
[general]
...
filesystem_size = 768
...
To change this, it is recommended that you create your own filesystem configuration and apply changes there. However, this can be temporarily overridden on the make command line, e.g.:
make FILESYSTEM_SIZE=512 image qemu
⚠️ Warning: setting the
filesystem_sizevalue too low will produce an error resembling the following:thread 'main' panicked at src/lib.rs:94:53: called `Result::unwrap()` on an `Err` value: Error(Path("/tmp/redox_installer_759506/include/openssl/.pkgar.srtp.h"), State { next_error: Some(Os { code: 28, kind: StorageFull, message: "No space left on device" }), backtrace: InternalBacktrace { backtrace: None } })
Filesystem Customization
The Redox image can be customized by tweaking the configuration files at config/your-cpu/*.toml. However, it is recommended that you create your own configuration file and apply changes there.
(The configuration files at config/your-cpu can override the data type values from the filesystem templates at config)
Creating a custom filesystem configuration
The following items describe the process for creating a custom filesystem configuration file (my_desktop.toml):
-
Create the
my_desktop.tomlfile from an existing filesystem configuration:cp config/your-cpu-arch/desktop.toml config/your-cpu-arch/my_desktop.toml -
Add the following to the
.configfile to set the new configuration as the build system's default:CONFIG_NAME?=my_desktop
Many filesystem configuration settings can be adjusted. See the templates in the config folder for reference.
💡 Tip: files named with the prefix "
my_" in theredoxrepo are git-ignored. Be sure to follow this convention for all custom filesystem configurations to avoid accidentally committing them to the Redox project.
Adding a package to the filesystem configuration
In the following example, the acid package is added to the my_desktop.toml configuration:
-
Open the
my_desktop.tomlfile:nano config/your-cpu/my_desktop.toml -
Add the
acidpackage to the[packages]section:[packages] acid = {} -
Build the
acidpackage and create a new Redox image:make r.acid image
Done! The acid package is now included in your new Redox image.
Binary Packages
By default, the Redox build system builds all packages from source (i.e., recipes). If you want to use pre-built packages from our build server, however, there's a TOML option for it.
This is useful for some purposes, such as producing development builds, confirming package status from the Redox package server, and reducing image build time with large programs.
-
Open the
my_desktop.tomlfile:nano config/your-cpu/my_desktop.toml -
Add the binary package below the
[packages]section:[packages] ... new-package = "binary" ... -
Download and add the binary package on your Redox image:
make image -
Open QEMU to verify your binary package:
make qemu
REPO_BINARY
In the previous example, the build system's default behavior was overridden by explicitly setting a package to use a pre-built binary. To configure the build system to download pre-built packages by default, however, we can set the REPO_BINARY environment variable (REPO_BINARY?=1).
When REPO_BINARY is enabled, the Redox image is made to use pre-built binaries for all packages assigned to {}; when REPO_BINARY is disabled, however, those same packages are compiled from source (i.e., recipes).
For example:
[packages]
...
package-name1 = {} # use the REPO_BINARY setting ("source" if 0; "binary" if 1)
package-name2 = "binary" # pre-built package
package-name3 = "source" # source-based recipe
...
Package Management
Redox package management is similar to that of the major Linux distributions, except that many of Redox's (Rust-written) packages use static linking by default, rather than dynamic linking.
Static linking provides a few advantages over dynamic linking:
-
Better Security
Static linking can improve system security by running each program's library code in isolated memory locations. This is true even when identical versions of a vulnerable library are being used by multiple programs at once.
To steal sensitive data from statically linked programs, an attacker would need to inject code directly into each program's memory address space, rather than the address space of a shared library. This increases the cost of the attack.
-
Better Performance
When a program is built with static linking, its library references are resolved before execution. Thus, there's no need for processing on the dynamic linker.
This means a statically linked program will open faster than its dynamically linked equivalent, provided both are loaded entirely from disk.
-
Simpler Dependency Management
When a dynamically linked program depends on multiple versions of the same library, naming conflicts can arise from the identical object or symbol names within those versions. This issue can necessitate isolating the library files, often by giving them unique names or placing them in separate
/libdirectories, to ensure the proper version is used in each case.With static linking, however, there's no need for run-time dependency management, as library dependencies are included within the executable binaries.
Rust programs aren't affected by this problem because of Cargo.
📝 Note: Rust programs are statically linked by default.
Format
What is "pkgar" ?
Short for "package archive", pkgar is a file format, library, and command-line
executable for creating and extracting cryptographically secure collections of
files, primarily for use in package management on Redox OS.
The technical details are still in development, so we think it is good to
instead review the goals of pkgar and some examples that demonstrate its
design principles.
pkgar has the following goals:
- Atomic - Updates are done atomically if possible
- Economical - Transfer of data must only occur when hashes change, allowing for network and data usage to be minimized
- Fast - Encryption and hashing algorithms are chosen for performance, and packages can potentially be extracted in parallel
- Minimal - Unlike other formats such as
tar, the metadata included in apkgarfile is only what is required to extract the package - Relocatable - Packages can be installed to any directory, by any user, provided the user can verify the package signature and has access to that directory.
- Secure - Packages are always cryptographically secure, and verification of all contents must occur before installation of a package completes.
To demonstrate how the format's design achieves these goals, let's look at some examples.
Example 1: Newly installed package
In this example, a package is installed that has never been installed on the
system, from a remote repository. We assume that the repository's public key is
already installed on disk, and that the URL to the package's pkgar is known.
First, a small, fixed-size header portion of the pkgar is downloaded. This is
currently 136 bytes in size. It contains a NaCL signature, NaCL public key,
BLAKE3 hash of the entry metadata, and 64-bit count of entry metadata structs.
Before this header can be used, it is verified. The public key must match the one installed on disk. The signature of the struct must verify against the public key. If this is true, the hash and entry count are considered valid.
The entry metadata can now be downloaded to a temporary file. During the download, the BLAKE3 hash is calculated. If this hash matches the hash in the header, the metadata is considered valid and is moved atomically to the correct location for future use. Both the header and metadata are stored in this file.
Each entry metadata struct contains a BLAKE3 hash of the entry data, a 64-bit
offset of the file data in the data portion of the pkgar, a 64-bit size of the
file data, a 32-bit mode identifying Unix permissions, and up to a 256-byte
relative path for the file.
For each entry, before downloading the file data, the path can be validated for install permissions. The file data is downloaded to a temporary file, with no read, write, or execute permissions. While the download is happening, the BLAKE3 hash is calculated. If this hash matches, the file data is considered valid.
After downloading all entries, the temporary files have their permissions set as indicated by the mode in the metadata. They are then moved atomically to the correct location. At this point, the package is successfully installed.
Example 2: Updated package
In this example, a package is updated, and only one file changes. This is to
demonstrate the capabilities of pkgar to minimize disk writes and network
traffic.
First, the header is downloaded. The header is verified as before. Since a file has changed, the metadata hash will have changed. The metadata will be downloaded and verified. Both header and metadata will be atomically updated on disk.
The entry metadata will be compared to the previous entry metadata. The hash for one specific file will have changed. Only the contents for that file will be downloaded to a temporary file, and verified. Once that is complete, it will be atomically updated on disk. The package update is successfully completed, and only the header, entry metadata, and the files that have changed were downloaded and written.
Example 3: Package verification
In this example, a package is verified against the metadata saved on disk. It is possible to reconstruct a package from an installed system, for example, in order to install that package from a live disk.
First, the header is verified as before. The entry metadata is then verified. If there is a mismatch, an error is thrown and the package could be reinstalled.
The entry metadata will be compared to the files on disk. The mode of each file will be compared to the metadata mode. Then the hash of the file data will be compared to the hash in the metadata. If there is a mismatch, again, an error is thrown and the package could be reinstalled.
It would be possible to perform this process while copying the package to a new target. This allows the installation of a package from a live disk to a new install without having to store the entire package contents.
Conclusion
As the examples show, the design of pkgar is meant to provide the best
possible package management experience on Redox OS. At no point should invalid
data be installed on disk in accessible files, and installation should be
incredibly fast and efficient.
Work still continues on determining the repository format.
The source for pkgar is fairly lightweight, we highly recommend reading it and contributing to the pkgar repository.
If you have questions, feel free to ask us on the Chat page.
Downloading packages with pkg
pkg is the Redox package manager installing binary packages to a running system. If you want to build packages, or include binary packages during the build, please see the Including Programs in Redox page.
Due to limited device support, you may get better results in an virtual machine than on real hardware.
The most commonly used pkg commands are show below:
-
Install a package:
sudo pkg install <package-name> -
Upgrade all installed packages:
sudo pkg upgrade -
List package contents:
pkg list <package-name> -
Get a file signature:
pkg sign <package-name> -
Download a package:
pkg fetch <package-name> -
Clean an extracted package:
pkg clean <package-name> -
Create a package:
pkg create <package-name> -
Extract a package:
pkg extract <package-name> -
Get detailed information about one of the above options:
pkg help <pkg-command>
📝 Note: Some
pkgcommands must be run withsudobecause they manipulate the contents of protected folders:/usr/binand/pkg.
The available packages can be found on the build server list.
Tasks
This page covers the commands used for common and specific tasks on Redox.
Hardware
Show CPU information
cat /scheme/sys/cpu
System
Show system information
uname -a
Show memory (RAM) usage
free -h
Show the storage usage
df -h
Shutdown the computer
sudo shutdown
Show all running processes
ps
Show system-wide common programs
ls /bin
Show all schemes
ls /scheme
Show the system log
cat /scheme/sys/log
Or
dmesg
Networking
Show system DNS name
hostname
Show all network addresses of your system
hostname -I
Ping a website or IP
ping (website-link/ip-address)
Show website information
whois https://website-name.com
Download a GitHub repository on the current directory
git clone https://github.com/user-name/repository-name.git
Download a Git repository
git clone https://website-name.com/repository-name
Download a Git repository to the specified directory
git clone https://website-name.com/repository-name folder-name
Download a file with wget
wget https://website-name.com/file-name
Resume an incomplete download
wget -c https://website-name.com/file-name
Download from multiple links in a text file
wget -i file.txt
Download an entire website and convert it to work locally (offline)
wget --recursive --page-requisites --html-extension --convert-links --no-parent https://website-name.com
Download a file with curl
curl -O https://website-name.com
Download files from multiple websites at once
curl -O https://website-name.com/file-name -O https://website2-name.com/file-name
Host a website with Simple HTTP Server
- Point the program to the website folder
- The Home page of the website should be available on the root of the folder
- The Home page should be named as
index.html
simple-http-server -i -p 80 folder-name
This command will use the port 80 (the certified port for HTTP servers), you can change as you wish.
User
Clean the terminal content
clear
Exit the terminal session, current shell or root privileges
exit
Current user on the shell
whoami
Show the default terminal shell
echo $SHELL
Show your current terminal shell
echo $0
Show your installed terminal shells (active on $PATH)
cat /etc/shells
Change your default terminal shell permanently (common path is /usr/bin)
chsh -s /path/of/your/shell
Add an abbreviation for a command on the Ion shell
alias name='command'
Change the user password
passwd user-name
Show the commands history
history
Show the commands with the name specified in history
history name
Change the ownership of a file, folder, device and mounted-partition (recursively)
sudo chown -R user-name:group-name directory-name
Or
chown user-name file-name
Show system-wide configuration files
ls /etc
Show the user configuration files of programs
ls ~/.local/share ~/.config
Print a text on terminal
echo text
Show the directories in the $PATH environment variable
echo $PATH
Show the dependencies (shared libraries) used by a program
ldd program-name
Add a new directory on the $PATH environment variable of the Ion shell
TODO
Restore the shell variables to default values
reset
Measure the time spent by a program to run a command
time command
Run a executable file on the current directory
./
Run a non-executable shell script
sh script-name
Or
bash script-name
Files and Folders
Show files and folders in the current directory
ls
Print some text file
cat file-name
Edit a text file
kibi file-name
Save your changes by pressing Ctrl+S
Show the current directory
pwd
Change the active directory to the specified folder
cd folder-name
Change to the previous directory
cd -
Change to the upper directory
cd ..
Change the current directory to the user folder
cd ~
Show files and folders (including the hidden ones)
ls -A
Show the files, folders and subfolders
ls *
Show advanced information about the files/folders of the directory
ls -l
Create a new folder
mkdir folder-name
Copy a file
cp -v file-name destination-folder
Copy a folder
cp -v folder-name destination-folder
Move a folder
mv folder-name destination-folder
Remove a file
rm file-name
Remove a folder
(Use with caution if you called the command with su, sudo or doas)
rm -rf folder-name
Add text in a text file
echo "text" >> directory/file
Search for files
find . -type f -name file-name
(Run with sudo or su if these directories are under root permissions)
Search for folders
find . -type d -name folder-name
(Run with sudo or su if the directories are under root permissions)
Show files/folders in a tree
tree
Media
Play a video
ffplay video-name
Play a music
ffplay music-name
Show an image
image-viewer image-name
Graphics
Show the OpenGL driver information
glxinfo | grep OpenGL
Questions, Feedback, Reporting Issues
- Most questions are answered in the Website FAQ.
- Technical questions are answered in the Developer FAQ.
Join the Redox Chat. It is the best method to chat with the Redox Team.
You can find historical questions in our Discourse Forum.
If you would like to report issues, send a message on the Support room of the chat or create an issue here and click in the New Issue button.
System Design
This chapter will discuss the design of Redox.
Microkernels
The Redox kernel is a microkernel. Microkernels stand out in their design by providing minimal abstractions in kernel-space. Microkernels focus on user-space, unlike Monolithic kernels which focus on kernel-space.
The basic philosophy of microkernels is that any component which can run in user-space should run in user-space. Kernel-space should only be utilized for the most essential components (e.g., system calls, process separation, resource management, IPC, thread management, etc).
The kernel's main task is to act as a medium for communication and segregation of processes. The kernel should provide minimal abstraction over the hardware (that is, drivers, which can and should run in user-space).
Microkernels are more secure and less prone to crashes and driver bugs than monolithic kernels. This is because most kernel components are moved to user-space and use different memory address spaces, and thus can't do damage to the system. Furthermore, microkernels are extremely maintainable, due to their small code size the number of bugs in the kernel is reduced a lot.
As anything else, microkernels do also have disadvantages.
Advantages of microkernels
There are quite a lot of advantages (and some disadvantages) with microkernels, a few of which will be covered here.
Better Stability
When compared to microkernels, Monolithic kernels tend to be prone to crashes and driver bugs. A buggy driver in a Monolithic kernel can crash the whole system because the driver code is running on the same memory address space of the kernel, thus the kernel process can't continue to run (to avoid memory corruption) and crash (kernel panic). Or the bugs in a driver can spread to other drivers without causing crashes, which is hard to ensure stability and a headache to investigate the root of the problems.
While in a microkernel the drivers run in different memory address spaces (separation of concerns) which allows the system to handle any crash safely and isolate driver bugs.
In Linux we often see errors with drivers dereferencing bad pointers which ultimately results in kernel panics.
There is very good documentation in the MINIX documentation about how this can be addressed by a microkernel.
Better Security
Microkernels are undoubtedly more secure than monolithic kernels. The minimality principle of microkernels is a direct consequence of the Principle Of Least Privilege, according to which all components should have only the privileges absolutely needed to provide the needed functionality.
Many security-critical bugs in monolithic kernels come from services and drivers running unrestricted in kernel mode, without any form of protection.
In other words: in monolithic kernels, drivers can do whatever they want, without restrictions, when running in kernel mode.
Better Modularity and Configuration
Monolithic kernels are, well, monolithic. They do not allow fine-grained control like microkernels. This is due to many essential components being "hard-coded" into the kernel, and thus requiring modifications to the kernel itself (e.g., device drivers).
Microkernels are very modular by nature. You can add, replace, reload, modify, change, and remove system components or drivers, on runtime, without even touching the kernel.
Modern monolithic kernels try to solve this issue using kernel modules but still often require the system to reboot.
Better Expansion
In microkernels new system components and drivers can be easily added using daemons, while in monolithic kernels the entire kernel needs to be updated to add them which can introduce bugs to other system components or drivers.
Sane Debugging
In microkernels most kernel components (drivers, filesystems, etc) are moved to user-space, thus bugs on them can't crash the kernel (kernel panic).
The "component panics" (where "component" is the name of the system component) are more common in microkernels than kernel panics because the kernel code size is very small, the log of a component panic can be saved which ease debugging a lot.
This is very important to debug in real hardware, because if a kernel panic happens the log can't be saved to find the cause of the bug.
While in monolithic kernels a bug in a system component or driver can cause a kernel panic and freeze the system (if it happens in real hardware, you can't debug without serial output support)
(Buggy drivers are the main cause of kernel panics)
Disadvantages of microkernels
Small Performance Overhead
Any modern operating system needs basic security mechanisms such as memory isolation and virtualization. Furthermore any process (including the kernel) has its own stack and variables stored in registers. On context switch, that is each time a system call is invoked or any other inter-process communication (IPC) is done, some tasks have to be done, including:
- Saving caller registers, especially the program counter (caller: process invoking syscall or IPC)
- Reprogramming the MMU's page table (aka TLB)
- Putting CPU in another mode (kernel mode and user mode, also known as ring 0 and ring 3)
- Restoring callee registers (callee: process invoked by syscall or IPC)
These are not inherently slower on microkernels, but microkernels need to perform these operations more frequently. Many of the system functionality is performed by user-space processes, requiring additional context switches.
The performance difference between monolithic and microkernels has been marginalized over time, making their performance comparable. This is partly due to a smaller surface area which can be easier to optimize.
We are working on exciting performance optimizations to minimize the overhead of extra context switches.
Versus monolithic kernels
Monolithic kernels provide a lot more abstractions than microkernels.

The above illustration from Wikimedia, by Wooptoo, License: Public domain) shows how they differ.
Documentation about the kernel/user-space separation
Documentation about microkernels
- OSDev Technical Wiki
- Message Passing Documentation
- Minix Documentation
- Minix Features
- Minix Reliability
- GNU Hurd Documentation
- Fuchsia Documentation
- HelenOS FAQ
- Minix Paper
- seL4 Whitepaper
- Tanenbaum-Torvalds Debate
A Note On The Current State
Redox has less than 40,000 Rust lines of kernel code. For comparison Minix has around 6,000 C lines of kernel code.
(The above comparison can't be used to argue that Minix is more stable or safe than Redox due to a less amount of source code lines, because Redox is more advanced than Minix in features, thus more lines of code are expected and a 1:1 comparison can't be made)
We would like to move more parts of Redox to user-space to get an even more stable and secure kernel.
Boot Process
Boot Loader
The boot loader source can be found in cookbook/recipes/bootloader/source after a successful build or in the Boot Loader repository.
BIOS Boot
BIOS Boot is a boot process that dates back to the IBM PC. Because of its lengthy history, BIOS starts up in 16-bit mode (Real Mode), and the boot loader needs to load in multiple stages to move into higher bit environments. The firmware will execute the boot sector located in the first sector of the main storage device, which is known as the stage 1 bootloader (OSDev Wiki).
The stage 1 bootloader is written in Assembly and can be found in asm/x86-unknown-none/stage1.asm. The stage 1 main task is to allow reading of the whole disk to load stage 2 in another sector of the storage device. The stage 2 bootloader is also written in Assembly. The main task is transferring BIOS functions from real mode to protected mode (32-bit), then switches to protected mode or long mode (64-bit) and finally loads the Rust-written boot loader, called stage 3.
These three boot loader stages are combined in one executable written to the first megabyte of the storage device. The first code that is executed in Rust-written code is pub extern "C" fn start() in src/os/bios/mod.rs. At this point, the bootloader follows the same common boot process on all boot methods, which can be seen in a later section.
UEFI Boot
Redox supports UEFI booting on x86-64, ARM64, and RISC-V 64-bit machines. UEFI starts up in 64-bit mode; thus, the boot process doesn't need multiple stages. The firmware will find the EFI System Partition (ESP) on the storage device, then load and execute PE32+ UEFI programs typically located at /EFI/BOOT/BOOTX64.efi (OSDev Wiki).
In the case of our bootloader, the first code that is executed is pub extern "C" fn main() in src/os/uefi/mod.rs. At this point, the bootloader follows the same common boot process on all boot methods, which can be seen in a later section.
Common boot process
The bootloader initializes the memory map and the display mode, both of which rely on firmware mechanisms that are not accessible after control is switched to the kernel. The bootloader then finds the RedoxFS boot partition on the disk and loads /boot/kernel and /boot/initfs files into memory.
For a live disk, it does load the whole partition into memory. It then loads /boot/kernel and /boot/initfs also at a different location in memory.
After the kernel and initfs have been loaded, it sets up a virtual paging for kernel and environment variables, including the location of the RedoxFS boot partition to be passed into it. Then, it maps the kernel to its expected virtual address and jumps to its entry function.
Kernel
The Redox kernel is a single ELF program in /boot/kernel. This kernel performs (fairly significant) architecture-specific initialization in the kstart function before jumping to the kmain function. At this point, the user-space bootstrap, a specially prepared executable that limits the required kernel parsing, sets up the /scheme/initfs scheme, and loads and executes the init program.
The kernel creates three different namespaces during the bootstrap process. Each namespace has its schemes that can be accessed by userspace programs, depending on where it is loaded:
-
the
null(0) namespace, a namespace that drivers are running on:/scheme/memory/scheme/pipe
-
the
root(1) namespace, the initial namespace set up during boot:/scheme/kernel.acpi/scheme/kernel.dtb/scheme/kernel.proc/scheme/debug/scheme/irq/scheme/serio
-
Additional namespaces requested by user, also loaded for
rootnamespace:/scheme/event/scheme/memory/scheme/pipe/scheme/sys/scheme/time
Init
Redox has a multi-staged init process, designed to allow for the loading of storage drivers in a modular and configurable fashion. This is commonly referred to as an init RAMdisk (initfs). The RAMdisk is contained in /boot/initfs, which is a special file format containing the bootstrap code in ELF format and packed files which was loaded into /scheme/initfs by the kernel program.
RAMdisk Init
The ramdisk init has the job of loading the drivers and daemons required to access the root filesystem and then transferring control to the filesystem init. The load order is defined in /etc/init.rc in initfs:
- Daemons required for
relibcrtcdloads machine-specific RTC into/scheme/timenulldnull handler, creates/scheme/nullzerozero handler, creates/scheme/zeroranddrand handler, creates/scheme/rand
- Logging
logdsystem log handler, creates/scheme/logramfsloads in-memory FS handling into/scheme/memory
- Graphics buffers
inputdvirtual terminal (VT) handler, creates/scheme/inputvesadVESA interface handler, creates/scheme/display.vesafbbootlogdforwards log from logd to VTfbcondhandles keyboard interaction to VT
- Live daemon
livedlivedisk handler, creates/scheme/disk.live
- Drivers in
/etc/init_drivers.rcps2dloads PS/2 handling into/scheme/serioacpidloads ACPI handling into/scheme/kernel.acpipcidPCI handler, creates/scheme/pcipcid-spawnerspawns drivers depending on available hardwareahcidAHCI storage driveridedIDE storage drivernvmedNVME storage drivervirtio-blkdVirtIO BLK storage drivervirtio-gpudVirtIO GPU driver
After loading all drivers and daemons above, the redoxfs driver is executed with --uuid $REDOXFS_UUID where $REDOXFS_UUID is the partition chosen by the bootloader and creates /scheme/file. The command set-default-scheme file is then executed, so that the default path handler is set to /scheme/file.
Filesystem Init
The filesystem init continues the loading of drivers for all other functionality. This includes audio, networking, and anything not required for storage device access. The drivers' init configuration is mainly found in /usr/lib/init.d and /etc/pcid.d. In the redox builder repository, it's configurable in the config directory. After this, the login prompt is shown.
If Orbital is enabled, the display server is launched.
Login
After the init processes have set up drivers and daemons, the user can log in to the system. The login program accepts a username, with a default user called user, prints the /etc/motd file, and then executes the user's login shell, usually ion. At this point, the user will now be able to access the shell
Graphical overview
Here is an overview of the initialization process with scheme creation and usage. For simplicity's sake, we do not depict all scheme interaction but at least the major ones. this is currently out of date, but still informative

Boot process documentation
Redox kernel
System calls are generally simple, and have a similar ABI compared to regular function calls. On x86-64, it simply uses the syscall instruction, causing a mode switch from user-mode (ring 3) to kernel-mode (ring 0), and when the system call handler is finished, its mode switches back, as if the syscall instruction was a regular call instruction, using sysretq.
System Services in User Space
As any microkernel-based operating system, most kernel components are moved to user-space and adapted to work on it.
Monolithic kernels in general have hundreds of system calls due to the high number of kernel components (system calls are interfaces for these components), not to mention the number of sub-syscalls provided by ioctl and e.g. procfs/sysfs. Microkernels on the other hand, only have dozens of them.
This happens because the non-core kernel components are moved to user-space, thereby relying on IPC instead, which we will later explain.
User-space bootstrap is the first program launched by the kernel, and has a simple design. The kernel loads the initfs blob, containing both the bootstrap executable itself and the initfs image, that was passed from the boot loader. It creates an address space containing it, and jumps to a bootloader-provided offset. Bootstrap allocates a stack (in an Assembly stub), mprotects itself, and does the remaining steps to exec the init daemon. It also sets up the initfs scheme daemon.
The system calls used for IPC, are almost exclusively file-based. The kernel therefore has to know what schemes to forward certain system calls to. All file syscalls are marked with either SYS_CLASS_PATH or SYS_CLASS_FILE. The kernel associates paths with schemes by checking their scheme prefix against the scheme's name, in the former case, and in the latter case, the kernel simply remembers which scheme opened file descriptors originated from. Most IPC in general is done using schemes, with the exception of regular pipes like Linux has, which uses pipe2, read, write, close. Any scheme can also of course setup its own custom pipe-like IPC that also uses the aforementioned syscalls, like shm and chan from ipcd.
Schemes are implemented as a regular Rust trait in the kernel. Some builtin kernel schemes exist, which just implement that trait. Userspace schemes are provided via the UserScheme trait implementor, which relies on messages being sent between the kernel and the scheme daemon. This channel is created by scheme daemons when opening :SCHEME_NAME, which is parsed to the root scheme "" with path "SCHEME_NAME". Messages are sent by reading from and writing to that root scheme file descriptor.
So all file-based syscalls on files owned by user-space, will send a message to that scheme daemon, and when the result is sent back, the kernel will return that result back to the process doing the syscall.
Communication between user-space and the kernel, is generally fast, even though the current syscall handler implementation is somewhat unoptimized. Systems with Meltdown mitigations would be an exception, although such mitigations are not yet implemented.
Communication
This page explains how a program communicates with the system components.
Context
- A scheme is a system service
- SQE means "Submission Queue Entry"
- CQE means "Completion Queue Entry"
- POSIX and Linux functions are implemented by relibc using Redox services provided by schemes, they work with the appropriate schemes to implement the function. It might involve opening a scheme, maybe writing to a scheme, or maybe calling
mmapon the scheme after opening (this is pretty common). - relibc and redox-rt talk to the scheme via a system call - open, read, write, mmap, etc.
- A system component (userspace daemon) uses the Scheme API (from the
redox-schemelibrary) to implement the system service. The Scheme API also is doing system calls likeopen,readandwrite, but the message format for reading and writing is a special format. The latest version of the Scheme API reads SQE messages and writes CQE messages. SQE is basically the parameters to the system call that the caller originally did, packaged into a message. CQE is the response that the daemon sends back. - The kernel is responsible for creating the SQE messages, and for unpacking the CQE messages.
Example
- The program calls some POSIX or Linux function from relibc
- relibc/redox-rt convert it to system calls
- The kernel converts the system calls to SQE
- The userspace daemon calls read on a "scheme socket" and gets an SQE message
- The userspace daemon calls write on the scheme socket and sends a CQE message
- The kernel converts the CQE message to the result of the system call
- relibc/redox-rt gets the result from the system call and uses that to calculate the result of the POSIX or Linux function call
Memory Management
TODO.
Scheduling on Redox
The Redox kernel uses a scheduling algorithm called Round Robin.
The kernel registers a function called an interrupt handler that the CPU calls periodically. This function keeps track of how many times it is called, and will schedule the next process ready for scheduling every 10 "ticks".
Drivers
On Redox the device drivers are user-space daemons, being a common Unix process they have their own namespace with restricted schemes.
In other words, a driver on Redox can't damage other system interfaces, while on Monolithic kernels a driver could wipe your data because the driver run on the same memory address space of the filesystem (thus same privilege level).
You can find the driver documentation on the repository README and drivers code.
RedoxFS
This is the default filesystem of Redox OS, inspired by ZFS and adapted to a microkernel architecture.
Redox had a read-only ZFS driver but it was abandoned because of the monolithic nature of ZFS that created problems with the Redox microkernel design.
(It's a replacement for TFS)
Current features:
- Compatible with Redox and Linux (FUSE)
- Copy-on-write
- Data/metadata checksums
- Transparent encryption
- Standard Unix file attributes
- File/directory size limit up to 193TiB (212TB)
- File/directory quantity limit up to 4 billion per 193TiB (2^32 - 1 = 4294967295)
- Disk encryption fully supported by the Redox bootloader, letting it load the kernel off an encrypted partition.
- MIT licensed
Being MIT licensed, RedoxFS can be bundled on GPL-licensed operating systems (Linux, for example).
Tooling
RedoxFS tooling can be used to create, mount and edit contents of an .img file containing RedoxFS. It can be installed with:
cargo install redoxfs
If you found errors while installing it, make sure to install fuse3.
Create a disk
You can create an empty, non bootable RedoxFS by allocating an empty file with fallocate then run redoxfs-mkfs to initialize the whole image as RedoxFS.
fallocate -l 1G redox.img
redoxfs-mkfs redox.img
Mount a disk
To mount the disk, run redoxfs [image] [directory]:
mkdir ./redox-img
redoxfs redox.img ./redox-img
It will mount the disk using FUSE underneath.
Unmount
Unmount the disk using FUSE unmount binary:
fusermount3 ./redox-img
Graphics and Windowing
Drivers
VESA (vesad)
vesad is not really a driver, it writes to a framebuffer given by firmware (via UEFI or BIOS software interrupts).
Because we don't have GPU drivers yet, we rely on what firmware gives to us.
GPUs
On Linux/BSDs, the GPU communication with the kernel is done by the DRM system (Direct Rendering Manager, libdrm library), that Mesa3D drivers use to work (Mesa3D implement OpenGL/Vulkan drivers, DRM expose the hardware interfaces).
Said this, in Redox a "DRM driver" needs to be an user-space driver which use the system calls/schemes to communicate with the hardware.
The last step is to implement the Redox backend in our Mesa3D fork/recipe to use these user-space drivers.
Software Rendering
We don't have GPU drivers yet but LLVMpipe (OpenGL CPU emulation) is working.
Orbital
The Orbital desktop environment provides a display server, window manager and compositor.
Comparison with X11/Wayland
This display server is more simple than X11 and Wayland making the porting task more quick and easy, it's not advanced like X11 and Wayland yet but enough to port most Linux/BSD programs.
Compared to Wayland, Orbital has one server implementation, while Wayland provide protocols for compositors.
Features
- Custom Resolutions
- App Launcher (bottom bar)
- File Manager
- Text Editor
- Calculator
- Terminal Emulator
If you hold the Super key (generally the key with a Windows logo) it will show all keyboard shortcuts in a pop-up.
Libraries
The programs using these libraries can work on Orbital.
- winit
- softbuffer
- Slint (through winit and softbuffer)
- Iced (through winit and softbuffer)
- egui (winit or SDL2 can be used)
- SDL1.2
- SDL2
- Mesa3D's OSMesa
Security
In Orbital a GUI program cannot read input events or the content (framebuffer) from windows of other GUI programs, like Wayland.
Clients
Apps (or 'clients') create a window and draw to it by using the orbclient client.
Client Examples
If you wish to see examples of client apps that use orbclient to "talk" to Orbital and create windows and draw to them, then you can find some in orbclient/examples folder.
Porting
If you want to port a program to Orbital, see below:
-
If the program is written in Rust probably it works on Orbital because the
winitcrate is used in most places, but there are programs that access X11 or Wayland directly. You need to port these programs towinitand merge on upstream. -
If the program is written in C or C++ and access X11 or Wayland directly, it must be ported to the Orbital library.
Security
This page covers the current Redox security design.
- The namespaces and capability-based system are implemented by the kernel but some parts can be moved to user-space.
- A namespace is a list of schemes, if you run
ls :, it will show the schemes on the current namespace. - Each process has a namespace.
- Capabilities are customized file descriptors that carry specific actions.
Sandbox
The sandbox system duplicates the system resources for each program, it allows them to be completely isolated from the main system. Flatpak and Snap use a sandbox security system on Linux, Redox will do the same.
Redox allows sandbox by limiting a program's capabilities:
- Only a certain number of schemes in the program's namespace is allowed, or no scheme at all. That way new file descriptors can't be opened.
- All functionality is forced to occur via file descriptors (WIP).
Features
This page contains an operating system comparison table for common/important features.
Desktop
| Feature | Redox | Linux (GNU/Linux) | FreeBSD | Plan 9 |
|---|---|---|---|---|
| SMP | Yes | Yes | Yes | Yes |
| NUMA | No (planned) | Yes | Yes | No |
| Full Disk Encryption | Yes | Yes | Yes | No |
| Exploit Mitigations | No (planned) | Yes | Yes | No |
| OpenGL/Vulkan | Only OpenGL with CPU emulation | Yes | Yes | No |
| UEFI Boot Loader | Yes | Yes | Yes | No |
| IDE | Yes | Yes | Yes | Yes |
| SATA | Yes | Yes | Yes | Yes |
| NVMe | Yes | Yes | Yes | No |
| PCI | Yes | Yes | Yes | No |
| PCIe | Yes | Yes | Yes | No |
| USB | Yes (incomplete) | Yes | Yes | Yes |
| Ethernet | Yes | Yes | Yes | Yes |
| Wi-Fi | No (planned) | Yes | Yes | No |
| Bluetooth | No (planned) | Yes | Yes | No |
Mobile
| Feature | Redox | Android | iOS |
|---|---|---|---|
| File-based Encryption | No | Yes | Not documented |
| Sandboxing | Yes | Yes | Yes |
| USB Tethering | No (planned) | Yes | Yes |
| NFC | No (planned) | Yes | Yes |
| GPS | No (planned) | Yes | Yes |
| Sensors | No (planned) | Yes | Yes |
| Factory Reset | No (planned) | Yes | Yes |
External References
- Rust OS Comparison - A table comparing some Rust-written operating systems.
Schemes and Resources
An essential design choice made for Redox is to refer to resources using scheme-rooted paths. This gives Redox the ability to:
- Treat resources (files, devices, etc.) in a consistent manner
- Provide resource-specific behaviors with a common interface
- Allow management of names and namespaces to provide sandboxing and other security features
- Enable device drivers and other system resource management to communicate with each other using the same mechanisms available to user programs
Scheme-rooted Paths
Scheme-rooted paths are the way that resources are identified on Redox.
What is a Resource
A resource is anything that a program might wish to access, usually referenced by some name.
What is a Scheme
A scheme identifies the starting point for finding a resource.
What is a Scheme-rooted Path
A scheme-rooted path takes the following form, with text in bold being literal.
/scheme/scheme-name/resource-name
scheme-name is the name of the kind of resource, and it also identifies the name used by the manager daemon for that kind.
resource-name is the specific resource of that kind. Typically in Redox, the resource-name is a path with elements separated by slashes, but the resource manager is free to interpret the resource-name how it chooses, allowing other formats to be used if required.
Differences from Unix
Unix systems have some special file types, such as "block special file" or "character special file". These special files use major/minor numbers to identify the driver and the specific resource within the driver. There are also pseudo-filesystems, for example procfs that provide access to resources using paths.
Redox's scheme-rooted paths provide a consistent approach to resource naming, compared with Unix.
Regular Files
For Redox, a path that does not begin with /scheme/ is a reference to the the root filesystem, which is managed by the file scheme.
Thus /home/user/.bashrc is interpreted as /scheme/file/home/user/.bashrc.
In this case, the scheme is file and the resource is
home/user/.bashrc within that scheme.
This makes paths for regular files feel as natural as Unix file paths.
Resources
A resource is any "thing" that can be referred to using a path. It can be a physical device, a logical pseudodevice, a file on a file system, a service that has a name, or an element of a dataset.
The client program accesses a resource by opening it, using the resource name in scheme-rooted path format. The first part of the path is the name of the scheme, and the rest of the path is interpreted by the scheme provider, assigning whatever meaning is appropriate for the resources included under that scheme.
Some schemes, such as /scheme/pty/ simply allocate sequentially numbered resources and do not need the complexity of
a slash-separated path.
Resource Examples
Some examples of resources are:
- Files within a filesystem -
/path/to/fileis interpreted as/scheme/file/path/to/file. Other filesystems can be referenced as/scheme/otherfs/path/to/file. - Pseudo-terminals -
/scheme/pty/nwherenis a number, refers to a particular pseudo-terminal. - Display -
/scheme/display.vesa/nwherenis a number, refers to the VESA virtual display - Virtual display 1 is the system log, display 2 is the text UI, and display 3 is the graphical display used by Orbital. - Networking -
/scheme/udp/a.b.c.d/pis the UDP socket with IPv4 addressa.b.c.d, port numberp.
Schemes
The scheme, which takes its name from URI schemes, identifies the type of resource, and identifies the manager daemon responsible for that resource.
Within Redox, a scheme may be thought of in a few ways. It is all of these things:
- The type of a resource, such as "file", "NVMe drive", "TCP connection", etc. (Note that these are not valid scheme names, they are just given by way of example.)
- The starting point for locating the resource, i.e. it is the root of the path to the resource, which the system can then use in establishing a connection to the resource.
- A uniquely named service that is provided by some driver or daemon program, with the full path identifying a specific resource accessed via that service.
Scheme Daemons
A scheme is typically provided by a daemon. A daemon is a program that runs as a process in userspace; it is typically started by the system during boot. When the process starts, it registers with kernel using the name of the scheme that it manages.
Kernel vs. Userspace Schemes
A userspace scheme is implemented by a scheme daemon, described above. A kernel scheme is implemented within the kernel, and manages critical resources not easily managed with a userspace daemon. When possible, schemes should be implemented in userspace.
Accessing Resources
In order to provide "virtual file" behavior, schemes generally implement file-like operations.
However, it is up to the scheme provider to determine what each file-like operation means.
For example, seek to an SSD driver scheme might simply add to a file offset, but to a floppy disk controller scheme,
it might cause the physical movement of disk read-write heads.
Typical scheme operations include:
open- Create a handle (file descriptor) to a resource provided by the scheme. e.g.File::create("/scheme/tcp/127.0.0.1/3000")in a regular program would be converted by the kernel intoopen("127.0.0.1/3000")and sent to the "tcp" scheme provider. The "tcp" scheme provider would parse the name, establish a connection to Internet address "127.0.0.1", port "3000", and return a handle that represents that connection.read- get some data from the thing represented by the handle, normally consuming that data so the nextreadwill return new data.write- send some data to the thing represented by the handle to be saved, sent or written.seek- change the logical location where the nextreadorwritewill occur. This may or may not cause some action by the scheme provider.
Schemes may choose to provide other standard operations, such as mkdir, but the meaning of the operation is up to the scheme. mkdir might create a directory entry, or it might create some type of substructure or container relevant to that particular scheme.
Some schemes implement fmap, which creates a memory-mapped area that is shared between the scheme resource and the scheme user. It allows direct memory operations on the resource, rather than reading and writing to a file descriptor. The most common use case for fmap is for a device driver to access the physical addresses of a memory-mapped device, using the memory: kernel scheme. It is also used for frame buffers in the graphics subsystem.
TODO: add F-operations.
TODO: explain file-like vs. socket-like schemes.
Userspace Schemes
Redox creates user-space schemes during initialization, starting various daemon-style programs, each of which can provide one or more schemes.
| Scheme | Daemon | Description |
|---|---|---|
| disk.* | ided, ahcid, nvmed | Storage drivers |
| disk.live | lived | RAM-disk driver that loads the bootable USB data into RAM |
| disk.usb-{id}+{port}-scsi | usbscsid | USB SCSI driver |
| logging | ramfs | Error logging scheme, using an in-memory temporary filesystem |
| initfs | bootstrap | Startup filesystem |
| file | redoxfs | Main filesystem |
| network | e1000d, rtl8168d | Link-level network send/receive |
| ip | smolnetd | Raw IP packet send/receive |
| tcp | smolnetd | TCP sockets |
| udp | smolnetd | UDP sockets |
| icmp | smolnetd | ICMP protocol |
| netcfg | smolnetd | Network configuration |
| dns | dnsd | DNS protocol |
| display.vesa | vesad | VESA driver |
| display.virtio-gpu | virtio-gpud | VirtIO GPU driver |
| orbital | orbital | Windowing system (window manager and virtual driver) |
| pty | ptyd | Pseudoterminals, used by terminal emulators |
| audiorw | sb16d, ac97d, ihdad | Sound drivers |
| audio | audiod | Audio manager and virtual device |
| usb.* | usb*d | USB drivers |
| acpi | acpid | ACPI driver |
| input | inputd | Virtual device |
| sudo | sudo | Privilege manager |
| chan | ipcd | Inter-process communication |
| shm | ipcd | Shared memory manager |
| log | logd | Logging |
| rand | randd | Pseudo-random number generator |
| zero | zerod | Discard all writes, and always fill read buffers with zeroes |
| null | nulld | Discard all writes, and read no bytes |
Kernel Schemes
The kernel provides a small number of schemes in order to support userspace.
| Name | Documentation | Description |
|---|---|---|
| namespace | root.rs | Namespace manager |
| user | user.rs | Dispatch for user-space schemes |
| debug | debug.rs | Debug messages that can't use the log: scheme |
| event | event.rs | epoll-like file descriptor read/write "ready" events |
| irq | irq.rs | Interrupt manager (converts interrupts to messages) |
| pipe | pipe.rs | Kernel manager for pipes |
| proc | proc.rs | Process context manager |
| thisproc | proc.rs | Process context manager |
| sys | mod.rs | System hardware resources information |
| kernel.acpi | acpi.rs | Read the CPU configuration (number of cores, etc) |
| memory | memory.rs | Physical memory mapping manager |
| time | time.rs | Real-time clock timer |
| itimer | time.rs | Interval timer |
| serio | serio.rs | Serial I/O (PS/2) driver (must stay in the kernel due to PS/2 protocol issues) |
Scheme List
This section has all Redox schemes in a list format to improve organization, coordination and focus.
Userspace
- disk.*
- disk.live
- disk.usb-{id}+{port}-scsi
- logging
- initfs
- file
- network
- ip
- tcp
- udp
- icmp
- netcfg
- dns
- display.vesa
- display.virtio-gpu
- orbital
- pty
- audiorw
- audio
- usb.*
- sudo
- acpi
- input
- chan
- shm
- log
- rand
- zero
- null
Kernel
- namespace
- user
- debug
- event
- irq
- pipe
- proc
- thisproc
- sys
- kernel.acpi
- memory
- time
- itimer
- serio
"Everything is a file"
Unix has a concept of using file paths to represent "special files" that have some meaning beyond a regular file. For example, a device file is a reference to a device resource that looks like a file path.
With the "Everything is a file" concept provided by Unix-like systems,
all sorts of devices, processes, and kernel parameters can be accessed as files in a regular filesystem.
If you are on a Linux computer, you should try to cd to /proc, and see what's going on there.
Redox extends this concept to a much more powerful one.
Since each "scheme provider" is free to interpret the path in its own way, new schemes can be created as needed for each type of resource.
This way USB devices don't end up in a "filesystem", but a protocol-based scheme like EHCI.
It is not necessary for the file system software to understand the meaning of a particular path,
or to give a special file some special properties that then become a fixed file system convention.
Redox schemes are flexible enough to be used in many circumstances, with each scheme provider having full flexibility to define its own path conventions and meanings, and only the programs that wish to take advantage of those meanings need to understand them.
Redox does not go as far as Plan 9, in that there are not separate paths for data and control of resources. In this case, Redox is more like Unix, where resources can potentially have a control interface.
Documentation about this design
Stiching It All Together
The "path, scheme, resource" model is simply a unified interface for efficient inter-process communication. Paths are simply resource descriptors. Schemes are simply resource types, provided by scheme managers.
A diagram would look like this:
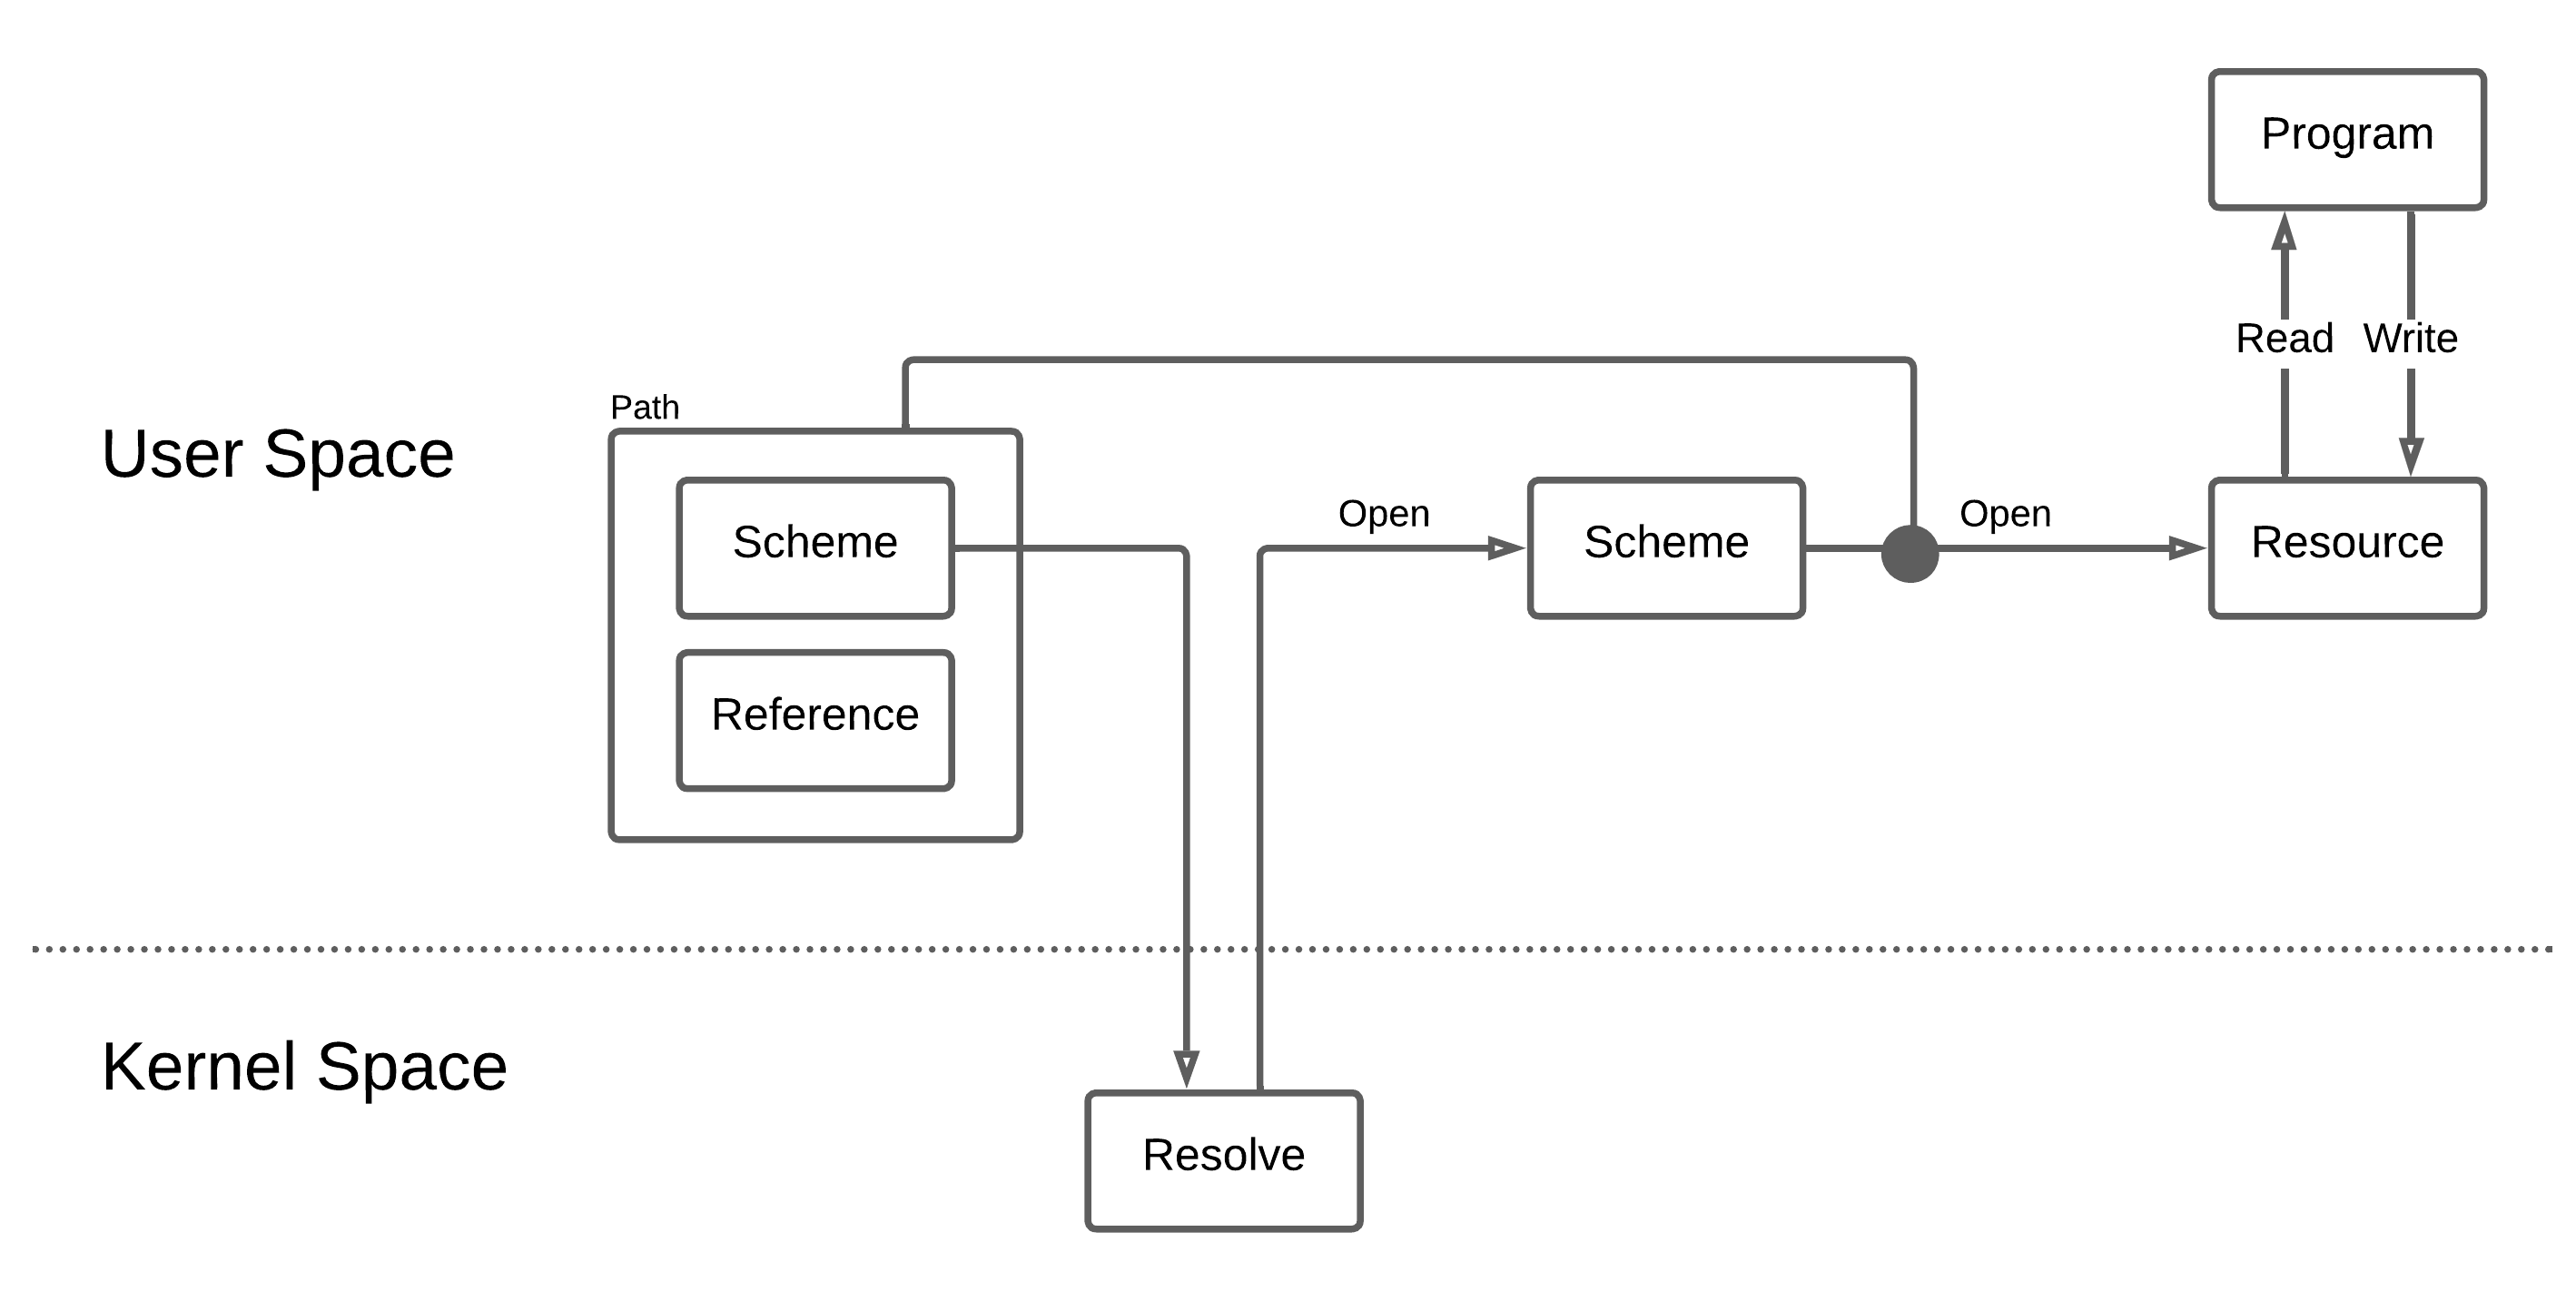
Scheme Operation
A kernel scheme is implemented directly in the kernel. A userspace scheme is typically implemented by a daemon.
A scheme is created in the root scheme and listens for requests using the event scheme.
Root Scheme
The root scheme is a special scheme provided by the kernel. It acts as the container for all other scheme names.
The root scheme is currently referenced as ":", so when creating a new scheme, the scheme provider calls File::create(":myscheme").
The file descriptor that is returned by this operation is a message passing channel between the scheme provider and the kernel.
File operations performed by a regular program are translated by the kernel into message packets that the scheme provider reads and responds to, using this file descriptor.
Event Scheme
The event scheme is a special scheme provided by the kernel that allows a scheme provider or other program to listen for events occurring on a file descriptor.
A more detailed explanation of the event scheme can be found on the Event Scheme page.
Note that very simple scheme providers do not use the event scheme.
However, if a scheme can receive requests or events from more than one source,
the event scheme makes it easy for the daemon (scheme provider) to block until something (an event) happens, do some work, then block again until the next event.
Daemons and Userspace Scheme Providers
A daemon is a program, normally started during system initialization. It runs with root permissions. It is intended to run continuously, handling requests and other relevant events. On some operating systems, daemons are automatically restarted if they exit unexpectedly. Redox does not currently do this but is likely to do so in the future.
On Redox, a userspace scheme provider is a typically a daemon, although it doesn't have to be.
The scheme provider informs the kernel that it will provide the scheme by creating it, e.g. File::create(":myscheme") will create the scheme myscheme.
Notice that the name used to create the scheme starts with ":", indicating that it is a new entry in the root scheme.
Since it is created in the root scheme, the kernel knows that it is a new scheme, as named schemes are the only thing that can exist in the root scheme.
In future, the scheme will register in a namespace using a different path format.
Namespaces
At the time a regular program is started, it becomes a process, and it exists in a namespace.
The namespace is a container for all the schemes, files and directories that a process can access.
When a process starts another program, the namespace is inherited,
so a new process can only access the schemes, files and directories that its parent process had available.
If a parent process wants to limit (sandbox) a child process, it would do so as part of creating the child process.
Currently, Redox starts all processes in the "root" namespace. This will be changed in the future, sandboxing all user programs so most schemes and system resources are hidden.
Redox also provides a null namespace.
A process that exists in the null namespace cannot open files or schemes by name, and can only use file descriptors that are already open.
This is a security mechanism, mostly used to by daemons running with root permission to prevent themselves from being hijacked into opening things they should not be accessing.
A daemon will typically open its scheme and any resources it needs during its initialization,
then it will ask the kernel to place it in the null namespace so no further resources can be opened.
Providing a Scheme
To provide a scheme, a program performs the following steps:
- Create the scheme, obtaining a file descriptor -
File::create(":myscheme") - Open a file descriptor for each resource that is required to provide the scheme's services, e.g.
File::open("/scheme/irq/{irq-name}") - Open a file descriptor for a timer if needed -
File::open("/scheme/time/{timer_type}") - Open a file descriptor for the event scheme (if needed) -
File::open("/scheme/event") - Move to the null namespace to prevent any additional resources from being accessed -
setrens(0,0) - Write to the
eventfile descriptor to register each of the file descriptors the provider will listen to, including the scheme file descriptor -event_fd.write(&Event{fd, ...})
Then, in a loop:
- Block, waiting for an event to read. For simple schemes, the scheme provider would not use this mechanism, it would simply do a blocking read of its scheme file descriptor.
- Read the event to determine (based on the file descriptor included in the event) if it is a timer, a resource event, or a scheme request.
- If it's a resource event, e.g. indicating a device interrupt, perform the necessary actions such as reading from the device and queuing the data for the scheme.
- If it's a scheme event, read a request packet from the scheme file descriptor and call the "handler". The request packet will indicate if it's an
open,read,write, etc. on the scheme:-
An
openwill include the name of the item to be opened. This can be parsed by the scheme provider to determine the exact resource the requestor wants to access. The scheme will allocate a handle for the resource, with a numbered descriptor. Descriptor numbers are in the range 0 to usize::MAX - 4096, leaving the upper 4096 values as internal error codes. These descriptors are used by the scheme provider to look up thehandledata structure it uses internally for the resource. The descriptors are typically allocated sequentially, but a scheme provider could return a pointer to the handle data structure if it so chooses.📝 Note: the descriptor returned from an
openrequest is not the same as the file descriptor returned to the client program. The kernel maps between the client's (process id,fdnumber) and the scheme provider's (process id,handlenumber). -
A
readorwrite, etc., will be handled by the scheme, using thehandlenumber to look up the information associated with the resource. The operation will be performed, or queued to be performed. If the request can be handled immediately, a response is sent back on the scheme file descriptor, matched to the original request.
-
- After all requests have been handled, loop through every
handleto determine if any queued requests are now complete. A response is sent back on the scheme file descriptor for each completed request, matched to that request. - Set a timer if appropriate, to enable handling of device timeouts, etc. This is performed as a
writeoperation on the timer file descriptor.
Kernel Actions
The kernel performs the following actions in support of the scheme:
- Any special resources required by a scheme provider are accessed as file operations on some other scheme. The kernel handles access to resources as it would for any other scheme.
- Regular file operations from user programs are converted by the kernel to request messages to the schemes. The kernel maps the user program's file descriptor to a scheme and a handle id provided by the scheme during the open operation, and places them in a packet.
- If the user program is performing a blocking read or write, the user program is suspended.
- The kernel sends event packets on the scheme provider's
eventfile descriptor, waking the blocked scheme provider. Each event packet indicates whether it is the scheme or some other resource, using the file descriptor obtained by the scheme provider during its initialization. - When the scheme provider reads from its scheme file descriptor, it receives the packets the kernel created describing the client request and handles them as described above.
- When the scheme provider sends a response packet, the kernel maps the response to a return value from the user program's file operation.
- When a blocking read or write is completed, the user program is marked ready to run, and the kernel will place it in the run queue.
Event Scheme
The event scheme is a special scheme that is central to the operation of device drivers, schemes and other programs that receive events from multiple sources. It's like a "clearing house" for activity on multiple file descriptors. The daemon or client program performs a read operation on the event scheme, blocking until an event happens. It then examines the event to determine what file descriptor is active, and performs a non-blocking read of the active file descriptor. In this way, a program can have many sources to read from, and rather than blocking on one of those sources while another might be active, the program blocks only on the event scheme, and is unblocked if any one of the other sources become active.
The event scheme is conceptually similar to Linux's epoll mechanism.
What is a Blocking Read
For a regular program doing a regular read of a regular file, the program calls read, providing an input buffer, and when the read call returns, the data has been placed into the input buffer. Behind the scenes, the system receives the read request and suspends the program, meaning that the program is put aside while it waits for something to happen. This is very convenient if the program has nothing to do while it waits for the read to complete. However, if the thing the program is reading from might take a long time, such as a slow device, a network connection or input from the user, and there are other things for the program to do, such as updating the screen, performing a blocking read can prevent handling these other activities in a timely manner.
Non-blocking Read
To allow reading from multiple sources without getting stuck waiting for any particular one, a program can open a path using the O_NONBLOCK flag. If data is ready to be read, the system immediately copies the data to the input buffer and returns normally. However, if data is not ready to be read, the read operation returns an error of type EAGAIN, which indicates that the program should try again later.
Now your program can scan many file descriptors, checking if any of them have data available to read. However, if none have any data, you want your program to block until there is something to do. This is where the event scheme comes in.
Using the Event Scheme
The purpose of the event scheme is to allow the daemon or client program to receive a message on the event_file, to inform it that some other file descriptor is ready to be read. The daemon reads from the event_file to determine which other file descriptor is ready. If no other descriptor is ready, the read of the event_file will block, causing the daemon to be suspended until the event scheme indicates some other file descriptor is ready.
Before setting up the event scheme, you should open all the other resources you will be working with, but set them to be non-blocking. E.g. if you are a scheme provider, open your scheme in non-blocking mode,
#![allow(unused)]
fn main() {
let mut scheme_file = OpenOptions::new()
            .create(true)
            .read(true)
            .write(true)
            .custom_flags(syscall::O_NONBLOCK as i32)
            .open(":myscheme")
            .expect("mydaemon: failed to create myscheme: scheme");
}
The first step in using the event scheme is to open a connection to it. Each program will have a connection to the event scheme that is unique, so no path name is required, only the name of the scheme itself.
#![allow(unused)]
fn main() {
let event_file = File::open("/scheme/event");
// you actually need to open it read/write
}
Next, write messages to the event scheme, one message per file descriptor that the event scheme should monitor. A message is in the form of a syscall::data::Event struct.
#![allow(unused)]
fn main() {
use syscall::data::Event;
let _ = event_file.write(&Event{ id: scheme_file.as_raw_fd(), ... });
// write one message per file descriptor
}
Note that timers in Redox are also handled via a scheme, so if you will be using a timer, you will need to open the timer scheme, and include that file descriptor among the ones your event_file should listen to.
Once your setup of the event scheme is complete, you begin your main loop:
- Perform a blocking read on the
eventfile descriptor.event_file.read(&mut event_buf); - When an event, such as data becoming available on a file descriptor, occurs, the
readoperation on theevent_filewill complete. - Look at the
event_bufto see which file descriptor is active. - Perform a non-blocking read on that file descriptor.
- Perform the appropriate processing.
- If you are using a timer, write to the timer file descriptor to tell it when you want an event.
- Repeat.
Non-blocking Write
Sometimes write operations can take time, such as sending a message synchronously or writing to a device with a limited buffer. The event scheme allows you to listen for write file descriptors to become unblocked. If a single file descriptor is opened in read-write mode, your program will need to register with the event scheme twice, once for reading and once for writing.
Implementing Non-blocking Reads in a Scheme
If your scheme supports non-blocking reads by clients, you will need to include some machinery to work with the event scheme on your client's behalf:
- Wait for an event that indicates activity on your scheme.
event_file.read(&mut event_buf); - Read a packet from your scheme file descriptor containing the request from the client program.
scheme_file.read(&mut packet)The packet contains the details of which file descriptor is being read, and where the data should be copied to. - If the client is performing a
readthat would block, then queue the client request and return theEAGAINerror, writing the error response to your scheme file descriptor. - When data is available to read, send an event by writing a special packet to your scheme, indicating the handle id that is active:
#![allow(unused)] fn main() { scheme_file.write(&Packet { a: syscall::number::SYS_FEVENT, b: handle_id, ... }); } - When routing this response back to the client, the kernel will recognize it as an event message, and post the event on the client's
event_fd, if one exists. - The scheme provider does not know whether the client has actually set up an
event_fd. The scheme provider must send the event "just in case". - If an event has already been sent, but the client has not yet performed a
read, the scheme should not send additional events. In correctly coded clients, extra events should not cause problems, but an effort should be made to not send unnecessary events. Be wary, however, as race conditions can occur where you think an extra event is not required but it actually is.
An Example
Enough theory! Time for an example.
We will implement a scheme which holds a vector. The scheme will push elements
to the vector when it receives writes, and pop them when it is read. Let's call
it vec.
The complete source for this example can be found at redox-os/vec_scheme_example.
TODO: the example has not been saved to the repo.
Setup
In order to build and run this example in a Redox environment, you'll need to be set up to compile the OS from source. The process for getting a program included in a local Redox build is laid out in the Including Programs in Redox page. Pause here and follow the helloworld example in that guide if you want to get this example running.
This example assumes that vec was used as the name of the crate instead of
helloworld. The crate should therefore be located at
cookbook/recipes/vec/source
Modify the Cargo.toml for the vec crate so that it looks something like
this:
[package]
name = "vec"
version = "0.1.0"
edition = "2018"

[[bin]]
name = "vec_scheme"
path = "src/scheme.rs"

[[bin]]
name = "vec"
path = "src/client.rs"

[dependencies]
redox_syscall = "^0.2.6"
Notice that there are two binaries here. We'll need another program to interact with
our scheme, since CLI tools like cat use more operations than we strictly
need to implement for our scheme. The client uses only the standard library.
The Scheme Daemon
Create src/scheme.rs in the crate. Start by useing a couple of symbols.
#![allow(unused)]
fn main() {
use std::cmp::min;
use std::fs::File;
use std::io::{Read, Write};

use syscall::Packet;
use syscall::scheme::SchemeMut;
use syscall::error::Result;
}
We start by defining our mutable scheme struct, which will implement the
SchemeMut trait and hold the state of the scheme.
#![allow(unused)]
fn main() {
struct VecScheme {
    vec: Vec<u8>,
}

impl VecScheme {
    fn new() -> VecScheme {
        VecScheme {
            vec: Vec::new(),
        }
    }
}
}
Before implementing the scheme operations on our scheme struct, let's breifly
discuss the way that this struct will be used. Our program (vec_scheme) will
create the vec scheme by opening the corresponding scheme handler in the root
scheme (:vec). Let's implement a main() that intializes our scheme struct
and registers the new scheme:
fn main() {
    let mut scheme = VecScheme::new();

    let mut handler = File::create(":vec")
        .expect("Failed to create the vec scheme");
}
When other programs open/read/write/etc against our scheme, the Redox kernel will make those requests available to our program via this scheme handler. Our scheme will read that data, handle the requests, and send responses back to the kernel by writing to the scheme handler. The kernel will then pass the results of operations back to the caller.
fn main() {
    // ...

    let mut packet = Packet::default();

    loop {
        // Wait for the kernel to send us requests
        let read_bytes = handler.read(&mut packet)
            .expect("vec: failed to read event from vec scheme handler");

        if read_bytes == 0 {
            // Exit cleanly
            break;
        }

        // Scheme::handle passes off the info from the packet to the individual
        // scheme methods and writes back to it any information returned by
        // those methods.
        scheme.handle(&mut packet);

        handler.write(&packet)
            .expect("vec: failed to write response to vec scheme handler");
    }
}
Now let's deal with the specific operations on our scheme. The
scheme.handle(...) call dispatches requests to these methods, so that we
don't need to worry about the gory details of the Packet struct.
In most Unix systems (Redox included!), a program needs to open a file before it
can do very much with it. Since our scheme is just a "virtual filesystem",
programs call open with the path to the "file" they want to interact with
when they want to start a conversation with our scheme.
For our vec scheme, let's push whatever path we're given to the vec:
#![allow(unused)]
fn main() {
impl SchemeMut for VecScheme {
    fn open(&mut self, path: &str, _flags: usize, _uid: u32, _gid: u32) -> Result<usize> {
        self.vec.extend_from_slice(path.as_bytes());
        Ok(0)
    }
}
}
Say a program calls open("vec:/hello"). That call will work its way through
the kernel and end up being dispatched to this function through our
Scheme::handle call.
The usize we return here will be passed back to us as the id parameter of
the other scheme operations. This way we can keep track of different open files.
In this case, we won't make a distinction between two different programs talking
to us and simply return zero.
Similarly, when a process opens a file, the kernel returns a number (the file
descriptor) that the process can use to read and write to that file. Now let's
implement the read and write operations for VecScheme:
#![allow(unused)]
fn main() {
impl SchemeMut for VecScheme {
    // ...

    // Fill up buf with the contents of self.vec, starting from self.buf[0].
    // Note that this reverses the contents of the Vec.
    fn read(&mut self, _id: usize, buf: &mut [u8]) -> Result<usize> {
        let num_written = min(buf.len(), self.vec.len());

        for b in buf {
            if let Some(x) = self.vec.pop() {
                *b = x;
            } else {
                break;
            }
        }

        Ok(num_written)
    }

    // Simply push any bytes we are given to self.vec
    fn write(&mut self, _id: usize, buf: &[u8]) -> Result<usize> {
        for i in buf {
            self.vec.push(*i);
        }

        Ok(buf.len())
    }
}
}
Note that each of the methods of the SchemeMut trait provide a default
implementation. These will all return errors since they are essentially
unimplemented. There's one more method we need to implement in order to prevent
errors for users of our scheme:
#![allow(unused)]
fn main() {
impl SchemeMut for VecScheme {
    // ...

    fn close(&mut self, _id: usize) -> Result<usize> {
        Ok(0)
    }
}
}
Most languages' standard libraries call close automatically when a file object
is destroyed, and Rust is no exception.
To see all the possible operations on schemes, check out the API docs.
TODO: there is no scheme documentation at this link.
A Simple Client
As mentioned earlier, we need to create a very simple client in order to use our
scheme, since some command line tools (like cat) use operations other than
open, read, write, and close. Put this code into src/client.rs:
use std::fs::File;
use std::io::{Read, Write};

fn main() {
    let mut vec_file = File::open("/scheme/vec/hi")
        .expect("Failed to open vec file");

    vec_file.write(b" Hello")
        .expect("Failed to write to vec");

    let mut read_into = String::new();
    vec_file.read_to_string(&mut read_into)
        .expect("Failed to read from vec");

    println!("{}", read_into); // olleH ih/
}
We simply open some "file" in our scheme, write some bytes to it, read some bytes from it, and then spit those bytes out on stdout. Remember, it doesn't matter what path we use, since all our scheme does is add that path to the vec. In this sense, the vec scheme implements a global vector.
Running the Scheme
Since we've already set up the program to build and run in QEMU, simply run:
make r.scheme-name image qemu
We'll need multiple terminal windows open in the QEMU window for this step.
Notice that both binaries we defined in our Cargo.toml can now be found in
/usr/bin (vec_scheme and vec). In one terminal window, run
sudo vec_scheme. A program needs to run as root in order to register a new
scheme. In another terminal, run vec and observe the output.
Exercises for the Reader
- Make the
vecscheme print out something whenever it gets events. For example, print out the user and group IDs of the user who tries to open a file in the scheme. - Create a unique
vecfor each opened file in your scheme. You might find a hashmap useful for this. - Write a scheme that can run code for your favorite esoteric programming language.
Programs and Libraries
- Redox is a general-purpose operating system, thus it can run any type of program.
Some programs are interpreted by a runtime for the program's language, such as a script running in the GNU Bash shell or a Python program. Others are compiled into CPU instructions that run on a particular operating system (Redox) and specific hardware (e.g. x86 compatible CPU in 64-bit mode).
- In Redox, the binaries use the standard ELF ("Executable and Linkable Format") format.
Programs could directly invoke Redox system calls, but most call library functions that are higher-level and more easy to use. The program is linked with the libraries it needs.
- Most C/C++ programs call functions in a C Standard Library (libc) such as
fopen() - Redox includes a Rust implementation of the C Standard Library called relibc. This is how programs such as Git and Python can run on Redox. relibc has partial POSIX compatibility.
- relibc has Linux functions for libraries and programs
- Rust programs implicitly or explicitly call functions in the Rust Standard Library.
- The Rust libstd includes an implementation of its system-dependent parts (such as file access and setting environment variables) for Redox, in
src/libstd/sys/redox. Most of libstd works in Redox, so many Rust programs can be compiled for Redox.
The Redox Cookbook package system contain recipes (software ports) for compiling C, C++ and Rust programs into Redox binaries.
The porting of programs on Redox is done case-by-case, if a program just need small patches, the programmer can modify the Rust crate source code or add .patch files on the recipe folder, but if big or dirty patches are needed, Redox create a fork of it on GitLab and rebase for a while in the redox branch of the fork (some Redox forks use branches for different versions).
Components of Redox
Redox is made up of several discrete components.
Core
- bootloader - Kernel bootstrap
- kernel - System manager
- bootstrap - User-space bootstrap
- init
- initfs
- drivers - Device drivers
- redoxfS - Filesystem
- audiod - Audio daemon
- netstack - TCP/UDP stack
- ps2d - PS/2 driver
- relibc - Redox C library
- randd
- zerod
- ion - Terminal shell
- orbital - Desktop environment
Orbital
- orblogin - Login manager
- launcher - App panel
- background - Wallpaper program
- viewer - Image viewer
- calculator - Math program
- COSMIC Files - File manager
- COSMIC Editor - Text editor
- COSMIC Terminal - Terminal emulator
- COSMIC Reader - Document viewer
GUI
The desktop environment of Redox (Orbital) is provided by a set of programs that run in user-space.
-
Orbital - The display server and window manager sets up the
orbital:scheme, manages the display, and handles requests for window creation, redraws, and event polling. -
Launcher - The launcher multi-purpose program that scans the applications in the
/apps/directory and provides the following services:- Called Without Arguments - A taskbar that displays icons for each application
- Called With Arguments - An application chooser that opens a file in a matching program.
- If one application is found that matches, it will be opened automatically
- If more than one application is found, a chooser will be shown
Programs
The following are GUI utilities that can be found in the /apps/ directory.
- Calculator - A calculator that provides similar functionality to the
calcprogram. - Editor - A simple editor that is similar to Notepad.
- File Browser - A file browser that displays icons, names, sizes, and details for files. It uses the
launchercommand to open files when they are clicked. - Image Viewer - A simple image viewer.
- Sodium - A vi-like editor that provides syntax highlighting.
- Terminal Emulator - An ANSI terminal emulator that launches the Ion shell by default.
Ion
Ion is a terminal shell and library for shells/command execution in Redox, it's used by default. Ion has it's own manual, which you can find on the Ion Manual.
1. The default shell in Redox
What is a terminal shell?
A terminal shell is a layer around the operating system kernel and libraries, that allows users to interact with the operating system. That means a shell can be used on any operating system (Ion runs on both Linux and Redox) or implementation of a standard library as long as the provided API is the same. Shells can either be graphical (GUI) or command-line (CLI).
Text shells
Text shells are programs that provide interactive user interface with an operating system. A shell reads from users as they type and performs operations according to the input. This is similar to read-eval-print loop (REPL) found in many programming languages (e.g. Python).
Typical Unix shells
Probably the most famous shell is GNU Bash, which can be found in the majority of Linux distributions, and also in MacOSX. On the other hand, FreeBSD uses tcsh by default.
There are many more shell implementations, but these two form the base of two fundamentally different sets:
- Bourne shell syntax (bash, sh, zsh)
- C shell syntax (csh, tcsh)
Of course these two groups are not exhaustive; it is worth mentioning at least the fish shell and xonsh. These shells are trying to abandon some features of old-school shell to make the language safer and more sane.
Fancy features
Writing commands without any help from the shell would be very exhausting and impossible to use for everyday work. Therefore, most shells (including Ion of course!) include features such as command history, autocompletion based on history or man pages, shortcuts to speed-up typing, etc.
2. A scripting language
Ion can also be used to write simple scripts for common tasks or system configuration after startup. It is not meant as a fully-featured programming language, but more like a glue to connect other programs together.
Relation to terminals
Early terminals were devices used to communicate with large computer systems like IBM mainframes. Nowadays Unix-like operating systems usually implement so called virtual terminals (tty stands for teletypewriter ... whoa!) and terminal emulators (e.g. xterm, gnome-terminal).
Terminals are used to read input from a keyboard and display textual output of the shell and other programs running inside it. This means that a terminal converts key strokes into control codes that are further used by the shell. The shell provides the user with a command line prompt (for instance: user name and working directory), line editing capabilities (Ctrl + a,e,u,k...), history, and the ability to run other programs (ls, uname, vim, etc.) according to user's input.
TODO: In Linux we have device files like /dev/tty, how is this concept handled in Redox?
Shell
When Ion is called without "-c", it starts a main loop, which can be found inside Shell.execute().
#![allow(unused)]
fn main() {
        self.print_prompt();
        while let Some(command) = readln() {
            let command = command.trim();
            if !command.is_empty() {
                self.on_command(command, &commands);
            }
            self.update_variables();
            self.print_prompt();
        }
}
self.print_prompt(); is used to print the shell prompt.
The readln() function is the input reader. The code can be found in crates/ion/src/input_editor.
The documentation about trim() can be found on the libstd documentation.
If the command is not empty, the on_command method will be called.
Then, the shell will update variables, and reprint the prompt.
#![allow(unused)]
fn main() {
fn on_command(&mut self, command_string: &str, commands: &HashMap<&str, Command>) {
    self.history.add(command_string.to_string(), &self.variables);

    let mut pipelines = parse(command_string);

    // Execute commands
    for pipeline in pipelines.drain(..) {
        if self.flow_control.collecting_block {
            // TODO move this logic into "end" command
            if pipeline.jobs[0].command == "end" {
                self.flow_control.collecting_block = false;
                let block_jobs: Vec<Pipeline> = self.flow_control
                                               .current_block
                                               .pipelines
                                               .drain(..)
                                               .collect();
                match self.flow_control.current_statement.clone() {
                    Statement::For(ref var, ref vals) => {
                        let variable = var.clone();
                        let values = vals.clone();
                        for value in values {
                            self.variables.set_var(&variable, &value);
                            for pipeline in &block_jobs {
                                self.run_pipeline(&pipeline, commands);
                            }
                        }
                    },
                    Statement::Function(ref name, ref args) => {
                        self.functions.insert(name.clone(), Function { name: name.clone(), pipelines: block_jobs.clone(), args: args.clone() });
                    },
                    _ => {}
                }
                self.flow_control.current_statement = Statement::Default;
            } else {
                self.flow_control.current_block.pipelines.push(pipeline);
            }
        } else {
            if self.flow_control.skipping() && !is_flow_control_command(&pipeline.jobs[0].command) {
                continue;
            }
            self.run_pipeline(&pipeline, commands);
        }
    }
}
}
First, on_command adds the commands to the shell history with self.history.add(command_string.to_string(), &self.variables);.
Then the script will be parsed. The parser code is in crates/ion/src/peg.rs.
The parse will return a set of pipelines, with each pipeline containing a set of jobs.
Each job represents a single command with its arguments.
You can take a look in crates/ion/src/peg.rs.
#![allow(unused)]
fn main() {
pub struct Pipeline {
    pub jobs: Vec<Job>,
    pub stdout: Option<Redirection>,
    pub stdin: Option<Redirection>,
}
pub struct Job {
    pub command: String,
    pub args: Vec<String>,
    pub background: bool,
}
}
What Happens Next:
- If the current block is a collecting block (a for loop or a function declaration) and the current command is ended, we close the block:
- If the block is a for loop we run the loop.
- If the block is a function declaration we push the function to the functions list.
- If the current block is a collecting block but the current command is not ended, we add the current command to the block.
- If the current block is not a collecting block, we simply execute the current command.
The code blocks are defined in crates/ion/src/flow_control.rs.
pub struct CodeBlock {
    pub pipelines: Vec<Pipeline>,
}
The function code can be found in crates/ion/src/functions.rs.
The execution of pipeline content will be executed in run_pipeline().
The Command class inside crates/ion/src/main.rs maps each command with a description and a method
to be executed.
For example:
#![allow(unused)]
fn main() {
commands.insert("cd",
                Command {
                    name: "cd",
                    help: "Change the current directory\n    cd <path>",
                    main: box |args: &[String], shell: &mut Shell| -> i32 {
                        shell.directory_stack.cd(args, &shell.variables)
                    },
                });
}
cd is described by "Change the current directory\n cd <path>", and when called the method
shell.directory_stack.cd(args, &shell.variables) will be used. You can see its code in crates/ion/src/directory_stack.rs.
System Tools
coreutils
Coreutils is a collection of basic command line utilities included with Redox (or with Linux, BSD, etc.). This includes programs like ls, cp, cat and various other tools necessary for basic command line interaction.
Redox use the Rust implementation of the GNU Coreutils, uutils.
Available programs:
ls- Show the files and folders of the current directory.cp- Copy and paste some file or folder.cat- Show the output of some text file.chmod- Change the permissions of some file or directory.clear- Clean the terminal output.dd- Copies and converts a file.df- Show the disk partitions information.du- Shows disk usage on file systems.env- Displays and modifies environment variables.free- Show the RAM usage.kill- Kill a process.ln- Creates a link to a file.mkdir- Create a directory.ps- Show all running processes.reset- Restart the terminal to allow the command-line input.shutdown- Shutdown the system.sort- Sort, merge, or sequence check text files.stat- Returns data about an inode.tail- Copy the last part of a file.tee- Duplicate the standard output.test- Evaluate expression.time- Count the time that some command takes to finish it's operation.touch- Update the timestamp of some file or folder.uname- Show the system information, like kernel version and architecture type.uptime- Show how much time your system is running.which- Show the path where some program is located.
userutils
Userutils contains the utilities for dealing with users and groups in Redox OS.
They are heavily influenced by Unix and are, when needed, tailored to specific Redox use cases.
These implementations strive to be as simple as possible drawing particular inspiration by BSD systems. They are indeed small, by choice.
Available programs:
getty- Used byinit(8)to open and initialize the TTY line, read a login name and invokelogin(1).id- Displays user identity.login- Allows users to login into the systempasswd- Allows users to modify their passwords.su- Allows users to substitute identity.sudo- Enables users to execute a command as another user.useradd- Add a userusermod- Modify user informationuserdel- Delete a usergroupadd- Add a user groupgroupmod- Modify group informationgroupdel- Remove a user group
extrautils
Some additional command line tools are included in extrautils, such as less, grep, and dmesg.
Available programs:
calc- Do math operations.cur- Move terminal cursor keys usingvikeybindings.dmesg- Show the kernel message buffer.grep- Search all text matches in some text file.gunzip- Decompresstar.gzarchives.gzip- Compress files intotar.gzarchives.info- Read Markdown files with help pages.keymap- Change the keyboard map.less- Show the text file content one page at a time.man- Show the program manual.mdless- Pager with Markdown support.mtxt- Various text conversions, like lowercase to uppercase.rem- Countdown tool.resize- Print the size of the terminal in the form of shell commands to export theCOLUMNSandLINESenvironment variables.screenfetch- Show system information.tar- Manipulatetararchives.unzip- Manipulateziparchives.watch- Repeat a command every 2 seconds.
binutils
Binutils contains utilities for manipulating binary files.
Available programs:
hex- Filter and show files in hexadecimal format.hexdump- Filter and show files in hexadecimal format (better output formatting).strings- Find printable strings in files.
contain
This program provides containers (namespaces) on Redox.
acid
The general-purpose test suite of Redox to detect crashes, regressions and race conditions.
resist
The POSIX test suite of Redox to see how much % the system is compliant to the POSIX specification (more means better compatibility).
The Build Process
This chapter will cover the advanced build process of Redox.
Advanced Podman Build
To make the Redox build process more consistent across platforms, we are using Rootless Podman for major parts of the build. The basics of using Podman are described in the Building Redox page. This chapter provides a detailed discussion, including tips, tricks and troubleshooting, as well as some extra detail for those who might want to leverage or improve Redox's use of Podman.
(Don't forget to read the Build System page to know our build system organization and how it works)
Build Environment
-
Environment and command line Variables, other than
ARCH,CONFIG_NAMEandFILESYSTEM_CONFIG, are not passed to the part ofmakethat is done in Podman. You must set any other configuration variables, e.g.REPO_BINARY, in .config and not on the command line or on your environment. -
If you are building your own software to add in Redox, and you need to install additional packages using
apt-getfor the build, follow the Adding Packages to the Build section.
Installation
Most of the packages required for the build are installed in the container as part of the build process. However, some packages need to be installed on the host computer. You may also need to install an emulator such as QEMU. For most Linux distributions, this is done for you in the podman_bootstrap.sh script.
Note that the Redox filesystem parts are merged using FUSE. podman_bootstrap.sh installs libfuse for most platforms, if it is not already included. If you have problems with the final image of Redox, verify if libfuse is installed and you are able to use it.
Ubuntu
sudo apt-get install git make curl podman fuse fuse-overlayfs slirp4netns
Debian
sudo apt-get install git make curl podman fuse fuse-overlayfs slirp4netns
Arch Linux
sudo pacman -S --needed git make curl podman fuse3 fuse-overlayfs slirp4netns
Fedora
sudo dnf install git-all make curl podman fuse3 fuse-overlayfs slirp4netns
OpenSUSE
sudo zypper install git make curl podman fuse fuse-overlayfs slipr4netns
Pop!_OS
sudo apt-get install git make curl podman fuse fuse-overlayfs slirp4netns
FreeBSD
sudo pkg install git gmake curl fusefs-libs3 podman
MacOSX
- Homebrew
sudo brew install git make curl osxfuse podman fuse-overlayfs slirp4netns
- MacPorts
sudo port install git gmake curl osxfuse podman
NixOS
Before building Redox with NixOS, you must have configured Podman on your system. Just follow the instructions of the NixOS wiki:
{ pkgs, ... }:
{
  # Enable common container config files in /etc/containers
  virtualisation.containers.enable = true;
  virtualisation = {
    podman = {
      enable = true;

      # Create a `docker` alias for podman, to use it as a drop-in replacement
      dockerCompat = true;

      # Required for containers under podman-compose to be able to talk to each other.
      defaultNetwork.settings.dns_enabled = true;
    };
  };

  # Useful other development tools
  environment.systemPackages = with pkgs; [
    dive # look into docker image layers
    podman-tui # status of containers in the terminal
    docker-compose # start group of containers for dev
    podman-compose # start group of containers for dev
  ];
}
You will then have to configure your user to be able to use Podman:
users.extraUsers.${user-name} = {
  subUidRanges = [{ startUid = 100000; count = 65536; }];
  subGidRanges = [{ startGid = 100000; count = 65536; }];
};
The last step is to activate the development shell:
nix develop --no-warn-dirty --command $SHELL
build/container.tag
The building of the image is controlled by the tag file build/container.tag. If you run make all with PODMAN_BUILD=1, the file build/container.tag will be created after the image is built. This file tells make that it can skip updating the image after the first time.
Many targets in the Makefiles mk/*.mk include build/container.tag as a dependency. If the tag file is missing, building any of those targets may trigger an image to be created, which can take some time.
When you move to a new working directory, if you want to save a few minutes, and you are confident that your image is correct and your poduser home directory build/podman/poduser is valid, you can do
make container_touch
This will create the file build/container.tag without rebuilding the image. However, it will fail if the image does not exist. If it fails, just do a normal make, it will create the container when needed.
Cleaning Up
To remove the base image, any lingering containers, poduser's home directory, including the Rust installation, and build/container.tag, run:
make container_clean
- To verify that everything has been removed
podman ps -a
- Show any remaining images or containers
podman images
- Remove all images and containers. You still may need to remove
build/container.tagif you did not domake container_clean.
podman system reset
In some rare instances, poduser's home directory can have bad file permissions, and you may need to run:
sudo chown -R `id -un`:`id -gn` build/podman
Where `id -un` is your User ID and `id -gn` is your effective Group ID. Be sure to make container_clean after that.
Note:
make cleandoes not runmake container_cleanand will not remove the container image.- If you already did
make container_clean, doingmake cleancould trigger an image build and a Rust install in the container. It invokescargo cleanon various components, which it must run in a container, since the build is designed to not require Cargo on your host machine. If you have Cargo installed on the host and in your PATH, you can usemake PODMAN_BUILD=0 cleanto clean without building a container.
Debugging Your Build Process
If you are developing your own components and wish to do one-time debugging to determine what library you are missing in the Podman Build environment, the following instructions can help. Note that your changes will not be persistent. After debugging, you must Add your Libraries to the Build. With PODMAN_BUILD=1, run the following command:
- This will start a
bashshell in the Podman container environment, as a normal user withoutrootprivileges.
make container_shell
- Within that environment, you can build the Redox components with:
make repo
- If you need to change
ARCHorCONFIG_NAME, run:
./build.sh -a ARCH -c CONFIG_NAME repo
- If you need
rootprivileges, while you are still running the abovebashshell, go to a separate Terminal or Console window on the host, and type:
cd ~/tryredox/redox
make container_su
You will then be running Bash with root privilege in the container, and you can use apt-get or whatever tools you need, and it will affect the environment of the user-level container_shell above. Do not precede the commands with sudo as you are already root. And remember that you are in an Ubuntu instance.
Note: Your changes will not persist once both shells have been exited.
Type exit on both shells once you have determined how to solve your problem.
Adding Packages to the Build
This method can be used if you want to make changes/testing inside the Debian container with make env.
The default Containerfile, podman/redox-base-containerfile, imports all required packages for a normal Redox build.
However, you cannot easily add packages after the base image is created. You must add them to your own Containerfile and rebuild the container image.
Copy podman/redox-base-containerfile and add to the list of packages in the initial apt-get.
cp podman/redox-base-containerfile podman/my-containerfile
nano podman/my-containerfile
...
        xxd \
        rsync \
        MY_PACKAGE \
...
Make sure you include the continuation character \ at the end of each line except after the last package.
Then, edit .config, and change the variable CONTAINERFILE to point to your Containerfile, e.g.
CONTAINERFILE?=podman/my-containerfile
If your Containerfile is newer than build/container.tag, a new image will be created. You can force the image to be rebuilt with make container_clean.
If you feel the need to have more than one image, you can change the variable IMAGE_TAG in mk/podman.mk to give the image a different name.
If you just want to install the packages temporarily, run make env, open a new terminal tab/windows, run make container_su and use apt install on this tab/window.
Summary of Podman-related Make Targets, Variables and Podman Commands
-
PODMAN_BUILD- If set to 1 in .config, or in the environment, or on themakecommand line, much of the build process takes place in Podman. -
CONTAINERFILE- The name of the containerfile used to build the image. This file includes theapt-getcommand that installs all the necessary packages into the image. If you need to add packages to the build, edit your own containerfile and change this variable to point to it. -
make build/container.tag- If no container image has been built, build one. It's not necessary to do this, it will be done when needed. -
make container_touch- If a container image already exists andpoduser's home directory is valid, but there is no tag file, create the tag file so a new image is not built. -
make container_clean- Remove the container image,poduser's home directory and the tag file. -
make container_shell- Start an interactive Podmanbashshell in the same environment used bymake; for debugging theapt-getcommands used during image build. -
make env- Start an interactivebashshell with theprefixtools in your PATH. Automatically determines if this should be a Podman shell or a host shell, depending on the value ofPODMAN_BUILD. -
make repoor./build.sh -a ARCH -c CONFIG repo- Used while in a Podman shell to build all the Redox component packages.make allwill not complete successfully, since part of the build process must take place on the host. -
podman exec --user=0 -it CONTAINER bash- Use this command in combination withmake container_shellormake envto getrootaccess to the Podman build environment, so you can temporarily add packages to the environment.CONTAINERis the name of the active container as shown bypodman ps. For temporary, debugging purposes only. -
podman system reset- Use this command whenmake container_cleanis not sufficient to solve problems caused by errors in the container image. It will remove all images, use with caution. If you are using Podman for any other purpose, those images will be deleted as well.
Gory Details
If you are interested in how we are able to use your working directory for builds in Podman, the following configuration details may be interesting.
We are using Rootless Podman's --userns keep-id feature. Because Podman is being run Rootless, the container's root user is actually mapped to your User ID on the host. Without the keep-id option, a regular user in the container maps to a phantom user outside the container. With the keep-id option, a user in the container that has the same User ID as your host User ID, will have the same permissions as you.
During the creation of the base image, Podman invokes Buildah to build the image. Buildah does not allow User IDs to be shared between the host and the container in the same way that Podman does. So the base image is created without keep-id, then the first container created from the image, having keep-id enabled, triggers a remapping. Once that remapping is done, it is reused for each subsequent container.
The working directory is made available in the container by mounting it as a volume. The Podman option:
--volume "`pwd`":$(CONTAINER_WORKDIR):Z
takes the directory that make was started in as the host working directory, and mounts it at the location $CONTAINER_WORKDIR, normally set to /mnt/redox. The :Z at the end of the name indicates that the mounted directory should not be shared between simultaneous container instances. It is optional on some Linux distros, and not optional on others.
For our invocation of Podman, we set the PATH environment variable as an option to podman run. This is to avoid the need for our make command to run .bashrc, which would add extra complexity. The ARCH, CONFIG_NAME and FILESYSTEM_CONFIG variables are passed in the environment to allow you to override the values in mk/config.mk or .config, e.g. by setting them on your make command line or by using build.sh.
We also set PODMAN_BUILD=0 in the environment, to ensure that the instance of make running in the container knows not to invoke Podman. This overrides the value set in .config.
In the Containerfile, we use as few RUN commands as possible, as Podman commits the image after each command. And we avoid using ENTRYPOINT to allow us to specify the podman run command as a list of arguments, rather than just a string to be processed by the entrypoint shell.
Containers in our build process are run with --rm to ensure the container is discarded after each use. This prevents a proliferation of used containers. However, when you use make container_clean, you may notice multiple items being deleted. These are the partial images created as each RUN command is executed while building.
Container images and container data is normally stored in the directory $HOME/.local/share/containers/storage. The following command removes that directory in its entirety. However, the contents of any volume are left alone:
podman system reset
Advanced Build
In this section, we provide the gory details that may be handy to know if you are contributing to or developing for Redox.
(Don't forget to read the Build System page to know our build system organization and how it works)
Setup Your Environment
Although it's recommended to read the Building Redox or Podman Build pages instead of the process described here, advanced users may accomplish the same as the native_bootstrap.sh script with the following steps, which are provided by way of example for Pop!_OS/Ubuntu/Debian. For other platforms, have a look at the native_bootstrap.sh file to help determine what packages to install for your Unix-like system.
The steps to perform are:
- Clone The Repository
- Install The Necessary Packages
- Install Rust
- Adjust Your Configuration Settings
- Build the system
Clone The Repository
- Create a directory and clone the repository
mkdir -p ~/tryredox
cd ~/tryredox
git clone https://gitlab.redox-os.org/redox-os/redox.git --origin upstream --recursive
cd redox
make pull
Please be patient, this can take minutes to hours depending on the hardware and network you're using.
In addition to installing the various packages needed for building Redox, native_bootstrap.sh and podman_bootstrap.sh both clone the repository, so if you used either script, you have completed Step 1.
Install The Necessary Packages and Emulator
If you cloned the sources before running native_bootstrap.sh, you can use:
cd ~/tryredox/redox
./native_bootstrap.sh -d
If you can't use native_bootstrap.sh script, you can attempt to install the necessary packages below.
Pop!_OS/Ubuntu/Debian Users
Install the build system dependencies:
sudo apt-get install ant autoconf automake autopoint bison \
build-essential clang cmake curl dos2unix doxygen file flex \
fuse3 g++ genisoimage git gperf intltool libexpat-dev libfuse-dev \
libgmp-dev libhtml-parser-perl libjpeg-dev libmpfr-dev libpng-dev \
libsdl1.2-dev libsdl2-ttf-dev libtool llvm lua5.4 m4 make meson nasm \
ninja-build patch perl pkg-config po4a protobuf-compiler python3 \
python3-mako rsync scons texinfo unzip wget xdg-utils xxd zip zstd
- If you want to use QEMU, run:
sudo apt-get install qemu-system-x86 qemu-kvm
- If you want to use VirtualBox, run:
sudo apt-get install virtualbox
Fedora Users
Install the build system dependencies:
sudo dnf install autoconf vim bison flex genisoimage gperf \
glibc-devel.i686 expat expat-devel fuse-devel fuse3-devel gmp-devel \
libpng-devel perl perl-HTML-Parser libtool libjpeg-turbo-devel
SDL2_ttf-devel sdl12-compat-devel m4 nasm po4a syslinux \
texinfo ninja-build meson waf python3-mako make gcc gcc-c++ \
openssl patch automake perl-Pod-Html perl-FindBin gperf curl \
gettext-devel perl-Pod-Xhtml pkgconf-pkg-config cmake llvm zip \
unzip lua luajit make clang doxygen ant protobuf-compiler zstd
- If you want to use QEMU, run:
sudo dnf install qemu-system-x86 qemu-kvm
- If you want to use VirtualBox, install from the VirtualBox Linux Downloads page.
Arch Linux Users
Install the build system dependencies:
pacman -S --needed cmake fuse git gperf perl-html-parser nasm \
wget texinfo bison flex po4a autoconf curl file patch automake \
scons waf expat gmp libtool libpng libjpeg-turbo sdl12-compat \
m4 pkgconf po4a syslinux meson python python-mako make xdg-utils \
zip unzip llvm clang perl doxygen lua ant protobuf
- If you want to use QEMU, run:
sudo pacman -S qemu
- If you want to use VirtualBox, run:
sudo pacman -S virtualbox
OpenSUSE Users
Install the build system dependencies:
sudo zypper install gcc gcc-c++ glibc-devel-32bit nasm make fuse-devel \
cmake openssl automake gettext-tools libtool po4a patch flex gperf autoconf \
bison curl wget file libexpat-devel gmp-devel libpng16-devel libjpeg8-devel \
perl perl-HTML-Parser m4 patch scons pkgconf syslinux-utils ninja meson python-Mako \
xdg-utils zip unzip llvm clang doxygen lua54 ant protobuf
- If you want to use QEMU, run:
sudo zypper install qemu-x86 qemu-kvm
Gentoo Users
Install the build system dependencies:
sudo emerge dev-lang/nasm dev-vcs/git sys-fs/fuse
- If you want to use QEMU, run:
sudo emerge app-emulation/qemu
- If you want to use VirtualBox, install from the VirtualBox Linux Downloads page.
FreeBSD Users
Install the build system dependencies:
sudo pkg install coreutils findutils gcc nasm pkgconf fusefs-libs3 \
cmake gmake wget openssl texinfo python automake gettext bison gperf \
autoconf curl file flex expat2 gmp png libjpeg-turbo sdl12 sdl2_ttf \
perl5.36 p5-HTML-Parser libtool m4 po4a syslinux ninja meson xdg-utils \
zip unzip llvm doxygen patch automake scons lua54 py-protobuf-compiler
- If you want to use QEMU, run:
sudo pkg install qemu qemu-system-x86_64
- If you want to use VirtualBox, run:
sudo pkg install virtualbox
MacOS Users
The MacOSX require workarounds because the Redox toolchain don't support ARM64 as host and MacOSX don't allow FUSE to work while SIP is enabled.
This is what you can do:
- Install QEMU and create a x86-64 VM for a Linux distribution
- Install VirtualBox and create a VM for a Linux distribution (only works with Apple computers using Intel CPUs)
- Install UTM and create a x86-64 VM for a Linux distribution
- Disable SIP (Not recommended, only if you know what you are doing)
- Install a Linux distribution
MacPorts
Install the build system dependencies:
sudo port install coreutils findutils gcc49 gcc-4.9 nasm pkgconfig \
osxfuse x86_64-elf-gcc cmake ninja po4a findutils texinfo autoconf \
openssl3 openssl11 bison curl wget file flex gperf expat gmp libpng \
jpeg libsdl12 libsdl2_ttf libtool m4 ninja meson python311 py37-mako \
xdg-utils zip unzip llvm-16 clang-16 perl5.24 p5-html-parser doxygen \
gpatch automake scons gmake lua protobuf-c
- If you want to use QEMU, run:
sudo port install qemu qemu-system-x86_64
- If you want to use VirtualBox, run:
sudo port install virtualbox
If you have some problem, try to install this Perl module:
cpan install HTML::Entities
Homebrew
Install the build system dependencies:
brew install automake bison gettext libtool make nasm gcc@7 \
gcc-7 pkg-config cmake ninja po4a macfuse findutils texinfo \
openssl@1.1 openssl@3.0 autoconf curl wget flex gperf expat \
gmp libpng jpeg sdl12-compat sdl2_ttf perl libtool m4 ninja \
meson python@3.11 zip unzip llvm doxygen gpatch automake scons \
lua ant protobuf redox-os/gcc_cross_compilers/x86_64-elf-gcc x86_64-elf-gcc
- If you want to use QEMU, run:
brew install qemu qemu-system-x86_64
- If you want to use VirtualBox, run:
brew install virtualbox
If you have some problem, try to install this Perl module:
cpan install HTML::Entities
Install Rust Stable And Nightly
Install Rust, make the nightly version your default toolchain, then list the installed toolchains:
curl https://sh.rustup.rs -sSf | sh
then
source ~/.cargo/env
rustup default nightly
rustup toolchain list
cargo install --force --version 0.1.1 cargo-config
NOTE: ~/.cargo/bin has been added to your PATH environment variable for the running session.
The . "$HOME/.cargo/env command (equivalent to source ~/.cargo/env) have been added to your shell start-up file, ~/.bashrc, but you may wish to add it elsewhere or modify it according to your own environment.
Prefix
The tools that build Redox are specific to each CPU architecture. These tools are located in the directory prefix, in a subdirectory named for the architecture, e.g. prefix/x86_64-unknown-redox. If you have problems with these tools, you can remove the subdirectory or even the whole prefix directory, which will cause the tools to be re-downloaded or rebuilt. The variable PREFIX_BINARY in mk/config.mk controls whether they are downloaded or built.
Cookbook
The Cookbook system is an essential part of the Redox build system. Each Redox component package is built and managed by the Cookbook toolset. The variable REPO_BINARY in mk/config.mk controls if the recipes are compiled from sources or use binary packages from Redox CI server, read the section REPO_BINARY for more details. See the Including Programs in Redox page for examples of using the Cookbook toolset. If you will be developing recipes to include in Redox, it is worthwhile to have a look at the tools in the cookbook directory.
Creating a Build Environment Shell
If you are working on specific components of the system, and will be using some of the tools in the cookbook directory and bypassing make, you may wish to create a build environment shell. This shell includes the prefix tools in your PATH. You can do this with:
make env
This command also works with a Podman Build, creating a shell in Podman and setting PATH to include the necessary build tools.
Updating The Sources
If you want to update the build system or if some of the recipes have changed, you can update those parts of the system with make pull. However, this will not update the sources of the recipes.
cd ~/tryredox/redox
make pull
If you want to update the source for the recipes, use make rebuild, or remove the file $(BUILD)/fetch.tag and run make fetch.
Changing the Filesystem Size and Contents
You can modify the size and contents of the filesystem for emulation and livedisk as described in the Configuration Settings page.
Next Steps
Once this is all set up, we can finally build! See the Compiling Redox section.
Working with i686
The build system supports building for multiple CPU architectures in the same directory tree. Building for i686 or aarch64 only requires that you set the ARCH Make variable to the correct value. Normally, you would do this in the .config section, but you can also do this temporarily with the make ARCH=i686 command, in the shell environment (export ARCH=i686) or with the build.sh script.
First Time Build
Bootstrap Pre-Requisites And Download Sources
Follow the instructions for running bootstrap.sh to setup your environment on the Building Redox or Native Build pages.
Install QEMU
The i386 emulator is not installed by bootstrap.sh. You can add it like this:
(Pop!_OS/Ubuntu/Debian)
sudo apt-get install qemu-system-i386
Configuration Values
Before your first build, be sure to set the ARCH variable in .config to your architecture type, in this case i686. You can change several other configurable settings, such as the filesystem contents, etc. See Configuration Settings.
Add packages to the filesystem.
You can add programs to the filesystem by following the instructions here.
Advanced Users
For more details on the build process, please read Advanced Build.
Compiling Redox
Now we have:
- Downloaded the sources
- Set the
ARCHenvironment variable toi686 - Selected a filesystem configuration, e.g.
desktop - Tweaked the settings to our liking
- Probably added our recipes to the filesystem
We are ready to build a Redox image.
Building an image for emulation
cd ~/tryredox/redox
This command will create the image, e.g. build/i686/desktop/harddrive.img, which you can run with an emulator. See Running Redox.
time make all
Building A Bootable Redox Image
cd ~/tryredox/redox
- The following command will create the file
build/i686/desktop/livedisk.iso, which can be copied to a USB device or CD for testing or installation. See Running Redox on real hardware.
time make live
Give it a while. Redox is big.
Cleaning Previous Build Cycles
Cleaning Intended For Rebuilding Core Packages And Entire System
When you need to rebuild core-packages like relibc, gcc and related tools, clean the entire previous build cycle with:
cd ~/tryredox/redox/
rm -rf prefix/i686-unknown-redox/relibc-install/ cookbook/recipes/gcc/{build,sysroot,stage*} build/i686/*/{harddrive.img,livedisk.iso}
Cleaning Intended For Only Rebuilding Non-Core Package(s)
If you're only rebuilding a non-core package, you can partially clean the previous build cycle just enough to force the rebuilding of the Non-Core Package:
cd ~/tryredox/redox/
rm build/i686/*/{fetch.tag,harddrive.img}
Running Redox
Running The Redox Desktop
To open QEMU, run:
make qemu
This should open up a QEMU window, booting to Redox.
If it does not work, disable KVM with:
make qemu kvm=no
or:
make qemu iommu=no
If this doesn't work either, you should go open an issue.
Running The Redox Console Only
We disable to GUI desktop by passing the gpu=no option. The following disables the graphics support and welcomes you with the Redox console:
make qemu gpu=no
It's useful to run the console in order to capture the output from the non-GUI programs.
It helps to debug applications and share the console captured logs with other developers in the Redox community.
QEMU Tap For Network Testing
Expose Redox to other computers within a LAN. Configure QEMU with a "TAP" which will allow other computers to test Redox client/server/networking capabilities.
Join the chat if this is something you are interested in pursuing.
Note
If you encounter any bugs, errors, obstructions, or other annoying things, please send a message in the chat or report the issue on GitLab. Thanks!
ARM64
The build system supports building for multiple CPU architectures in the same directory tree. Building for i686 or aarch64 only requires that you set the ARCH environment variable to the correct value. Normally, you would do this in .config, but you can also do this temporarily with the make ARCH=aarch64 command, in the shell environment (export ARCH=aarch64) or with the build.sh script.
(ARM64 has limited support)
First Time Build
Bootstrap Pre-Requisites and Download Sources
Follow the instructions for running bootstrap.sh to setup your environment, read the Building Redox page or the Podman Build page.
Install QEMU
The ARM64 emulator is not installed by bootstrap.sh. You can add it like this:
(Pop!_OS/Ubuntu/Debian)
sudo apt-get install qemu-system-aarch64
Install Additional Tools To Build And Run ARM 64-bit Redox OS Image
sudo apt-get install u-boot-tools qemu-system-arm qemu-efi
Configuration Values
Before your first build, be sure to set the ARCH variable in .config to your CPU architecture type, in this case aarch64. You can change several other configurable settings, such as the filesystem contents, etc. See Configuration Settings.
Add packages to the filesystem.
You can add programs to the filesystem by following the instructions on the Including Programs in Redox page.
Advanced Users
For more details on the build process, please read the Advanced Build page.
Compiling Redox
Now we have:
- Downloaded the sources
- Set the
ARCHtoaarch64 - Selected a filesystem config, e.g.
desktop - Tweaked the settings to our liking
- Probably added our recipe to the filesystem
We are ready to build the a Redox image.
Building an image for emulation
cd ~/tryredox/redox
This command will create the image, e.g. build/aarch64/desktop/harddrive.img, which you can run with an emulator. See the Running Redox page.
time make all
Give it a while. Redox is big.
Read the make all (first run) section to know what the command above does.
Cleaning Previous Build Cycles
Cleaning Intended For Rebuilding Core Packages And Entire System
When you need to rebuild core-packages like relibc, gcc and related tools, clean the entire previous build cycle with:
cd ~/tryredox/redox/
rm -rf prefix/aarch64-unknown-redox/relibc-install/ cookbook/recipes/gcc/{build,sysroot,stage*} build/aarch64/*/{harddrive.img,livedisk.iso}
Cleaning Intended For Only Rebuilding Non-Core Package(s)
If you're only rebuilding a non-core package, you can partially clean the previous build cycle just enough to force the rebuilding of the Non-Core Package:
cd ~/tryredox/redox/
rm build/aarch64/*/{fetch.tag,harddrive.img}
Running Redox
To open QEMU, run:
make qemu kvm=no gpu=no
This should boot to Redox. The desktop GUI will be disabled, but you will be prompted to login to the Redox console.
QEMU Tap For Network Testing
Expose Redox to other computers within a LAN. Configure QEMU with a "TAP" which will allow other computers to test Redox client/server/networking capabilities.
Join the Chat if this is something you are interested in pursuing.
Note
If you encounter any bugs, errors, obstructions, or other annoying things, please send a message in the Chat or report the issue on GitLab. Thanks!
Raspberry Pi
Build and run device-specific images
Most ARM motherboards do not use the default image for booting, which requires us to do some extra steps with building images.
Raspberry Pi 3 Model B+
It is easy to port Raspberry Pi 3 Model B+ (raspi3b+) since the bootloader of Raspberry Pi family uses the similar filesystem (FAT32) for booting.
In order to build a RasPi3B+ image:
- Add
BOARD?=raspi3bpandCONFIG_NAME?=minimalto.config - Run
make all - Download the firmware
cd ~/tryredox
git clone https://gitlab.redox-os.org/Ivan/redox_firmware.git
Run in QEMU
Assume that we are using the server-minimal configuration and built the image successfully, run:
- Add two additional dtb files to EFI system partition:
DISK=build/aarch64/server-minimal/harddrive.img
MOUNT_DIR=/mnt/efi_boot
DTB_DIR=$MOUNT_DIR/dtb/broadcom
WORKPLACE=/home/redox/tryredox
DTS=$WORKPLACE/redox_firmware/platform/raspberry_pi/rpi3/bcm2837-rpi-3-b-plus.dts
mkdir -p $MOUNT_DIR
mount -o loop,offset=$((2048*512)) $DISK $MOUNT_DIR
mkdir -p $DTB_DIR
dtc -I dts -O dtb $DTS > $DTB_DIR/bcm2837-rpi-3-b.dtb
cp $DTB_DIR/bcm2837-rpi-3-b.dtb $DTB_DIR/bcm2837-rpi-3-b-plus.dtb
sync
umount $MOUNT_DIR
- Run
make qemu_raspi live=no
Booting from USB
Assume that we are using the server-minimal configuration and access serial console using GPIOs 14 and 15 (pins 8 and 10 on the 40-pin header). Do the following:
- Run
make live - Download the firmware from official repository
cd ~/tryredox
git clone --depth=1 https://github.com/raspberrypi/firmware.git
- Copy all required firmware to EFI system partition
DISK=build/aarch64/server-minimal/livedisk.iso
MOUNT_DIR=/mnt/efi_boot
DTB_DIR=$MOUNT_DIR/dtb/broadcom
WORKPLACE=/home/redox/tryredox
DTS=$WORKPLACE/redox_firmware/platform/raspberry_pi/rpi3/bcm2837-rpi-3-b-plus.dts
UBOOT=$WORKPLACE/redox_firmware/platform/raspberry_pi/rpi3/u-boot-rpi-3-b-plus.bin
CONFIG_TXT=$WORKPLACE/redox_firmware/platform/raspberry_pi/rpi3/config.txt
FW_DIR=$WORKPLACE/firmware/boot
mkdir -p $MOUNT_DIR
mount -o loop,offset=$((2048*512)) $DISK $MOUNT_DIR
cp -rf $FW_DIR/* $MOUNT_DIR
mkdir -p $DTB_DIR
dtc -I dts -O dtb $DTS > $DTB_DIR/bcm2837-rpi-3-b.dtb
cp $DTB_DIR/bcm2837-rpi-3-b.dtb $DTB_DIR/bcm2837-rpi-3-b-plus.dtb
cp $UBOOT $MOUNT_DIR/u-boot.bin
cp $CONFIG_TXT $MOUNT_DIR
sync
umount $MOUNT_DIR
- Run:
dd if=build/aarch64/server-minimal/livedisk.iso of=/dev/sdX
(/dev/sdX is your USB device.)
Booting from SD Card
This process is similar to that of "Booting from USB", but has some differences:
- Use
harddrive.imginstead oflivedisk.iso - After
ddcommand, try to make the EFI system partition of the SD card become a hybrid MBR. See this post for more details
root@dev-pc:/home/ivan/code/os/redox# gdisk /dev/sdc
GPT fdisk (gdisk) version 1.0.8

Partition table scan:
  MBR: protective
  BSD: not present
  APM: not present
  GPT: present

Found valid GPT with protective MBR; using GPT.

Command (? for help): r

Recovery/transformation command (? for help): p
Disk /dev/sdc: 61067264 sectors, 29.1 GiB
Model: MassStorageClass
Sector size (logical/physical): 512/512 bytes
Disk identifier (GUID): B37FD04D-B67D-48AA-900B-884F0E3B2EAD
Partition table holds up to 128 entries
Main partition table begins at sector 2 and ends at sector 33
First usable sector is 34, last usable sector is 524254
Partitions will be aligned on 2-sector boundaries
Total free space is 2015 sectors (1007.5 KiB)

Number  Start (sector)    End (sector)  Size       Code  Name
   1              34            2047   1007.0 KiB  EF02  BIOS
   2            2048          264191   128.0 MiB   EF00  EFI
   3          264192          522239   126.0 MiB   8300  REDOX

Recovery/transformation command (? for help): h

WARNING! Hybrid MBRs are flaky and dangerous! If you decide not to use one,
just hit the Enter key at the below prompt and your MBR partition table will
be untouched.

Type from one to three GPT partition numbers, separated by spaces, to be
added to the hybrid MBR, in sequence: 2
Place EFI GPT (0xEE) partition first in MBR (good for GRUB)? (Y/N): n

Creating entry for GPT partition #2 (MBR partition #1)
Enter an MBR hex code (default EF): 0c
Set the bootable flag? (Y/N): n

Unused partition space(s) found. Use one to protect more partitions? (Y/N): n

Recovery/transformation command (? for help): o

Disk size is 61067264 sectors (29.1 GiB)
MBR disk identifier: 0x00000000
MBR partitions:

Number  Boot  Start Sector   End Sector   Status      Code
   1                  2048       264191   primary     0x0C
   2                     1         2047   primary     0xEE

Recovery/transformation command (? for help): w
Warning! Secondary header is placed too early on the disk! Do you want to
correct this problem? (Y/N): y
Have moved second header and partition table to correct location.

Final checks complete. About to write GPT data. THIS WILL OVERWRITE EXISTING
PARTITIONS!!

Do you want to proceed? (Y/N): y
OK; writing new GUID partition table (GPT) to /dev/sdc.
The operation has completed successfully.
root@dev-pc:/home/ivan/code/os/redox#
Troubleshooting the Build
This page covers all troubleshooting methods and tips for our build system.
(You must read the Build System page before)
- Setup
- Building the System
- Solving Compilation Problems
- Debug Methods
- Kill A Frozen Redox VM
- Kernel Panic
Setup
When you run podman_bootstrap.sh or native_bootstrap.sh, the Linux tools and libraries required to support the toolchain and build all recipes are installed. Then the redox project is downloaded from the Redox GitLab server. The redox project does not contain the system component sources, it only contains the build system. The cookbook subproject, which contains recipes for all the packages to be included in Redox, is also copied as part of the download.
Podman
If your build appears to be missing libraries, have a look at the Debugging Your Podman Build Process section.
If your Podman environment becomes broken, you can use podman system reset and rm -rf build/podman. In some cases, you may need to run the sudo rm -rf build/podman command.
If any command ask your to choose an image repository (after the make container_clean command execution) select the first item, it will give an error and you need to run the time make all command again
Manual Configuration
If you have problems setting Podman to rootless mode, do the following steps:
(These commands were taken from the official Podman rootless wiki and Shortcomings of Rootless Podman, thus it could be broken/wrong in the future, read the wiki to see if the commands match, we will try to update the method to work with everyone)
- Install the
podman,crun,slirp4netnsandfuse-overlayfspackages on your system. podman ps -a- This command will show all your Podman containers, if you want to remove all of them, runpodman system reset- Follow this step if necessary (if the Podman of your distribution use cgroups V2), you will need to edit the
containers.conffile at/etc/containersor your user folder at~/.config/containers, change the lineruntime = "runc"toruntime = "crun" - Execute the
cat /etc/subuidandcat /etc/subgidcommands to see user/group IDs (UIDs/GIDs) available for Podman.
If you don't want to edit the file, you can use this command:
sudo usermod --add-subuids 100000-165535 --add-subgids 100000-165535 your-user
You can use the values 100000-165535 for your user, just edit the two text files, we recommend sudo nano /etc/subuid and sudo nano /etc/subgid, when you finish, press Ctrl+X to save the changes.
- After the change on the UID/GID values, execute this command:
podman system migrate
- If you have a network problem on the container, this command will allow connections on the port 443 (without root):
sudo sysctl net.ipv4.ip_unprivileged_port_start=443
- Hopefully, you have a working Podman build now.
(If you still have problems with Podman, read the Troubleshooting chapter or join us on the chat)
Let us know if you have improvements for Podman troubleshooting on the chat.
Native Build
Not all Linux distributions are supported by native_bootstrap.sh, so if you have frequent compilation problems try the podman_bootstrap.sh script for Podman builds.
If you want to support your Unix-like system without Podman, you can try to install the Debian/Ubuntu package equivalents for your system from your package manager/software store, you can see them on the ubuntu() function of the native_bootstrap.sh script.
The native_bootstrap.sh script and redox-base-containerfile covers the build system packages needed by the recipes at the demo.toml filesystem configuration.
(Note that some systems may have build environment problems hard and time consuming to fix, on these systems Podman will fix most headaches)
Git
If you did not use podman_bootstrap.sh or native_bootstrap.sh to setup your environment, you can download the sources with:
git clone https://gitlab.redox-os.org/redox-os/redox.git --origin upstream --recursive
- If the
cookbookproject or other components are missing, ensure that you used the--recursiveflag when doinggit clone. - Ensure that all the libraries and packages required by Redox are installed by running
./bootstrap.sh -dor, if you will be using the Podman build run the./podman_bootstrap.sh -dcommand.
Building The System
When you run make all, the following steps occur.
.config and mk/config.mk
makescans .config and mk/config.mk for settings, such as the CPU architecture, configuration name, and whether to use Podman during the build process. Read through the Configuration Settings page to make sure you have the settings that are best for you.
Prefix
The Redox toolchain, referred to as prefix because it is prefixed with the CPU architecture name, is downloaded and/or built. Modified versions of cargo, rustc, gcc and many other tools are created. They are placed in the prefix directory.
If you have a problem with the toolchain, try rm -rf prefix, and everything will be reinstalled the next time you run make all or make rebuild.
Filesystem Configuration
The list of Redox recipes to be built is read from the filesystem configuration file, which is specified in .config or mk/config.mk. If your recipe is not being included in the build, verify if you have set the CONFIG_NAME or FILESYSTEM_CONFIG in the .config file.
Fetch
Each recipe source is downloaded using git or curl, according to the [source] section of the recipe.toml file. Source is placed at cookbook/recipes/recipe-name/source.
(Some recipes still use the old recipe.sh format, they need to be converted to TOML)
If you are doing work on a recipe, you may want to comment out the [source] section of the recipe. To discard your changes to the source for a recipe, or to update to the latest version, uncomment the [source] section of the recipe, and use make uc.recipe-name in the recipe directory to remove both the source and any compiled code.
After all recipes are fetched, a tag file is created as build/$ARCH/$CONFIG_NAME/fetch.tag, e.g. build/x86_64/desktop/fetch.tag. If this file is present, fetching is skipped. You can remove it manually, or use make rebuild, if you want to force refetching.
Cookbook
Each recipe is built according to the recipe.toml file. The recipe binaries or library objects are placed in the target directory, in a subdirectory named based on the CPU architecture. These tasks are done by various Redox-specific shell scripts and commands, including repo.sh, cook.sh and Cargo. These commands make assumptions about $PATH and $PWD, so they might not work if you are using them outside the build process.
If you have a problem with a recipe you are building, try the make c.recipe-name command. A common problem when building on unsupported systems is that certain recipes will fail to build due to missing dependencies. Try using the Podman Build or manually installing the recipe dependencies.
After all recipes are cooked, a tag file is created as build/$ARCH/$CONFIG_NAME/repo.tag. If this file is present, cooking is skipped. You can remove it manually, or use make rebuild, which will force refetching and rebuilding.
Create the Image with FUSE
To build the final Redox image, redox_installer uses FUSE, creating a virtual filesystem and copying the recipe packages into it. This is done outside of Podman, even if you are using Podman Build.
On some Linux distributions, FUSE may not be permitted for some users, or bootstrap.sh might not install it correctly. Investigate whether you can address your FUSE issues, or join the chat if you need advice.
Solving Compilation Problems
-
Verify your Rust version (run
make envandcargo --version, thenexit), make sure you have the latest version of Rust nightly!.- rustup.rs is recommended for managing Rust versions. If you already have it, run the
rustupcommand.
- rustup.rs is recommended for managing Rust versions. If you already have it, run the
-
Verify if your
makeandnasmare up-to-date. -
Verify if the build system is using the latest commit by running the
git branch -vcommand. -
Verify if the submodules are using the latest pinned commit, to do this run:
cd submodule-name
git branch -v
- Verify if the recipe source is using the latest commit of the default branch, to do this run:
cd cookbook/recipes/some-category/recipe-name/source
git branch -v
- Run
make clean pull fetchto remove all your compiled binaries and update all sources. - Sometimes there are merge requests that briefly break the build, so check the Chat if anyone else is experiencing your problems.
- Sometimes both the source and the binary of some recipe is wrong, run
make ucr.recipe-nameand verify if it fix the problem.
Environment Leakage
Environment leakage is when some program or library is not fully cross-compiled to Redox, thus its dependency chain has Linux references that don't work on Redox.
It usually happens when the program or library get objects from outside the Redox build system PATH.
- The Redox build system PATH only read at
/usr/binand/binto use the host system build tools - The program build system must use the host system build tools and the Cookbook recipe dependencies, not the host system libraries.
- The most common way to detect this is to install the
*-devdependency package equivalent to the program recipe dependency, for example:
The program named "my-program" needs to use the OpenSSL library, thus you add the openssl recipe on the recipe.toml of the program, but the program don't detect the OpenSSL source code.
Then you install the libssl-dev package on your Ubuntu system and rebuild the program with the make cr.my-program command, then it finish the build process successfully.
But when you try to open the executable of the program inside of Redox, it doesn't work. Because it contain Linux references.
To fix this problem you need to find where the program build system get the OpenSSL source code and patch it with ${COOKBOOK_SYSROOT} environment variable (where the openssl recipe contents were copied)
Update Your Build System
Sometimes your build system can be outdated because you forgot to run make pull before other commands, read this section to learn the complete way to update the build system.
Update Relibc
An outdated relibc copy can contain bugs (already fixed on recent versions) or missing APIs, read this section to learn how to update it.
Prevent and Fix Breaking Changes
Sometimes build system or recipe breaking changes are merged (you need to monitor the Dev room in our chat to know if some commit or MR containing breaking changes were merged) and you need to cleanup your recipe or build system tooling binaries before the recipe or build system source updates to avoid conflicts with the new configuration.
Build System Breakage Prevention
The following methods can prevent a build system breakage after updates that change file configuration behavior.
- Wipe all recipe binaries, update build system source and rebuild the system (most common prevention)
make clean pull all
- Wipe all recipe binaries and Podman container, update build system source and rebuild the system
make clean container_clean pull all
- Wipe all recipe binaries/sources, update build system source and rebuild the system (least common prevention)
make distclean pull all
Build System Fixing
If the breaking change affect multiple recipes or any recipe can't be built, read the following instructions:
- Wipe the build system binaries and build the system (most common fix)
make clean all
Check if the compilation or runtime error continues after this command, if the error continues run the command below:
- Wipe and rebuild the filesystem tooling
make fstools_clean fstools
Check if the compilation or runtime error continues after this command, if the error continues run the command below:
- Wipe the Podman container (not common fix)
make container_clean
Check if the compilation or runtime error continues after this command, if the error continues it doesn't happen because of breaking changes on the build system.
Recipe Fixing
Some types of recipe errors can be backwards-incompatible build system, system component or relibc changes after the make pull rebuild command execution. Run the following tests to verify if the recipe error is an isolated problem or a breaking change:
- Rebuild the recipe binaries
make cr.recipe-name
Check if the compilation or runtime error continues after this command, if the error continues run the following command:
- Wipe the recipe sources and binaries and rebuild
make ucr.recipe-name
Check if the compilation or runtime error continues after this command, if the error continues run the following command:
- Update relibc and rebuild the recipe
touch relibc
make prefix cr.recipe-name
Check if the compilation or runtime error continues after this command, if the error continues run the following command:
- Reconfigure the Redox toolchain and rebuild the recipe
rm -rf prefix
make prefix cr.recipe-name
Check if the compilation or runtime error continues after this command, if the error continues run the following command:
- Wipe the build system binaries and rebuild the system (run this command if the binaries of multiple recipes are broken)
make clean all
Check if the compilation or runtime error continues after this command, if the error continues run the following command:
- Wipe the build system sources and binaries and rebuild the system (run this command if the sources and binaries of multiple recipes are broken)
make distclean all
Check if the compilation or runtime error continues after this command, if the error continues read the section below.
New Build System Copy
If the methods above doesn't work you need to download a new copy of the build system by running the podman_bootstrap.sh or native_bootstrap.sh scripts or using the following commands:
git clone https://gitlab.redox-os.org/redox-os/redox.git --origin upstream --recursive
cd redox
make all
Update Your Branch
If you are doing local changes on the build system, probably you left your branch active on the folder (instead of master branch).
New branches don't sync automatically with master, thus if the master branch receive new commits, you wouldn't use them because your branch is outdated.
To fix this, run:
git checkout master
git pull
git checkout your-branch
git merge master
Or
git checkout master
git pull
git merge your-branch master
If you want an anonymous merge, read the Anonymous Commits section.
Update Crates
Sometimes a Rust program use an old crate version lacking Redox support, read this section to learn how to update them.
Verify The Dependency Tree
Some crates take a long time to do a new release (years in some cases), thus these releases will hold old versions of other crates, versions where the Redox support is not available (causing errors during the program compilation).
The redox_syscall crate is the most affected by this, some crates hold a very old version of it and will require patches (cargo update -p alone doesn't work).
To identify which crates are using old versions of Redox crates you will need to verify the dependency tree of the program, inside the program source directory, run:
cargo tree --target=x86_64-unknown-redox
This command will draw the dependency tree and you will need to find the crate name on the tree.
If you don't want to find it, you can use the grep tool with a pipe to see all crate versions used in the tree, sadly grep don't preserve the tree hierarchy, thus it's only useful to see versions and if some patched crate works (if the patched crate works all crate matches will report the most recent version).
To do this, run:
cargo tree --target=x86_64-unknown-redox | grep crate-name
Debug Methods
-
Read this Wikipedia section to learn about debugging techniques
-
Use the
dmesgcommand to read the kernel and userspace daemons log -
You can start the QEMU with the
make qemu gpu=nocommand to easily copy the terminal text -
You can write to the
debug:scheme, which will output on the console, but you must be therootuser. This is useful if you are debugging an program where you need to use Orbital but still want to capture messages -
Currently, the build system strips function names and other symbols from programs, as support for symbols is not implemented yet
-
To use GDB add the
gdbserverrecipe in your filesystem configuration, run themake qemu gdb=yescommand in one shell, start thegdbserverprogram on QEMU and run themake gdbcommand in another shell -
Use the following command for advanced logging:
make some-command 2>&1 | tee file-name.log
Recipes
You will see the available debug methods for recipes on this section.
- If you change the recipe build mode (
releasetodebugor the opposite) while debugging, don't forget to rebuild withmake cr.recipe-namebecause the build system may not detect the changes.
Rust
Rust programs can carry assertions, checking and symbols, but they are disabled by default.
REPO_DEBUG- This environment variable will build the Rust program with assertions, checking and symbols.
(Debugging with symbols inside of Redox is not supported yet)
To enable them you can use the following commands or scripts:
- Permanently enable
REPO_DEBUGfor all recipes by adding the following text to your.configfile:
REPO_DEBUG?=1
- Enable the
REPO_DEBUGenvironment variable for one command, rebuild/package a recipe and add to the Redox image:
REPO_DEBUG=1 make cr.recipe-name image
- Enable the
REPO_DEBUGenvironment variable for multiple commands, rebuild/package a recipe and add to the Redox image:
export REPO_DEBUG=1
make cr.recipe-name image
- Enable the
COOKBOOK_DEBUGandCOOKBOOK_NOSTRIP(they are equivalent toREPO_DEBUGenvironment variable) inside therecipe.toml:
template = "custom"
script = """
COOKBOOK_DEBUG=true
COOKBOOK_NOSTRIP=true
cookbook_cargo
"""
- Backtrace
A backtrace helps you to detect bugs that happen with not expected input parameters, you can trace back through the callers to see where the bad data is coming from.
You can see how to use it below:
- Start QEMU with logging:
make qemu 2>&1 | tee file-name.log
- Enable this environment variable globally (on Redox):
export RUST_BACKTRACE=full
-
Run the program and repeat the bug (capturing a backtrace in the log file)
-
Close QEMU
-
Open the log file, copy the backtrace and paste in an empty text file
-
Run the
backtrace.shscript in theredoxdirectory (on Linux):
scripts/backtrace.sh -r recipe-name -b your-backtrace.txt
It will print the file and line number for each entry in the backtrace.
(This is the most simple example command, use the -h option of the backtrace.sh script to see more combinations)
GDB On QEMU
Use the following instructions to debug a Rust recipe with GDB:
- Add the following environment variable to your
.configfile:
REPO_DEBUG?=1
- Rebuild the recipe with assertions/checking/symbols and add into Redox image:
make cr.recipe-name image
- Start QEMU with GDB enabled:
make qemu gdb=yes
If the recipe has one executable, run the following command:
make debug.recipe-name
If the recipe has multiple executables use the following command:
make debug.recipe-name DEBUG_BIN=executable-name
Kill A Frozen Redox VM
Sometimes Redox can freeze or rarely get a kernel panic, to kill the QEMU process run this command:
pkill qemu-system
Kernel Panic
A kernel panic is when some bug avoid the safe execution of the kernel code, thus the system needs to be restarted to avoid memory corruption.
We use the following kernel panic message format:
KERNEL PANIC: panicked at some-path/file-name.rs:line-number:character-position:
the panic description goes here
- You can use the following command to search it in a big log:
grep -nw "KERNEL PANIC" --include "file-name.log"
QEMU
If you get a kernel panic in QEMU, copy the terminal text or capture a screenshot and send to us on Matrix or create an issue on GitLab.
Real Hardware
If you get a kernel panic in real hardware, capture a photo and send to us on Matrix or create an issue on GitLab.
Build System
The build system downloads and creates several files that you may want to know about. There are also several make commands mentioned below, and a few extras that you may find useful. Here's a quick summary. All file paths are relative to your redox base directory.
- Build System Organization
- GNU Make Commands
- Environment Variables
- Scripts
- Component Separation
- Pinned Commits
- Git Auto-checkout
- Update The Build System
- Update Relibc
- Fix Breaking Changes
- Configuration
- Cross-Compilation
- Build Phases
Build System Organization
Root Folder
podman_bootstrap.sh- The script used to configure the Podman buildnative_bootstrap.sh- The script used to configure the Native buildMakefile- The main Makefile of the build system, it loads all the other Makefiles..config- Where you override your build system settings. It is loaded by the Makefile (it is ignored bygit).
GNU Make Configuration
mk/config.mk- The build system settings are here. You can override these settings in your.config, don't change them here to avoid conflicts in themake pullcommand.mk/*.mk- The rest of the Makefiles. You should not need to change them.
Podman Configuration
podman/redox-base-containerfile- The file used to create the image used by the Podman build. The installation of Ubuntu packages needed for the build is done here. See the Adding Packages to the Build section if you need to add additional Ubuntu packages.
Filesystem Configuration
config- This folder contains all filesystem configurations.config/*.toml- Filesystem templates used by the CPU target configurations (a template can use other template to reduce duplication)config/your-cpu-arch/your-config.toml- The filesystem configuration of the QEMU image to be built, e.g.config/x86_64/desktop.tomlconfig/your-cpu-arch/server.toml- The variant with system components (without Orbital) and some important tools. Aimed for servers, low-end computers, testers and developers.
(Try this config if you have boot problems on QEMU or real hardware).
config/your-cpu-arch/desktop.toml- The variant with system components, the Orbital desktop environment and some important programs (this is the default configuration of the build system). Aimed for end-users, gamers, testers and developers.config/your-cpu-arch/dev.toml- The variant with development tools included. Aimed for developers.config/your-cpu-arch/demo.toml- The variant with a complete system and optional programs and games. Aimed for end-users, gamers, testers and developers.config/your-cpu-arch/desktop-minimal.toml- The minimaldesktopvariant for low-end computers and embedded hardware. Aimed for servers, low-end computers, embedded hardware and developers.config/your-cpu-arch/minimal.toml- The variant without network support and Orbital. Aimed for low-end computers, embedded hardware, testers and developers.config/your-cpu-arch/minimal-net.toml- The variant without Orbital and tools. Aimed for low-end computers, embedded hardware, testers and developers.config/your-cpu-arch/resist.toml- The variant with theresistPOSIX test suite. Aimed for developers.config/your-cpu-arch/acid.toml- The variant with theacidgeneral-purpose test suite. Aimed for developers.config/your-cpu-arch/ci.toml- The continuous integration variant, recipes added here become packages on the build server. Aimed for packagers and developers.config/your-cpu-arch/jeremy.toml- The build of Jeremy Soller (creator/BDFL of Redox) with the recipes that he is testing at the moment.
Cookbook
prefix/*- Tools used by the Cookbook system. They are normally downloaded during the first system build.
(If you are having a problem with the build system, you can remove the prefix directory and it will be recreated during the next build)
cookbook/*- Part of the Cookbook system, these scripts and tools will build your recipes.cookbook/repo- Contains all packaged recipes.cookbook/recipes/recipe-name- A recipe (software port) directory (represented asrecipe-name), this directory holds therecipe.tomlfile.cookbook/recipes/recipe-name/recipe.toml- The recipe configuration file, this configuration contains instructions for downloading Git repositories or tarballs, then creating executables or other files to include in the Redox filesystem. Note that a recipe can contain dependencies that cause other recipes to be built, even if the dependencies are not otherwise part of your Redox build.
(To learn more about the recipe system read the Porting Applications using Recipes page)
cookbook/recipes/recipe-name/recipe.sh- The old recipe configuration format (can't be used as dependency of a recipe with a TOML syntax).cookbook/recipes/recipe-name/source.tar- The tarball of the recipe (renamed).cookbook/recipes/recipe-name/source- The directory where the recipe source is extracted or downloaded.cookbook/recipes/recipe-name/target- The directory where the recipe binaries are stored.cookbook/recipes/recipe-name/target/${TARGET}- The directory for the recipes binaries of the CPU architecture (${TARGET}is the environment variable of your CPU architecture).cookbook/recipes/recipe-name/target/${TARGET}/build- The directory where the recipe build system run its commands.cookbook/recipes/recipe-name/target/${TARGET}/stage- The directory where recipe binaries go before the packaging, aftermake all,make rebuildandmake imagethe installer will extract the recipe package on the QEMU image, generally at/usr/binor/usr/libin a Redox filesystem hierarchy.cookbook/recipes/recipe-name/target/${TARGET}/sysroot- The folder where recipe build dependencies (libraries) goes, for example:library-name/src/example.ccookbook/recipes/recipe-name/target/${TARGET}/stage.pkgar- Redox package file.cookbook/recipes/recipe-name/target/${TARGET}/stage.sig- Signature for thetarpackage format.cookbook/recipes/recipe-name/target/${TARGET}/stage.tar.gz- Legacytarpackage format, produced for compatibility reasons as we are working to make the package manager use thepkgarformat.cookbook/recipes/recipe-name/target/${TARGET}/stage.toml- Contains the runtime dependencies of the package and is part of both package formats.
Build System Files
build- The directory where the build system will place the final image. Usuallybuild/$(ARCH)/$(CONFIG_NAME), e.g.build/x86_64/desktopbuild/your-cpu-arch/your-config/harddrive.img- The Redox image file, to be used by QEMU or VirtualBox for virtual machine execution on a Unix-like host.build/your-cpu-arch/your-config/livedisk.iso- The Redox bootable image file, to be used on real hardware for testing and possible installation.build/your-cpu-arch/your-config/fetch.tag- An empty file that, if present, tells the build system that the downloading of recipe sources is done.build/your-cpu-arch/your-config/repo.tag- An empty file that, if present, tells the build system that all recipes required for the Redox image have been successfully built. The build system will not check for changes to your code when this file is present. Usemake rebuildto force the build system to check for changes.build/podman- The directory where Podman Build places the container user's home directory, including the container's Rust installation. Usemake container_cleanto remove it. In some situations, you may need to remove this directory manually, possibly with root privileges.build/container.tag- An empty file, created during the first Podman build, so a Podman build knows when a reusable Podman image is available. Usemake container_cleanto force a rebuild of the Podman image on your nextmake rebuildrun.
GNU Make Commands
You can combine make commands, but order is significant. For example, make r.games image will build the games recipe and create a new Redox image, but make image r.games will make the Redox image before the recipe building, thus the new recipe binary will not be included on your Redox filesystem.
Build System
make pull- Update the source code of the build system without building.make all- Builds the entire system, checking for changes and only building as required. Only use this for the first build. If the system was successfully built previously, this command may reportNothing to be done for 'all', even if some recipes have changed. Usemake rebuildinstead.make rebuild- Update all binaries from recipes with source code changes (it don't detect changes on the Redox toolchain), it should be your normalmaketarget.make prefix- Download the Rust/GCC forks and build relibc (it update the relibc binary with source code changes after themake pull,touch relibcandmake prefixcommands).make fstools- Build the image builder (installer), Cookbook and RedoxFS (aftertouch installerortouch redoxfs).make fstools_clean- Clean the image builder, Cookbook and RedoxFS binaries.make fetch- Update recipe sources, according to each recipe, without building them. Only the recipes that are included in your(CONFIG_NAME).tomlare downloaded. Does nothing if$(BUILD)/fetch.tagis present. You won't need this.make clean- Clean all recipe binaries (Note thatmake cleanmay require some tools to be built).make unfetch- Clean all recipe sources.make distclean- Clean all recipe sources and binaries (please backup or submit your source changes before the execution of this command).make repo- Package the recipe binaries, according to each recipe. Does nothing if$(BUILD)/repo.tagis present. You won't need this.make live- Creates a bootable image,build/livedisk.iso. Recipes are not usually rebuilt.make popsicle- Flash the Redox bootable image on your USB device using the Popsicle tool (the program executable must be present on your shell$PATHenvironment variable, you can get the executable by extracting the AppImage, installing from the package manager or building from source)make env- Creates a shell with a build environment configured to use the Redox toolchain. If you are using Podman Build it will change your current terminal shell to the container shell, you can use it to update crates of Rust programs or debug build issues such as missing packages (if you are using the Podman Build you can only use this command in one terminal shell, because it will block the build system directory access from other Podman shell)make container_shell- Open the GNU Bash shell of the Podman container as the active shell of your terminal, it's logged as thepodmanuser withoutrootprivileges (don't use this command to replace themake envcommand because it don't setup the Redox toolchain in the Podman container shell)make container_su- Open the GNU Bash shell of the Podman container as the active shell of your terminal, it's logged as therootuser (don't use this command to replace themake envcommand because it don't setup the Redox toolchain in the Podman container shell)make container_clean- This will discard images and other files created by Podman.make container_touch- If you have removed the filebuild/container.tag, but the container image is still usable, this will recreate thecontainer.tagfile and avoid rebuilding the container image.make container_kill- If you have started a build using Podman Build, and you want to stop it,Ctrl-Cmay not be sufficient. Use this command to terminate the most recently created container.
Recipes
-
make f.recipe-name- Download the recipe source. -
make r.recipe-name- Build a single recipe, checking if the recipe source has changed, and creating the executable, etc. e.g.make r.games(you can't use this command to replace themake all,make fstoolsandmake prefixcommands because it don't trigger them, make sure to run them before to avoid errors)The package is built even if it is not in your filesystem configuration.
(This command will continue where you stopped the build process, it's useful to save time if you had a compilation error and patched a crate)
-
make p.recipe-name- Add the recipe to an existing Redox image -
make c.recipe-name- Clean the recipe binaries. -
make u.recipe-name- Clean the recipe source code (please backup or submit your source changes before the execution of this command). -
make uc.recipe-name- A shortcut formake u.recipe c.recipe -
make cr.recipe-name- A shortcut formake c.recipe r.recipe -
make ucr.recipe-name- A shortcut formake u.recipe c.recipe r.recipe(please backup or submit your source changes before the execution of this command). -
make rp.recipe-name- A shortcut formake r.recipe p.recipe
All recipe commands (f, r, c, u, cr, ucr) can be run with multiple recipes, just separate them with a comma. for example: make f.recipe1,recipe2 will download the sources of recipe1 and recipe2
QEMU/VirtualBox
make image- Builds a new QEMU image,build/harddrive.img, without checking if any recipes have changed. It can save you some time if you are just updating one recipe withmake r.recipe-namemake mount- Mounts the Redox image as a filesystem at$(BUILD)/filesystem. Do not use this if QEMU is running, and remember to usemake unmountas soon as you are done. This is not recommended, but if you need to get a large file onto or off of your Redox image, this is available as a workaround.make unmount- Unmounts the Redox image filesystem. Use this as soon as you are done withmake mount, and do not start QEMU until this is done.make qemu- If abuild/harddrive.imgfile exists, QEMU will run using that image. If you want to force a rebuild first, usemake rebuild qemu. Sometimesmake qemuwill detect changes and rebuild, but this is not typical. If you are interested in a particular combination of QEMU command line options, have a look throughmk/qemu.mkmake qemu gpu=no- Start QEMU without a GUI (Orbital is disabled).make qemu gpu=virtio- Start QEMU with the VirtIO GPU driver.make qemu audio=no- Disable all sound drivers.make qemu usb=no- Disable all USB drivers.make qemu uefi=yes- Enable the UEFI boot loader (it supports more screen resolutions).make qemu live=yes- Fully load the Redox image to RAM.make qemu disk=nvme- Boot Redox from a NVMe interface (SSD emulation).make qemu disk=usb- Boot Redox from a virtual USB device.make qemu disk=cdrom- Boot Redox from a virtual CD-ROM disk.make qemu kvm=no- Start QEMU without the Linux KVM acceleration.make qemu iommu=no- Start QEMU without IOMMU.make qemu gdb=yes- Start QEMU with GDB support (you need to add thegdbserverrecipe on your filesystem configuration before, then run themake gdbcommand in another shell)make gdb- Connects the GDB from Linux/BSD/MacOSX to the GDB server (gdbserver) on Redox in QEMU.make qemu option1=value option2=value- Cumulative QEMU options are supported.make virtualbox- The same asmake qemu, but for VirtualBox (it requires the VirtualBox service to be running, runsystemctl status vboxdrv.serviceto verify orakmods; systemctl restart vboxdrv.serviceto enable on systems using systemd).
Environment Variables
$(BUILD)- Represents thebuildfolder.$(ARCH)- Represents the CPU architecture folder atbuild${TARGET}- Represents the CPU architecture folder at thecookbook/recipes/recipe-name/targetfolder$(CONFIG_NAME)- Represents your filesystem configuration folder atbuild/your-cpu-arch
We recommend that you use these variables with the " symbol to clean any spaces on the path, spaces are interpreted as command separators and will break the commands.
Example:
"${VARIABLE_NAME}"
If you have a folder inside the variable folder you can call it with:
"${VARIABLE_NAME}"/folder-name
Or
"${VARIABLE_NAME}/folder-name"
Scripts
You can use these scripts to perform actions not implemented as make commands in the build system.
- To run a script use the following command:
scripts/script-name.sh input-text
The "input-text" is the word used by the script.
Changelog
scripts/changelog.sh- Show the changelog of all Redox components.
Recipe Files
Show all files installed by a recipe.
scripts/find-recipe.sh recipe-name
Recipe Categories
Run make options on some recipe category.
scripts/category.sh -x category-name
Where x is your make option, it can be f, r, c, u, cr, ucr, uc or ucf
Include Recipes
Create a list with recipe-name = {} #TODO for quick testing of WIP recipes.
scripts/include-recipes.sh "TODO.text"
You will insert the text after the #TODO in the text part, it can be found on the recipe.toml file of the recipe.
If you want to add recipes to the ci.toml filesystem configuration to be available on the package build server, the recipe names must be sorted in alphabetical order, to do this from the output of this script use the following command:
scripts/include-recipes.sh "TODO.text" | sort
Recipe Analysis
Show the folders and files on the stage and sysroot folders of some recipe (to identify packaging issues or violations).
scripts/show-package.sh recipe-name
Recipe Commit Hash
Show the current Git branch and commit of the recipe source.
scripts/commit-hash.sh recipe-name
Package Size
Show the package size of the recipes (stage.pkgar and stage.tar.gz), it must be used by package maintainers to enforce the library linking size policy.
scripts/pkg-size.sh recipe-name
Recipe Location
Show the location of the written recipe.
scripts/recipe-path.sh recipe-name
Recipe Match
Search some text inside the recipe.toml of all recipes and show their content.
(Require bat and ripgrep installed, run cargo install bat ripgrep to install)
scripts/recipe-match.sh "text"
Print Recipe
Show the content of the recipe configuration.
scripts/print-recipe.sh recipe-name
Recipe Executables
List the recipe executables to find duplicates and conflicts.
- By default the script will only verify duplicates, if the
-aoption is used it will print the executable names of all compiled recipes - The
-arm64option will show the ARM64 recipe executables - The
-i686option will show the i686 recipe executables
scripts/executables.sh
Cargo Update
Download the recipe source and run cargo update
scripts/cargo-update.sh recipe-name
Dual Boot
scripts/dual-boot.sh- Install Redox in the free space of your storage device and add a boot entry (if you are using the systemd-boot boot loader).
Ventoy
scripts/ventoy.sh- Create and copy the Redox bootable image to an Ventoy-formatted device.
Recipe Debugging (Rust)
scripts/backtrace.sh- Allow the user to copy a Rust backtrace from Redox and retrieve the symbols (use the-hoption to show the "Usage" message).
Component Separation
relibc- The cross-compiled recipes will link to the relibc of this folder (build system submodule)redoxfs- The FUSE driver of RedoxFS (build system submodule, to run on Linux)cookbook/recipes/relibc- The relibc recipe to be installed inside of Redox for static or dynamic linking of binaries (for native compilation)cookbook/recipes/redoxfs- The RedoxFS user-space daemon that run inside of Redox (recipe)
Pinned Commits
The build system pin the last working commit of the submodules, if some submodule is broken because of some commit, the pinned commit avoid the fetch of this broken commit, thus pinned commits increase the development stability (broken changes aren't passed for developers and testers).
(When you run make pull the build system update the submodule folders based on the last pinned commit)
Current Pinned Submodules
cookbookinstallerredoxfsrelibcrust
Manual Submodule Update
Whenever a fix or new feature is merged on the submodules, the upstream build system must update the commit hash, to workaround this you can run git pull on the folder of the submodule directly, example:
make pull
cd submodule-folder-name
git checkout master
git pull
cd ..
Git Auto-checkout
The make rebuild and make r.recipe commands will Git checkout (change the active branch) of the recipe source to master (only recipes that fetch Git repositories are affected, thus all Redox components).
If you are working in a separated branch on the recipe source you can't build your changes, to avoid this comment out the [source] and git = fields from your recipe.toml :
#[source]
#git = "some-repository-link"
Submodules
The make pull command will Git checkout the submodules active branches to master and pin a commit in HEAD, if you are working on the build system submodules don't run this command, to keep the build system using your changes.
To update the build system while you have out-of-tree changes in some submodule, run these commands:
- This command will only update the root build system files
git pull
- Now you need to manually update each submodule folder without your changes
cd submodule-name
git checkout master
git pull
cd ..
Update The Build System
This is the recommended way to update your build system/recipe sources and binaries.
make pull rebuild
If the make pull command download new commits of the relibc submodule, you will need to run the commands of the Update relibc section.
(The Podman container is updated automatically if upstream add new packages to the Containerfile, but you can also force the container image to be updated with the make container_clean command)
Update Relibc
An outdated relibc copy can contain bugs (already fixed on recent commits) or missing APIs, to update the relibc sources and build it, run:
make pull
touch relibc
make prefix
Fix Breaking Changes
To learn how to fix breaking changes before and after build system updates read this section.
All recipes
To pass the new relibc changes for all recipes (programs are the most common case) you will need to rebuild all recipes, unfortunately it's not possible to use make rebuild because it can't detect the relibc changes to trigger a complete rebuild.
To clean all recipe binaries and trigger a complete rebuild, run:
make clean all
One Recipe
To pass the new relibc changes to one recipe, run:
make cr.recipe-name
Configuration
You can find the global settings on the Configuration Settings page.
Format
The Redox configuration files use the TOML format, it has a very easy syntax and is very flexbile.
You can see what the format supports on the TOML website.
Filesystem Customization
Read the Filesystem Customization section.
Cross-Compilation
The Redox build system is an example of cross-compilation. The Redox toolchain runs on Linux, and produces Redox executables. Anything that is installed with your package manager is just part of the toolchain and does not go on Redox.
In the background, the make all command downloads the Redox toolchain to build all recipes (patched forks of rustc, GCC and LLVM).
If you are using Podman, the podman_bootstrap.sh script will download an Ubuntu container and make all will install the Redox toolchain, all recipes will be compiled in the container.
The recipes produce Redox-specific executables. At the end of the build process, these executables are installed inside the QEMU image.
The relibc (Redox C Library) provides the Redox system calls to any software.
Build Phases
Every build system command/script has phases, read this page to know them.
Build Phases
Every build system command and script has phases, this page documents them.
- native_bootstrap.sh
- podman_bootstrap.sh
- make all (first run)
- make all (second run)
- make all (Podman, first run)
- make prefix
- make prefix (after "touch relibc")
- make rebuild
- make r.recipe
- make qemu
native_bootstrap.sh
This is the script used to do the initial configuration of the build system, see its phases below:
- Install the Rust toolchain (using rustup.rs) and add
cargoto the shell PATH. - Install the packages (based on your Unix-like distribution) of the development tools to build all recipes.
- Download the build system sources (if you run without the
-doption -./native_bootstrap.sh -d) - Show a message with the commands to build the Redox system.
podman_bootstrap.sh
This script is the alternative to native_bootstrap.sh for Podman, used to configure the build system for a Podman environment, see its phases below:
- Install Podman, GNU Make, FUSE and QEMU if it's not installed.
- Download the Debian container and install the recipe dependencies.
- Download the build system sources (if you run without the
-doption -./podman_bootstrap.sh -d) - Show a message with the commands to build the Redox system.
make all (first run)
This is the command used to build all recipes inside your default TOML configuration (config/your-cpu-arch/desktop.toml or the one inside your .config), see its phases below:
- Download the binaries of the Redox toolchain (patched rustc, GCC and LLVM) from the build server.
- Download the sources of the recipes specified on your TOML configuration.
- Build the recipes.
- Package the recipes.
- Create the QEMU image and install the packages.
make all (second run)
If the build/$ARCH/$CONFIG/repo.tag file is up to date, it won't do anything. If the repo.tag file is missing it will works like make rebuild.
make all (Podman environment, first run)
This command on Podman works in a different way, see its phases below:
- Download the Redox container (Ubuntu + Redox toolchain).
- Install the Rust toolchain inside the container.
- Install the Ubuntu packages of the development tools to build all recipes (inside the container).
- Download the sources of the recipes specified on your TOML configuration.
- Build the recipes.
- Package the recipes.
- Create the QEMU image and install the packages.
make prefix
This command is used to download the build system toolchain, see its phases below:
- Download the Rust and GCC forks from the build server (if it's not present or you if you executed
rm -rf prefixto fix issues). - Build the
relibcsubmodule.
make prefix (after "touch relibc")
- Build the new relibc changes
make rebuild
This is the command used to verify and build the recipes with changes, see its phases below:
- Verify source changes on recipes (if confirmed, download them) or if a new recipe was added to the TOML configuration.
- Build the recipes with changes.
- Package the recipes with changes.
- Create the QEMU image and install the packages.
make r.recipe
This is the command used to build a recipe, see its phases below.
- Search where the recipe is stored.
- Verify if the
sourcefolder is present, if not, download the source from the method specified inside therecipe.toml(this step will be ignored if the[source]andgit =fields are commented out). - Build the recipe dependencies as static objects (for static linking).
- Start the compilation based on the template of the
recipe.toml - If the recipe is using Cargo, it will download the crates, build them, link them/relibc to the program binary.
- If the recipe is using GNU Autotools, CMake or Meson, they will check the build environment and the presence library objects, build the libraries or the program and link them/relibc to the final binary.
- Package the recipe.
Typically, make r.recipe is used with make image to quickly build a recipe and create an image to test it.
make qemu
This is the command used to run Redox inside QEMU, see its phases below:
- It checks for pending changes, if found, it will trigger
make rebuild. - It checks the existence of the QEMU image, if not available, it will works like
make image. - A command with custom arguments is passed to QEMU to boot Redox without problems.
- The QEMU window is shown with a menu to choose the resolution.
- The bootloader does a bootstrap of the kernel, the kernel starts the init, the init starts the user-space daemons and Orbital.
- The Orbital login screen appear.
Developing for Redox
Currently Redox does not have a complete set of development tools that run natively. You must do your development on Linux or other Unix-like system, then include or copy your program to your Redox filesystem. This chapter outlines some of the things you can do as a developer.
(Before reading this chapter you must read the Build System page)
Including Programs in Redox
(Before reading this page you must read the Build System page)
This page will teach you how to add programs on the Redox image, it's a simplified version of the Porting Applications using Recipes page.
The Cookbook system makes the packaging process very simple. First, we will show how to add an existing program for inclusion. Then we will show how to create a new program to be included. In the Coding and Building page, we discuss the development cycle in more detail.
Existing Recipe
Redox has many programs that are available for inclusion. Each program has a recipe in the directory cookbook/recipes/recipe-name. Adding an existing program to your build is as simple as adding it to config/$ARCH/myfiles.toml, or whatever name you choose for your .toml configuration definition. Here we will add the games package, which contains several terminal games.
Setup the Redox Build Environment
- Follow the steps in the Building Redox or Native Build pages to create the Redox Build Environment on your system.
- Build the system as described. This will take quite a while the first time.
- Run the system in QEMU.
cd ~/tryredox/redox
make qemu
Assuming you built the default configuration desktop for x86_64, none of the Redox games (e.g. /usr/bin/minesweeper) have been included yet.
- On your Redox emulation, log into the system as user
userwith an empty password. - Open a
Terminalwindow by clicking on the icon in the toolbar at the bottom of the Redox screen, and typels /usr/bin. You will see thatminesweeperis not listed. - Type
Ctrl-Alt-Gto regain control of your cursor, and click the upper right corner of the Redox window to exit QEMU.
Setup your Configuration
Read the Configuration Settings page and follow the commands below.
- From your
redoxbase directory, copy an existing configuration and edit it.
cd ~/tryredox/redox
cp config/x86_64/desktop.toml config/x86_64/myfiles.toml
nano config/x86_64/myfiles.toml
- Look for the
[packages]section and add the package to the configuration. You can add the package anywhere in the[packages]section, but by convention, we add them to the end or to an existing related area of the section.
...
[packages]
# Add the item below under the "[packages]" section
redox-games = {}
...
- Add the
CONFIG_NAMEenvironment variable on your .config to use themyfiles.tomlconfiguration.
nano .config
# Add the item below
CONFIG_NAME?=myfiles
- Save your changes with Ctrl+X and confirm with
y
Build the System
- In your base
redoxfolder, e.g.~/tryredox/redox, build the system and run it in QEMU.
cd ~/tryredox/redox
make all
make qemu
Or
cd ~/tryredox/redox
make all qemu
- On your Redox emulation, log into the system as user
userwith an empty password. - Open a
Terminalwindow by clicking it on the icon in the toolbar at the bottom of the Redox screen, and typels /usr/bin. You will see thatminesweeperis listed. - In the terminal window, type
minesweeper. Play the game using the arrow keys orWSAD,spaceto reveal a spot,fto flag a spot when you suspect a mine is present. When you typef, anFcharacter will appear.
If you had a problem, use this command to log any possible errors on your terminal output:
make r.recipe-name 2>&1 | tee recipe-name.log
And that's it! Sort of.
Dependencies
Read the Dependencies section to learn how to handle recipe dependencies.
Update crates
Read the Update crates section to learn how to update crates on Rust programs.
Modifying an Existing Recipe
If you want to make changes to an existing recipe for your own purposes, you can do your work in the directory cookbook/recipes/recipe-name/source. The Cookbook process will not download sources if they are already present in that folder. However, if you intend to do significant work or to contribute changes to Redox, please read the Coding and Building page.
Create Your Own Hello World
To create your own program to be included, you will need to create the recipe. This example walks through adding the "Hello World" program that the cargo new command automatically generates to the folder of a Rust project.
This process is largely the same for other Rust programs.
Setting Up The Recipe
The Cookbook will only build programs that have a recipe defined in
cookbook/recipes. To create a recipe for the Hello World program, first create the directory cookbook/recipes/hello-world. Inside this directory create the "recipe.toml" file and add these lines to it:
[build]
template = "cargo"
The [build] section defines how Cookbook should build our project. There are
several templates but "cargo" should be used for Rust projects.
The [source] section of the recipe tells Cookbook how to download the Git repository/tarball of the program.
This is done if cookbook/recipes/recipe-name/source does not exist, during make fetch or during the fetch step of make all. For this example, we will simply develop in the source directory, so no [source] section is necessary.
Writing the program
Since this is a Hello World example, we are going to have Cargo write the code for us. In cookbook/recipes/hello-world, do the following:
mkdir source
cd source
cargo init --name="hello-world"
This creates a Cargo.toml file and a src directory with the Hello World program.
Adding the program to the Redox image
To be able to run a program inside of Redox, it must be added to the filesystem. As above, create a filesystem config config/x86_64/myfiles.toml or similar by copying an existing configuration, and modify CONFIG_NAME in .config to be myfiles. Open config/x86_64/myfiles.toml and add hello-world = {} below the [packages] section.
During the creation of the Redox image, the build system installs those packages on the image filesystem.
[packages]
# Add the item below
hello-world = {}
To build the Redox image, including your program, run the following commands:
cd ~/tryredox/redox
make r.hello-world image
Running your program
Once the rebuild is finished, run make qemu, and when the GUI starts, log in to Redox, open the terminal, and run helloworld. It should print
Hello, world!
Note that the hello-world binary can be found in /usr/bin on Redox.
Coding and Building
(Before reading this page you must read the Build System page)
This page covers common development tasks on the Redox build system.
- Visual Studio Code Configuration
- VS Code Tips and Tricks
- Development Tips
- Working with Git
- Using Multiple Windows
- Setup your Configuration
- The Recipe
- Git Clone
- Edit your Code
- Verify Your Code on Linux
- The Full Rebuild
- Test Your Changes
- Update crates
- Search Text On Files
- Checking In your Changes
- Shortening the Rebuild Time
- Working with an unpublished version of a crate
- A Note about Drivers
Visual Studio Code Configuration
Before you start the VS Code IDE to do Redox development, you need to run this command on your terminal:
rustup target add x86_64-unknown-redox
If the code that you are working on includes directives like #[cfg(target_os = "redox)], that code will be disabled by default. To enable live syntax and compiler warnings for that code, add the following line to your VS Code config file (.vscode/settings.json):
"rust-analyzer.cargo.target": "x86_64-unknown-redox"
If you are browsing a codebase that contains native dependencies (e.g. the kernel repository), you might get analyzer errors because of lacking GCC toolchain. To fix it, install redoxer and its toolchain redoxer toolchain, then add the GCC toolchain to your PATH config (e.g. in ~/.bashrc):
export PATH="$PATH:$HOME/.redoxer/toolchain/bin"
The redoxer toolchain is added to the last of PATH list to make sure it's not replacing cargo that you're using.
VS Code Tips and Tricks
Although not for every Rustacean, VS Code is helpful for those who are working with unfamiliar code. We don't get the benefit of all its features, but the Rust support in VS Code is very good.
If you have not used VS Code with Rust, here's an overview. VS Code installation instructions are here.
After installing the rust-analyzer extension as described in the overview, you get access to several useful features.
- Inferred types and parameter names as inline hints.
- Peeking at definitions and references.
- Refactoring support.
- Autoformat and clippy on Save (optional).
- Visual Debugger (if your code can run on Linux).
- Compare/Revert against the repository with the Git extension.
Using VS Code on individual packages works pretty well, although it sometimes take a couple of minutes to kick in. Here are some things to know.
Start in the "source" folder
In your Coding shell, start VS Code, specifying the source directory.
code ~/tryredox/redox/cookbook/recipes/games/source
Or if you are in the source directory, just code . with the period meaning the source dir.
Add it to your "Favorites" bar
VS Code remembers the last project you used it on, so typing code with no directory or starting it from your Applications window or Favorites bar will go back to that project.
After starting VS Code, right click on the icon and select Add to Favorites.
Wait a Couple of Minutes
You can start working right away, but after a minute or two, you will notice extra text appear in your Rust code with inferred types and parameter names filled in. This additional text is just hints, and is not permanently added to your code.
Save Often
If you have made significant changes, rust-analyzer can get confused, but this can usually be fixed by doing Save All.
Don't Use it for the whole of Redox
VS Code cannot grok the gestalt of Redox, so it doesn't work very well if you start it in your redox base directory. It can be handy for editing recipes, config and make files. And if you want to see what you have changed in the Redox project, click on the Source Control icon on the far left, then select the file you want to compare against the repository.
Don't Build the System in a VS Code Terminal
In general, it's not recommended to do a system build from within VS Code. Use your Build window. This gives you the flexibility to exit Code without terminating the build.
Development Tips
- Make sure your build system is up-to-date, read the Update The Build System section in case of doubt.
- If some program can't build or work something could be missing/hiding on relibc, like a POSIX/Linux function or bug.
- If you have some error on QEMU remember to test different settings or verify your operating system (Pop_OS!, Ubuntu, Debian and Fedora are the recommend Linux distributions to do testing/development for Redox).
- Remember to log all errors, you can use this command as example:
your-command 2>&1 | tee file-name.log
- If you have a problem that seems to not have a solution, think on simple/stupid things, sometimes you are very confident on your method and forget obvious things (it's very common).
- If you want a more quick review of your Merge Request, make it small.
- If your big Merge Request is taking too long to be reviewed and merged try to shrink it with small MRs. Make sure it don't break anything, if this method break your changes, don't shrink.
Working with Git
Before starting the development, read the Creating Proper Pull Requests page, which describes how the Redox team uses Git.
In this example, we will discuss how to create a fork of the games recipe, pretending you are going to create a Merge Request for your changes. Don't actually do this. Only create a fork when you have changes that you want to send to Redox upstream.
Anonymous commits
If you are new to Git, it request your username and email before the first commit on some offline repository, if you don't want to insert your personal information, run:
- Repository
cd your-repository-folder
git config user.name 'Anonymous'
git config user.email '<>'
This command will make you anonymous only on this repository.
- Global
git config --global user.name 'Anonymous'
git config --global user.email '<>'
This command will make you anonymous in all repositories of your user.
Using Multiple Windows
For clarity and easy of use, we will be using two terminal tabs on your system, each running a different GNU Bash shell instance.
- The
Buildshell, normally at~/tryredox/redoxor where your baseredoxdirectory is. - The
Codingshell, atcookbook/recipes/games/redox-games/source.
Setup your Configuration
To get started, follow the steps in the Including Programs in Redox page to include the games package on your myfiles configuration file. In your terminal window, go to your redox base directory and run:
make qemu
On Redox, run minesweeper as described in the link above. Type the letter f and you will see F appear on your screen. Use Ctrl-Alt-G to regain control of your cursor, and click the upper right corner to exit QEMU.
Keep the terminal window open. That will be your Build shell.
The Recipe
Let's walk through contributing to the recipe redox-games, which is a collection of terminal games. We are going to modify minesweeper to display P instead of F on flagged spots.
The redox-games recipe is built in the folder cookbook/recipes/games/redox-games. When you download the redox base package, it includes a file cookbook/recipes/games/redox-games/recipe.toml. The recipe tells the build system how to get the source and how to build it.
When you build the system and include the redox-games recipe, the toolchain does a git clone into the directory cookbook/recipes/games/redox-games/source. Then it builds the recipe in the directory cookbook/recipes/games/redox-games/target.
Edit the recipe so it does not try to automatically download the sources.
- Create a
Terminalwindow runningbashon your system, which we will call yourCodingshell. - Change to the
redox-gamesdirectory. - Open
recipe.tomlin a text editor.
cd ~/tryredox/redox/cookbook/recipes/games/redox-games
nano recipe.toml
- Comment out the
[source]section at the top of the file.
# [source]
# git = "https://gitlab.redox-os.org/redox-os/games.git"
- Save your changes.
Git Clone
To setup this recipe for contributing, do the following in your Coding shell.
- Delete the
sourceandtargetdirectories incookbook/recipes/games/redox-games. - Clone the package into the
sourcedirectory, either specifying it in thegit cloneor by moving it afterclone.
rm -rf source target
git clone https://gitlab.redox-os.org/redox-os/games.git --origin upstream --recursive
mv games source
-
If you are making a change that you want to contribute, (you are not, don't actually do this) at this point you should follow the instructions in Creating Proper Pull Requests, replacing
redox.gitwithgames.git. Make sure you fork the correct repository, in this case redox-os/games. Remember to create a new branch before you make any changes. -
If you want to Git Clone a remote repository (main repository/your fork), you can add these sections on your
recipe.toml:
[source]
git = your-git-link
branch = your-branch # optional
Edit your Code
- Using your favorite code editor, make your changes. We use
nanoin this example, from yourCodingshell. You can also use VS Code.
cd source
nano src/minesweeper/main.rs
- Search for the line containing the definition of the
FLAGGEDconstant (around line 36), and change it toP.
const FLAGGED: &'static str = "P";
Verify Your Code on Linux
Most Redox programs are source-compatible with Linux without being modified. You can (and should) build and test your program on Linux.
- From within the
Codingshell, go to thesourcedirectory and use the Linux version ofcargoto check for errors.
cargo check
(Since much of the code in redox-games is older (pre-2018 Rust), you will get several warnings. They can be ignored)
You could also use cargo clippy, but minesweeper is not clean enough to pass.
- The
redox-gamesrecipe creates more than one executable, so to testminesweeperon Linux, you need to specify it tocargo. In thesourcedirectory, do:
cargo run --bin minesweeper
The Full Rebuild
After making changes to your recipe, you can use the make rebuild command, which will check for any changes to recipe and make a new Redox image. make all and make qemu do not check for recipes that need to be rebuilt, so if you use them, your changes may not be included in the system. Once you are comfortable with this process, you can try some tricks to save time.
- Within your
Buildshell, in yourredoxdirectory, do:
make rebuild 2>&1 | tee build.log
- You can now scan through
build.logto check for errors. The file is large and contains many ANSI Escape Sequences, so it can be hard to read. However, if you encountered a fatal build error, it will be at the end of the log, so skip to the bottom and scan upwards.
Test Your Changes
In the Redox instance started by make qemu, test your changes to minesweeper.
- Log in with user
userand no password. - Open a
Terminalwindow. - Type
minesweeper. - Use your arrow keys or
WSADto move to a square and typefto set a flag. The characterPwill appear.
Congratulations! You have modified a program and built the system! Next, create a bootable image with your change.
- If you are still running QEMU, type
Ctrl-Alt-Gand click the upper right corner of the Redox window to exit. - In your
Buildshell, in theredoxdirectory, do:
make live
In the directory build/x86_64/myfiles, you will find the file livedisk.iso. Follow the instructions on the Testing on Real Hardware section and test out your change.
Test Your Changes (out of the Redox build system)
Redoxer is the tool used to build and run Rust programs (and C/C++ programs with zero dependencies) for Redox, it download the Redox toolchain and use Cargo.
Commands
- Install the tool
cargo install redoxer
- Install the Redox toolchain
redoxer toolchain
- Build the Rust program or library with Redoxer
redoxer build
- Run the Rust program on Redox
redoxer run
- Test the Rust program or library with Redoxer
redoxer test
- Run arbitrary executable (
echo hello) with Redoxer
redoxer exec echo hello
Testing On Real Hardware
You can use the make live command to create bootable images, it will be used instead of make image.
This command will create the file build/your-cpu-arch/your-config/livedisk.iso, you will burn this image on your USB device, CD or DVD disks (if you have an USB device, Popsicle is the recommended method to flash your device).
Full bootable image creation
- Update your recipes and create a bootable image:
make rebuild live
Partial bootable image creation
- Build your source changes on some recipe and create a bootable image (no QEMU image creation):
make cr.recipe-name live
- Manually update multiple recipes and create a bootable image (more quick than
make rebuild):
make r.recipe1 r.recipe2 live
Flash the bootable image on your USB device
If you can't use Popsicle, you can use the Unix tool dd, follow the steps below:
- Go to the files of your Cookbook configuration:
cd build/your-cpu-arch/your-config
- Flash your device with
dd
First you need to find your USB device ID, use this command to show the IDs of all connected disks on your computer:
ls /dev/disk/by-id
Search for the items beginning with usb and find your USB device model, you will copy and paste this ID on the dd command below (don't use the IDs with part-x in the end).
sudo dd if=livedisk.iso of=/dev/disk/by-id/usb-your-device-model oflag=sync bs=4M status=progress
In the /dev/disk/by-id/usb-your-device-model path you will replace the usb-your-device-model part with your USB device ID obtained before.
Double-check the "of=/dev/disk/by-id/usb-your-device-model" part to avoid data loss
Burn your CD/DVD with the bootable image
- Go to the files of your Cookbook configuration:
cd build/your-cpu-arch/your-config
- Verify if your optical disk device can write on CD/DVD
cat /proc/sys/dev/cdrom/info
Check if the items "Can write" has 1 (Yes) or 0 (No), it also show the optical disk devices on the computer: /dev/srX.
- Burn the disk with xorriso
xorriso -as cdrecord -v -sao dev=/dev/srX livedisk.iso
In the /dev/srX part, the x letter is your optical device number.
Update crates
Search Text On Files
To find which package contains a particular command, crate or function call, you can use the grep command.
This will speed up your development workflow.
- Command examples
grep -rnw "redox-syscall" --include "Cargo.toml"
This command will find any "Cargo.toml" file that contains the phrase "redox-syscall". Helpful for finding which package contains a command or uses a crate.
grep -rni "physmap" --include "*.rs"
This command will find any ".rs" file that contains the string "physmap". Helpful for finding where a function is used or defined.
Options context:
-
-n- display the line number of the specified text on each file. -
-r- Search directories recursively. -
-w- Match only whole words. -
-i- Ignore case distinctions in patterns and data. -
grep explanation - GeeksforGeeks article explaining how to use the
greptool.
Checking In Your Changes
Don't do this now, but if you were to have permanent changes to contribute to a recipe, at this point, you would git push and create a Merge Request, as described in Creating Proper Pull Requests.
If you were contributing a new package, such as porting a Rust application to Redox, you would need to check in the recipe.toml file. It goes in the cookbook subproject. You may also need to modify a filesystem config file, such as config/your-cpu-arch/demo.toml. It goes in the redox project. You must fork and do a proper Pull Request for each of these projects. Please coordinate with the Redox team on the chat before doing this.
Shortening the Rebuild Time
To skip some of the steps in a full rebuild, here are some tricks.
Build your recipe for Redox
You can build just the redox-games recipe, rather than having make rebuild verifying each recipe for changes. This can help shorten the build time if you are trying to resolve issues such as compilation errors or linking to libraries.
- In your
Buildshell, in theredoxdirectory, type:
make r.redox-games
Build system Makefiles have a rule for r.recipe-name, where recipe-name is the name of a Redox recipe. It will make that recipe, ready to load into the Redox filesystem.
Once your Redox recipe has been successfully built, you can use make rebuild to create the image, or, if you are confident you have made all packages successfully, you can skip a complete rebuild and just make a new image.
If you had a problem, use this command to log any possible errors on your terminal output:
make cr.recipe-name 2>&1 | tee recipe-name.log
Make a New QEMU Image
Now that all the packages are built, you can make a Redox image without the step of checking for modifications.
- In your
Buildshell, in theredoxdirectory, do:
make image
make imageskips building any packages (assuming the last full make succeeded), but it ensures a new image is created, which should include the recipe you built in the previous step.
Most Quick Way To Test Your Changes
Run:
make r.recipe-name image qemu
Or (if your change don't allow incremental compilation)
make cr.recipe-name image qemu
This command will build just your modified recipe, then update your QEMU image with your modified recipe and run QEMU with Orbital.
Insert Text Files On QEMU (quickest method)
If you need to move text files, such as shell scripts or command output, from or to your Redox instance running on QEMU, use your Terminal window that you used to start QEMU. To capture the output of a Redox command, run script before starting QEMU.
tee qemu.log
make qemu gpu=no
redox login: user
# execute your commands, with output to the terminal
# exit QEMU
# exit the shell started by script
exit
The command output will now be in the file qemu.log. Note that if you did not exit the script shell, the output may not be complete.
To transfer a text file, such as a shell script, onto Redox, use the Terminal window with copy/paste.
redox login: user
cat > myscript.sh << EOF
# Copy the text to the clipboard and use the Terminal window paste
  EOF
If your file is large, or non-ASCII, or you have many files to copy, you can use the process described in the Insert Files On QEMU Image section. However, you do so at your own risk.
Files you create while running QEMU remain in the Redox image, so long as you do not rebuild the image. Similarly, files you add to the image will be present when you run QEMU, so long as you do not rebuild the image.
Make sure you are not running QEMU. Run make mount. You can now use your file browser to navigate to build/x86_64/myfiles/filesystem. Copy your files into or out of the Redox filesystem as required. Make sure to exit your file browser window, and use make unmount before running make qemu.
Note that in some circumstances, make qemu may trigger a rebuild (e.g. make detects an out of date file). If that happens, the files you copied into the Redox image will be lost.
Insert files on the Redox image using a recipe
You can use a Redox package to put your files inside the Redox filesystem, in this example we will use the recipe myfiles for this:
- Create the
sourcefolder inside themyfilesrecipe directory and copy or move your files to it:
mkdir cookbook/recipes/other/myfiles/source
- Build the recipe and add on the Redox image:
make rp.myfiles
- Add the
myfilesrecipe below the[packages]section of your filesystem configuration atconfig/your-cpu-arch/your-config.toml(if you want your files to be automatically added to new images):
[packages]
...
myfiles = {}
...
- Open QEMU to verify your files:
make qemu
This recipe will make Cookbook package all files in the source folder to be installed in the /home/user directory on your Redox filesystem.
Insert Files In The QEMU Image
If you feel the need to skip creating a new image, and you want to directly add a file to the existing Redox image, it is possible to do so. However, this is not recommended. You should use a recipe to make the process repeatable. But here is how to access the Redox image as if it were a Linux filesystem.
-
NOTE: You must ensure that Redox is not running in QEMU when you do this.
-
In your
Buildshell, in theredoxdirectory, type:
make mount
The Redox image is now mounted as a directory at build/x86_64/your-config/filesystem.
- Unmount the filesystem and test your image. NOTE: You must unmount before you start QEMU.
cd ~/tryredox/redox
make unmount
make qemu
Working with an unpublished version of a crate
Some recipes use Cargo dependencies (Cargo.toml) with recipe dependencies (recipe.toml), if you are making a change to one of these Cargo dependencies, your merged changes will take a while to appear on crates.io as we publish to there instead of using our GitLab fork.
To test your changes quickly, follow these tutorials on Cargo documentation:
A Note about Drivers
The drivers and drivers-initfs recipes share the source folder, thus your changes on the drivers recipe source code will added on the drivers-initfs recipe automatically.
(The recipe.toml of the drivers-initfs recipe use the same_as data type to symlink the source, you can read the second line of the drivers-initfs recipe)
When you're about to test drivers change, double check if you're applying for drivers in drivers-initfs by checking its recipe file in the former link. If you do, you need to trigger changes for base-initfs manually so it can save initfs drivers into base-initfs:
make r.drivers-initfs cr.base-initfs
The same rule also applies when you're about to change redoxfs.
Application Porting
The Including Programs in Redox page gives an example to port/modify a pure Rust program, in this page we explain the advanced way to port pure Rust programs, mixed Rust programs (Rust and C/C++ libraries, for example), C/C++ programs and others.
(Before reading this page you must read the Build System page)
- Recipe
- Cookbook
- Cookbook - Custom Template
- Functions
- Environment Variables
- Packaging Behavior
- GNU Autotools script
- GNU Autotools configuration script
- CMake script
- Meson script
- Cargo script
- Analyze the source code of a Rust program
- Cargo packages command example
- Cargo bins script example
- Cargo flags command example
- Disable the default Cargo flags
- Enable all Cargo flags
- Cargo profiles command example
- Cargo examples command example
- Rename binaries
- Change the active source code folder
- Configuration files
- Script-based programs
- Dynamically Linked Programs
- Sources
- Dependencies
- Feature Flags
- Building/Testing The Program
- Update crates
- Patch crates
- Cleanup
- Search Text On Recipes
- Search for functions on relibc
- Create a BLAKE3 hash for your recipe
- Verify the size of your package
- Submitting MRs
Recipe
A recipe is how we call a software port on Redox, this section explain the recipe configuration and details to consider.
Create a folder at cookbook/recipes/program-category with a file named as recipe.toml inside, we will modify this file to fit the program needs.
- Recipe creation from terminal with GNU Nano:
cd ~/tryredox/redox
mkdir cookbook/recipes/program-category/program-name
nano cookbook/recipes/program-category/program-name/recipe.toml
Recipe Configuration Example
The recipe configuration (recipe.toml) example below contain all supported recipe options. Adapt for your script, program, library or data files.
TOML sections and data types can also be mentioned using the section-name.data-type-name format for easier explanation and better explanation writing.
[source]
git = "repository-link" # source.git data type
upstream = "repository-link" # source.upstream data type
branch = "branch-name" # source.branch data type
rev = "version-tag" # source.rev data type
tar = "tarball-link.tar.gz" # source.tar data type
blake3 = "source-hash" # source.blake3 data type
patches = [ # source.patches data type
    "patch1.patch",
    "patch2.patch",
]
same_as = "../program-name" # source.same_as data type
script = """ # source.script data type
insert your script here
"""
[build]
template = "build-system" # build.template data type
cargoflags = "--option-name" # build.cargoflags data type
configureflags = [ # build.configureflags data type
    "OPTION1=text",
    "OPTION2=text",
]
cmakeflags = [ # build.cmakeflags data type
    "-DOPTION1=text",
    "-DOPTION2=text",
]
mesonflags = [ # build.mesonflags data type
    "-Doption1=text",
    "-Doption2=text",
]
dependencies = [ # build.dependencies data type
    "library1",
    "library2",
]
script = """ # build.script data type
# Uncomment the following if the package can be dynamically linked
#DYNAMIC_INIT
insert your script here
"""
[package]
dependencies = [ # package.dependencies data type
    "runtime-dependency1",
    "runtime-dependency2",
]
[source]- Section for data types that manage the program source (only remove it if you have asourcefolder)source.git- Git repository of the program (can be removed if a Git repository is not used), you can comment out it to not allow Cookbook to force agit pullor change the active branch tomasterormainsource.upstream- If you are using a fork of the program source with patches add the program upstream source here (can be removed if the upstream source is being used on thegitdata type)source.branch- Program version Git branch or patched Git branch (can be removed if using a tarball or themasterormainGit branches are being used)source.rev- Git tag or commit hash of the latest stable version or last working commit of the program (can be removed if you are using a tarball or waiting Rust library version updates)source.tar- Program source tarball (can be removed if a tarball is not used)source.blake3- Program source tarball BLAKE3 hash, can be generated using theb3sumtool, install with thecargo install b3sumcommand (can be removed if using a Git repository or under porting)source.patches- Data type to load.patchfiles (can be removed if patch files aren't used)"patch1.patch",- The patch file name (can be removed if thepatchesdata type above is not present)source.same_as- Insert the folder of other recipe to make a symbolic link to thesourcefolder of other recipe, useful if you want modularity with synchronizationsource.script- Data type used when you need to change the build system configuration (to regenerate the GNU Autotools configuration, for example)[build]- Section for data types that manage the program compilation and packagingbuild.template- Insert the program build system (cargofor Rust programs,configurefor programs using GNU Autotools andcustomfor advanced porting with - custom commands)build.cargoflags- Data type for Cargo flags (string)build.configureflags- Data type for GNU Autotools flags (array)build.cmakeflags- Data type for CMake flags (array)build.mesonflags- Data type for Meson flags (array)build.dependencies- Data type to add dynamically or statically linked library dependencies"library1",- Library recipe name (can be removed if thedependenciesdata type above is not present)build.script- Data type to load the custom commands for compilation and packaging[package]- Section for data types that manage the program packagepackage.dependencies- Data type to add tools, interpreters or "data files" recipes to be installed by the package manager or build system installer"runtime-dependency1",- Tool, interpreter or data recipe names (can be removed if thedependenciesdata type above is not present)
Quick Recipe Template
This is a recipe template for a quick porting workflow.
#TODO not compiled or tested
[source]
git = "repository-link"
rev = "version-tag"
tar = "tarball-link"
[build]
template = "build-system"
dependencies = [
    "library1",
]
You can quickly copy and paste this template on each recipe.toml, that way you spent less time writting and has less chances for typos.
- If your program use a tarball, you can quickly remove the
gitandrevdata types. - If your program use a Git repository, you can quickly remove the
tardata type. - If you don't need to pin a Git tag or commit hash for the latest stable release or last working commit, you can quickly remove the
revdata type. - If the program don't need C, C++ or patched Rust dependencies, you can quickly remove the
dependencies = []section.
After the #TODO comment you will write your current porting status.
Cookbook
The GCC and LLVM compiler frontends on Linux use the Linux target triplet by default, it will create Linux ELF binaries that don't work on Redox because it can't undertstand them.
Part of this process is to use glibc (GNU C Standard Library) which don't support Redox system calls, to make the compiler use relibc (Redox C Standard Library) Cookbook need to tell the build system of the program or library to use it, it's done with environment variables and target/platform flags for the Redox target.
Cookbook have build system templates to avoid custom commands for cross-compilation, but it's not always possible because some build systems or programs aren't standardized or adapted for cross-compilation.
(Build systems have different methods to enable cross-compilation and pass a different C standard library to the compiler, you will need to read their documentation, program/library specific configuration or hack them)
Cross Compiler
Cookbook use Rust/GCC forks to do cross-compilation of recipes (programs) with relibc to any supported CPU architecture, you can check our cross-compilers on GitLab (GCC, LLVM, Rust and their pre-compiled binaries).
Cross Compilation
The Cookbook default compilation type is cross-compilation because it reduces the requirements to run programs on Redox and allow us to do Redox development from Linux and other Unix-like systems.
By default Cookbook use the CPU architecture of your host system but you can change it easily on your .config file (ARCH? environment variable).
- Don't use a hardcoded CPU architecture in the
scriptdata types of yourrecipe.toml, it breaks cross-compilation with a different CPU architecture is used by the build system. - All recipes must use our cross-compilers, a Cookbook template does this automatically but it's not always possible, read the build system configuration of your program/library to find these options or patch the configuration files.
Templates
A recipe template is the build system of the program or library supported by Cookbook.
template = "cargo"- Build with Cargo using cross-compilation and static linking (Rust programs with one package in the Cargo workspace).template = "configure"- Build with GNU Autotools/GNU Make using cross-compilation and dynamic linking.template = "cmake"- Build with CMake using cross-compilation and dynamic linking.template = "meson"- Build with Meson using cross-compilation and dynamic linking.template = "remote"- Download the remote Redox package of the recipe if available in the package servertemplate = "custom"- Run your commands on thescript =field and build (Any build system or installation process).
The script = field runs any terminal command supported by GNU Bash, it's important if the build system of the program don't support cross-compilation or need custom options to work on Redox (you can't use the build.script data type if the custom template is not used).
Each template (except custom) script supports build flags, you can add flags as an array of strings:
cargoflags = "foo"configureflags = [ "foo" ]cmakeflags = [ "foo" ]mesonflags = [ "foo" ]
To find the supported Cookbook Bash functions, look the recipes using a script = field on their recipe.toml or read the source code.
Cases
- Programs using the Cargo build system have a
Cargo.tomlfile - Programs using the GNU Autotools build system have a
configureorautogen.shfile in the source tarball - Programs using the CMake build system have a
CMakeLists.txtfile - Programs using the Meson build system have a
meson.buildfile
Metapackages
Metapackages are packages without any files, just dependencies. Use the following recipe example to create a metapackage:
[package]
dependencies = [
    "package1",
    "package2",
]
Cookbook - Custom Template
The custom template enable the build.script = data type to be used, this data type will run any command supported by the GNU Bash shell. The shell script will be wrapped with Bash functions and variables to aid the build script. The wrapper can be found in this Cookbook source file.
- Script example
[build]
script = """
first-command
second-command
"""
The script section starts at the location of the ${COOKBOOK_BUILD} environment variable (recipe-name/target/$TARGET/build). This ${COOKBOOK_BUILD} will be an empty folder, while recipe sources are in ${COOKBOOK_SOURCE}. It is expected that the build script will not modify anything in ${COOKBOOK_SOURCE}, otherwise, please use the source.script = data type.
Functions
Each template has a Bash function to be used in the script data type when you need to customize the template configuration to fix the program compilation or enable/disable features.
cookbook_cargo- Bash function of thecargotemplatecookbook_configure- Bash function of theconfiguretemplatecookbook_cmake- Bash function of thecmaketemplatecookbook_meson- Bash function of themesontemplateDYNAMIC_INIT- Bash function to configure the recipe to be dynamically linkedDYNAMIC_STATIC_INIT- Bash function to configure the recipe to be both statically and dynamically linked (library recipe only)
Environment Variables
These variables available in the script:
-
${TARGET}- Redox compiler triple target ($ARCH-unknown-redox) -
${GNU_TARGET}- Redox compiler triple target (GNU variant) -
${COOKBOOK_MAKE_JOBS}- Total CPU threads available -
${COOKBOOK_RECIPE}- Recipe folder. -
${COOKBOOK_ROOT}- The Cookbook directory. -
${COOKBOOK_SOURCE}- Thesourcefolder atrecipe-name/source(program source). -
${COOKBOOK_SYSROOT}- Thesysrootfolder atrecipe-name/target/$TARGET/sysroot(library sources). -
${COOKBOOK_BUILD}- Thebuildfolder atrecipe-name/target/$TARGET/build(recipe build system). -
${COOKBOOK_STAGE}- Thestagefolder atrecipe-name/target/$TARGET/stage(recipe binaries). -
For RISC-V,
${TARGET}and${GNU_TARGET}isriscv64gc-unknown-redoxandriscv64-unknown-redox, usually you want${TARGET}unless the script requires a GNU target triple. -
To get
$ARCH, you need to addARCH="${TARGET%%-*}"to the beginning of the script.
There are more variables depending on the build script that you are using.
We recommend that you use path environment variables with the " symbol to clean any invalid characters (like spaces) on the path, spaces are interpreted as command separators and will break the path.
Example:
"${VARIABLE_NAME}"
If you have a folder inside the variable folder you can call it with:
"${VARIABLE_NAME}"/folder-name
Or
"${VARIABLE_NAME}/folder-name"
Quick Template
You can quickly copy these environment variables from this section.
"${COOKBOOK_SOURCE}/"
"${COOKBOOK_BUILD}/"
"${COOKBOOK_SYSROOT}/"
"${COOKBOOK_STAGE}/"
Packaging Behavior
Cookbook download the recipe sources on the source folder (recipe-name/source), copy the contents of this folder to the build folder (recipe-name/target/$TARGET/build), build the sources and move the binaries to the stage folder (recipe-name/target/$TARGET/stage).
If your recipe has library dependencies, it will copy the library source and linker objects to the sysroot folder to be used by the build folder.
- Moving the program files to the Redox filesystem
The "${COOKBOOK_STAGE}"/ path is used to specify where the recipe files will be stored in the Redox filesystem, in most cases /usr/bin and /usr/lib.
You can see path examples for most customized recipes below:
"${COOKBOOK_STAGE}"/ # The root of the Redox build system
"${COOKBOOK_STAGE}"/usr/bin # The folder where all system-wide executables go
"${COOKBOOK_STAGE}"/usr/lib # The folder where all system-wide static and shared library objects go
GNU Autotools script
Use this script if the program or library needs to be compiled with custom options
- Configure with dynamic linking
script = """
DYNAMIC_INIT
COOKBOOK_CONFIGURE_FLAGS+=(
    --option1
    --option2
)
cookbook_configure
"""
- GNU Make without Configure
script = """
DYNAMIC_INIT
COOKBOOK_CONFIGURE_FLAGS+=(
    --option1
    --option2
)
COOKBOOK_CONFIGURE="true"

rsync -av --delete "${COOKBOOK_SOURCE}/" ./
cookbook_configure
"""
Definition of cookbook_configure is roughly:
function cookbook_configure {
    "${COOKBOOK_CONFIGURE}" "${COOKBOOK_CONFIGURE_FLAGS[@]}" "$@"
    "${COOKBOOK_MAKE}" -j "${COOKBOOK_MAKE_JOBS}"
    "${COOKBOOK_MAKE}" install DESTDIR="${COOKBOOK_STAGE}"
}
GNU Autotools configuration script
Sometimes the program tarball or repository is lacking the configure script, so you will need to generate this script.
- Add the following code below the
[source]section
script = """
DYNAMIC_INIT
autotools_recursive_regenerate
"""
CMake script
Use this script for programs using the CMake build system, more CMake options can be added with a -D before them, the customization of CMake compilation is very easy.
- CMake using dynamic linking
script = """
DYNAMIC_INIT
COOKBOOK_CMAKE_FLAGS+=(
    -DOPTION1=text
    -DOPTION2=text
)
cookbook_cmake
"""
- CMake inside a subfolder
script = """
DYNAMIC_INIT
COOKBOOK_CMAKE_FLAGS+=(
    -DOPTION1=text
    -DOPTION2=text
)
cookbook_cmake "${COOKBOOK_SOURCE}"/subfolder
"""
Definition of cookbook_cmake is roughly:
function cookbook_cmake {
    "${COOKBOOK_CMAKE}" "${COOKBOOK_SOURCE}" \
        "${COOKBOOK_CMAKE_FLAGS[@]}" \
        "$@"

    "${COOKBOOK_NINJA}" -j"${COOKBOOK_MAKE_JOBS}"
    DESTDIR="${COOKBOOK_STAGE}" "${COOKBOOK_NINJA}" install -j"${COOKBOOK_MAKE_JOBS}"
}
Meson script
Use this script for programs using the Meson build system, more Meson options can be added with a -D before them, the customization of Meson compilation is very easy.
Keep in mind that some programs and libraries need more configuration to work.
- Meson using dynamic linking
script = """
DYNAMIC_INIT
COOKBOOK_MESON_FLAGS+=(
    -Doption1
    -Doption2
)
cookbook_meson
"""
- Meson inside a subfolder
script = """
DYNAMIC_INIT
COOKBOOK_MESON_FLAGS+=(
    -Doption1
    -Doption2
)
cookbook_meson "${COOKBOOK_SOURCE}"/subfolder
"""
Cargo script
Use this script if you need to customize the cookbook_cargo function.
script = """
COOKBOOK_CARGO_FLAGS=(
    --bin foo
)
PACKAGE_PATH="subfolder" cookbook_cargo "${COOKBOOK_CARGO_FLAGS[@]}"
"""
If the project is roughly a simple Cargo project then cookbook_cargo is all that you need.
script = """
cookbook_cargo
"""
Analyze the source code of a Rust program
Rust programs and libraries use the Cargo.toml configuration file to configure the build system and source code.
While packaging Rust programs you need to know where the main executable is located in the Cargo project, to do this you need to verify the Cargo.toml files of the project.
A Rust program can have one or more Cargo packages to build, read the common assumptions below:
- Most Rust programs with a
srcfolder use one Cargo package, thus you can use thecargotemplate. - Most Rust programs with multiple Cargo packages name the main package with the name of the program.
Beyond these common source code organization, there are special cases.
- In some Rust programs the
Cargo.tomlfile contains one of these data types:
[[bin]]
name = "executable-name"
[[lib]]
name = "library-object-name"
The [[bin]] is what you need, the program executable is built by this Cargo package.
But some programs don't have the [[bin]] and [[lib]] data types, for these cases you need to see the source code files, in most cases at the src folder.
- The file named
main.rscontains the program executable code. - The file named
lib.rscontains the library object code (ignore it).
(Some Rust programs use packages instead of example files for examples, to discover that see if the "examples" folder has .rs files (examples files) or folders with Cargo.toml files inside (packages) )
Cargo packages command example
This command is used for Rust programs that use package folders inside the repository for compilation, you need to use the name on the name field below the [package] section of the Cargo.toml file inside the package folder (generally using the same name of the program).
(This will fix the "found virtual manifest instead of package manifest" error)
script = """
cookbook_cargo_packages program-name
"""
(You can use cookbook_cargo_packages program1 program2 if it's more than one package)
Cargo package with flags
If you need a script for a package with flags (customization), you can use this script:
script = """
package=package-name
"${COOKBOOK_CARGO}" build \
            --manifest-path "${COOKBOOK_SOURCE}/Cargo.toml" \
            --package "${package}" \
            --release \
            --add-your-flag-here
        mkdir -pv "${COOKBOOK_STAGE}/usr/bin"
        cp -v \
            "target/${TARGET}/release/${package}" \
            "${COOKBOOK_STAGE}/usr/bin/${package}"
"""
- The
package-nameafterpackage=is where you will insert the Cargo package name of your program. - The
--add-your-flag-herewill be replaced by the program flag.
Cargo bins script example
Some Rust programs use bins instead of packages to build, to build them you can use this script:
script = """
binary=bin-name
"${COOKBOOK_CARGO}" build \
            --manifest-path "${COOKBOOK_SOURCE}/Cargo.toml" \
            --bin "${binary}" \
            --release \
            --add-your-flag-here
        mkdir -pv "${COOKBOOK_STAGE}/usr/bin"
        cp -v \
            "target/${TARGET}/release/${binary}" \
            "${COOKBOOK_STAGE}/usr/bin/${binary}"
"""
- The
bin-nameafterbinary=is where you will insert the Cargo package name of your program. - The
--add-your-flag-herewill be replaced by the program flags.
Cargo flags command example
Some Rust programs have flags for customization, you can find them below the [features] section in the Cargo.toml file.
script = """
cookbook_cargo --features flag-name
"""
Disable the default Cargo flags
It's common that some flag of the program doesn't work on Redox, if you don't want to spend much time testing flags that work and don't work, you can disable all of them to see if the most basic featureset of the program works with this script:
script = """
cookbook_cargo --no-default-features
"""
Enable all Cargo flags
If you want to enable all flags of the program, use:
script = """
cookbook_cargo --all-features
"""
Cargo profiles command example
This script is used for Rust programs using Cargo profiles.
script = """
cookbook_cargo --profile profile-name
"""
Cargo examples command example
This script is used for examples on Rust programs.
script = """
cookbook_cargo_examples example-name
"""
(You can use cookbook_cargo_examples example1 example2 if it's more than one example)
Cargo examples with flags
This script is used for Cargo examples with flags.
script = """
recipe="$(basename "${COOKBOOK_RECIPE}")"
    for example in example1 example2
    do
        "${COOKBOOK_CARGO}" build \
            --manifest-path "${COOKBOOK_SOURCE}/${PACKAGE_PATH}/Cargo.toml" \
            --example "${example}" \
            --release \
            --add-your-flag-here
        mkdir -pv "${COOKBOOK_STAGE}/usr/bin"
        cp -v \
            "target/${TARGET}/${build_type}/examples/${example}" \
            "${COOKBOOK_STAGE}/usr/bin/${recipe}_${example}"
    done
"""
(Replace the example1 item and others with the example names, if the program has only one example you can remove the example2 item)
Rename binaries
Some programs or examples use generic names for their executable files which could cause conflicts in the package installation process, to avoid this use the following command after the compilation or installation commands:
mv "${COOKBOOK_STAGE}/usr/bin/binary-name" "${COOKBOOK_STAGE}/usr/bin/new-binary-name"
- Duplicated names
Some recipes for Rust programs can duplicate the program name in the executable (name_name), you can also use the command above to fix these cases.
Change the active source code folder
Sometimes a program don't store the source code on the root of the Git repository, but in a subfolder.
For these cases you need to change the directory of the ${COOKBOOK_SOURCE} environment variable in the beginning of the build.script data type, to do this add the following command on your recipe script:
COOKBOOK_SOURCE="${COOKBOOK_SOURCE}/subfolder-name"
- An example for a Rust program:
script = """
COOKBOOK_SOURCE="${COOKBOOK_SOURCE}/subfolder-name"
cookbook_cargo
"""
Configuration Files
Some programs require to setup configuration files from the source code or tarball, to setup them use the following script example:
[build]
template = "custom"
script = """
cookbook function or custom build system commands
mkdir -pv "${COOKBOOK_STAGE}"/usr/share # create the /usr/share folder inside the package
cp -rv "${COOKBOOK_SOURCE}"/configuration-file "${COOKBOOK_STAGE}"/usr/share # copy the configuration file from the program source code to the package
"""
Modify the script above to your needs.
Script-based programs
Read the following scripts to package interpreted programs.
Adapted scripts
This script is for scripts adapted to be packaged, they contain shebangs and renamed the file to remove the script extension.
(Some programs and libraries need more configuration to work)
- One script
script = """
mkdir -pv "${COOKBOOK_STAGE}"/usr/bin
cp "${COOKBOOK_SOURCE}"/script-name "${COOKBOOK_STAGE}"/usr/bin/script-name
chmod a+x "${COOKBOOK_STAGE}"/usr/bin/script-name
"""
This script will move the script from the source folder to the stage folder and mark it as executable to be packaged.
(Probably you need to mark it as executable, we don't know if all scripts carry executable permission)
- Multiple scripts
script = """
mkdir -pv "${COOKBOOK_STAGE}"/usr/bin
cp "${COOKBOOK_SOURCE}"/* "${COOKBOOK_STAGE}"/usr/bin
chmod a+x "${COOKBOOK_STAGE}"/usr/bin/*
"""
This script will move the scripts from the source folder to the stage folder and mark them as executable to be packaged.
Non-adapted scripts
You need to use the following script examples for scripts not adapted for packaging, you need to add shebangs, rename the file to remove the script extension (.py) and mark as executable (chmod a+x).
(Some programs and libraries need more configuration to work)
- Python script example
script = """
mkdir -pv "${COOKBOOK_STAGE}"/usr/bin
cp "${COOKBOOK_SOURCE}"/script-name.py "${COOKBOOK_STAGE}"/usr/bin/script-name
chmod a+x "${COOKBOOK_STAGE}"/usr/bin/script-name
"""
(Rename the "script-name" parts with your script name and the .py extension for your script programming language extension if needed)
This script will rename your script name, make it executable and package.
- Multiple scripts
script = """
mkdir -pv "${COOKBOOK_STAGE}"/usr/bin
for script in "${COOKBOOK_SOURCE}"/*
do
  shortname=`basename "$script" ".py"`
  cp -v "$script" "${COOKBOOK_STAGE}"/usr/bin/"$shortname"
  chmod a+x "${COOKBOOK_STAGE}"/usr/bin/"$shortname"
done
"""
This script will rename all scripts to remove the .py extension, mark all scripts as executable and package.
- Shebang
It's the magic behind executable scripts as it make the system interpret the script as an common executable, if your script doesn't have a shebang on the beginning it can't be launched like an conventional compiled program executable.
To allow this use the following script:
script = """
mkdir -pv "${COOKBOOK_STAGE}"/usr/bin
cp "${COOKBOOK_SOURCE}"/script-name.py "${COOKBOOK_STAGE}"/usr/bin/script-name
sed -i '1 i\#!/usr/bin/env python3' "${COOKBOOK_STAGE}"/usr/bin/script-name
chmod a+x "${COOKBOOK_STAGE}"/usr/bin/script-name
"""
The sed -i '1 i\#!/usr/bin/env python3' "${COOKBOOK_STAGE}"/usr/bin/script-name command will add the shebang on the beginning of your script.
The python3 is the script interpreter in this case, use bash or lua or whatever interpreter is appropriate for your case.
There are many combinations for these script examples: you can download scripts without the [source] section, make customized installations, etc.
Dynamically Linked Programs
The DYNAMIC_INIT acts as a marker that indicates the recipe can be
dynamically linked. It automatically sets LDFLAGS and RUSTFLAGS based on
the preferred linkage. See the environment variables section under
configuration settings for more information.
In most cases if you want to use dynamic linking for a recipe just prepend
DYNAMIC_INIT in the recipe script. Depending on the recipe,
this should suffice. However, sometimes you may need to regenerate the GNU Autotools configuration,
which you can do by invoking the autotools_recursive_regenerate helper function
after DYNAMIC_INIT (See the examples below). This is to make sure the build
system uses our libtool fork. In other cases, more
recipe-specific modification may be required.
Example
# <...snip...>

[build]
template = "custom"
script = """
+DYNAMIC_INIT
cookbook_configure
"""
# <...snip...>
[source]
+script = """
+DYNAMIC_INIT
+autotools_recursive_regenerate
+"""

[build]
template = "custom"
script = """
+DYNAMIC_INIT
+cookbook_configure
"""
Dynamically linked programs depend on shared libraries at runtime. To
include these libraries, you must add them in the build.dependencies data type.
Example
# <...snip...>

[build]
dependencies = [
    "libmpc",
    "libgmp",
]
Troubleshooting
- Why the dynamic linker (
ld.so) is not finding my library?
Set LD_DEBUG=all and re-run the program. It will show you where library objects are
being found and loaded, as well as the library search paths. You probably
forgot to add a library in the build.dependencies list. You can also use
patchelf on your host or on Redox to display all DT_NEEDED entries of an
object (patchelf --print-needed <path>). It is available by default in the
desktop variant.
Sources
Tarballs
Tarballs are the most easy way to build a C/C++ program or library because the build system is already configured (GNU Autotools is the most used), while being more fast to download and process than big Git repositories if shallow clone is unused (the system don't need to process Git deltas).
Your recipe.toml will have the following content:
[source]
tar = "tarball-link"
Copy the tarball link and paste in the tarball-link field.
Only use official tarballs, GitHub auto-generate tarballs for each new release or tag of the program, but they aren't static (break the checksum) and don't verify the archive integrity.
You can find the official tarballs in the release announcement assets with the program name and ending with tar.gz or tar.xz (their URLs contain "releases" instead of "archive"), while unstable tarballs can be found on the "Source code" buttons (their URLs contain "archive").
- In most cases they are created using the GNU Tar tool.
- Avoid files containing the names "linux" and "x86_64" on GitHub, they are pre-built binaries for some operating system and CPU architecture, not source code.
- Some programs require Git submodules to work, you can't use tarballs if the official tarball don't bundle the submodules.
- Archives with
tar.xzandtar.bz2are preferred as they tend to have a higher compression level, thus smaller file size.
Build System
In most cases the tarballs use GNU Autotools to build, it's common that the tarball method of compilation is not well documented, causing confusion on new packagers.
To investigate, you can do the following things:
- Build with the
configuretemplate and see if it works (sometimes you need to use some flag or customize) - Search the Git repository of the program or library for
autogen.shandconfigure.acfiles, it means that support for GNU Autotools is available, when some tarball is created, it comes with aconfigurefile inside, this file doesn't exist on the Git repository and you need to create it by running theautogen.shscript. - Sometimes these files are available but GNU Autotools is deprecated (because it's old), we recommend that you use the supported build system (CMake or Meson in most cases).
Links
Sometimes it's hard to find the official tarball of some software, as each project website organization is different.
To help on this process, the Arch Linux packages and AUR are the most easy repositories to find tarball links in the configuration of packages.
- Arch Linux packages: Search for your program, open the program page, see the "Package Actions" category on the top right position and click on the "Source Files" button, a GitLab page will open, open the
.SRCINFOand search for the tarball link on the "source" fields of the file.
See the nano package example.
- AUR: Search for your program, open the program page, go to the "Sources" section on the end of the package details.
Git Repositories
Some programs don't offer official tarballs for releases, thus you need to use their Git repository and pin the tag or commit hash of the latest stable version or last working commit.
Your recipe.toml will have the following content:
[source]
git = "repository-link"
rev = "version-tag"
GitHub release
Each GitHub release has a tag or commit hash, you will use it to pin the lastest stable version of the program to keep code stability.
Example:
- Open the Rust 1.74 release announcement
- The tag is
1.74.0and the commit hash is79e9716c980570bfd1f666e3b16ac583f0168962and is shortened as79e9716
GitLab release commit hash
Each GitLab release has a tag or commit hash, you will use it to pin the lastest stable version of the program to keep code stability.
Example:
- Open the Redox 0.8.0 release announcement
- The tag is
0.8.0and the commit hash isc8634bd9890afdac4438d1ff99631d600d469264and is shortened asc8634bd9
Dependencies
A program dependency can be a library (a program that offer functions to some program), a runtime (a program that satisfy some program dependency when it's executed) or a build tool (a program to configure/build some program).
Most C, C++ and Rust programs place build tools/runtime together with development libraries (packages with -dev suffix) in their build instructions documentation.
Example:
sudo apt-get install cmake libssl-dev
The cmake package is the build system (build tool) while the libssl-dev package is the library (OpenSSL) linker objects (.a and .so files), the Debian package system bundle shared/static objects on their -dev packages (other Linux distributions just bundle shared objects).
You would need to create a recipe of the libssl-dev package and add in the build.dependencies data type of your recipe.toml file, while the cmake package would need to be installed on your system.
Dependencies added in the build.dependencies data type can be statically linked (if the DYNAMIC_INIT function is not used) or dynamically linked (if the DYNAMIC_INIT function is used), while dependencies added in the package.dependencies data type will be installed by the build system installer or package manager.
Mixed Rust programs have crates ending with -sys to use bundled or system C/C++ libraries.
If you want an easy way to find dependencies, see the Debian stable packages list.
You can search them with Ctrl+F, all package names are clickable and their websites is available on the right-side of the package description/details.
- We recommend to use the FreeBSD dependencies of the program if available because Linux dependencies tend to contain Linux-specific kernel features not available on Redox (unfortunately the FreeBSD package naming policy don't separate library objects/interpreters from build tools in all cases, thus you need to know or search each item to know if it's a library, interpreter or build tool)
- Debian packages are the most easy way to find dependencies because they are the most used by software developers to describe "Build Instructions" dependencies.
- Don't use the
.debpackages to create recipes, they are adapted for the Debian environment. - The Debian naming policy use dashes as separators in packages with custom options (program or library variant) enabled (program-variant), check the source package to be sure
- The recipe
PATHenvironment variable only use build tools at/usr/bin, it don't read the/usr/liband/includefolders because the Linux library objects don't work on Redox. - Don't add build tools in the
build.dependenciesdata type, check the Debian and Arch Linux meta-packages for a common reference of build tools. - The compiler will build the development libraries as
.afiles (objects for static linking) or.sofiles (objects for dynamic linking), the.afiles will be mixed in the final binary while the.sofiles will be installed out of the binary (stored on the/libdirectory of the system). - Linux distributions add a number after the
.sofiles to avoid conflicts on the/usr/libfolder when packages use different API versions of the same library, for example:library-name.so.6. - You need to know this information because each software is different, the major reason is the "Build Instructions" organization of each program.
If you have questions about program dependencies, feel free to ask us on the Chat.
Bundled Libraries
Some programs have bundled libraries, using CMake or a Python script, the most common case is using CMake (emulators do this in most cases).
The reason for this can be control over library versions to avoid compilation/runtime errors or a patched library with optimizations for specific tasks of the program.
In some cases some bundled library needs a Redox patch, if not it will give a compilation or runtime error.
Most programs using CMake will try to detect the system libraries on the build environment, if not they will use the bundled libraries.
The "system libraries" on this case is the recipes specified on the build.dependencies = [] section of your recipe.toml.
To determine if you need to use a Redox recipe as dependency check if you find a .patch file on the recipe folder or if the recipe.toml has a git = field pointing to the Redox GitLab, if not you can probably use the bundled libraries without problems.
Generally programs with CMake use a -DUSE_SYSTEM flag to enable the "system libraries" behavior.
Environment Variables
Sometimes specify the library recipe on the dependencies = [] section is not enough, some build systems have environment variables to receive a custom path for external libraries.
When you add a library on your recipe.toml the Cookbook will copy the library source code to the sysroot folder at cookbook/recipes/your-category/recipe-name/target/your-target, this folder has an environment variable that can be used inside the script = field on your recipe.toml.
Example:
script = """
export OPENSSL_DIR="${COOKBOOK_SYSROOT}"
cookbook_cargo
"""
The export will active the OPENSSL_DIR variable on the environment, this variable is implemented by the program build system, it's a way to specify the custom OpenSSL path to the program's build system, as you can see, when the òpenssl recipe is added to the dependencies = [] section its sources go to the sysroot folder.
Now the program build system is satisfied with the OpenSSL sources, the cookbook_cargo function calls Cargo to build it.
Programs using CMake don't use environment variables but an option, see this example:
script = """
COOKBOOK_CMAKE_FLAGS+=(
    -DOPENSSL_ROOT_DIR="${COOKBOOK_SYSROOT}"
)
cookbook_cmake
"""
On this example the -DOPENSSL_ROOT_DIR option will have the custom OpenSSL path.
Submodules
In some programs or libraries you can't use tarballs because they don't carry the necessary Git submodules of the program (most common in GitHub generated tarballs), on these cases you will need to use the Git repository or the commit of the last stable release (Cookbook download the submodules automatically).
To identify if the program use Git submodules, check if it have external folders to other repository (they appear with a commit hash on the right side) or the existence of a .gitmodules file.
Follow these steps to use the last stable version of the program when Git submodules are necessary:
- Open the program/library Git repository.
- Check the "Releases" or "Tags" buttons, in most cases the program have a stable release at "Releases".
- In both pages the commit hash of the stable release will be the first item of the announcement below the version number.
- Copy the repository link/release commit and paste on your
recipe.toml, for example:
git = "your-repository-link"
rev = "your-release-commit"
If the last stable release is years behind, we recommend that you ignore it and use the Git repository to download/build bug fixes sent after this old version, if you are concerned about the program upstream breaking the recipe, you can use the commit of the last successful CI test.
Configuration
The determine the program dependencies you can use Arch Linux and Gentoo as reference.
- The build instructions of C/C++ programs tend to mix necessary and optional dependencies together.
- Most Rust programs have build instructions focused on Linux and force some dependencies, some crates could not need them to work, investigate which crates the program is using.
- Some programs and libraries have bad documentation, lack build instructions or explain the dependencies, for these cases you will need to read third-party sources or examine the build system.
Arch Linux and AUR are the most simple references because they separate the build tools from runtimes and build dependencies, thus you make less mistakes.
They also have less expanded packages, while on Debian is common to have highly expanded programs and libraries, sometimes causing confusion.
(An expanded package is when most or all optional dependencies are enabled)
But Arch Linux is not clear about the optional feature flags and minimum dependencies to build and execute a program.
Using Gentoo as reference you can learn how to make the most minimum Redox port and increase your chances to make it work on Redox.
But Gentoo modify the feature flags of their packages to be used by their package system, thus you should use the FreeBSD Ports.
Arch Linux and AUR
Each package page of some program has a "Dependencies" section on the package details, see the items below:
dependency-name- Build or runtime dependencies, they lack the()symbol (required to make the program build and execute)dependency-name (make)- Build tools (required to build the program)dependency-name (optional)- Programs or libraries to expand the program functionality
See the firefox package, for example.
Gentoo
The Gentoo distribution does a wonderful job to document many programs and libraries, like source code location, dependencies, feature flags, cross-compilation and context.
It's the most complete reference for advanced packaging of programs, you can search the Gentoo packages on the Gentoo Packages website.
To start you need to read the Gentoo documentation page to learn advanced packaging and some problems.
The "Dependencies" section of a Gentoo package will show a table with the following categories:
BDEPEND- Host build tools (don't add them on thedependencies = []section of yourrecipe.toml)DEPEND- These dependencies are necessary to build the programRDEPEND- These dependencies are necessary to execute the program, can be mandatory or optionalPDEPEND- Optional dependencies (customization)
The complex classification of Gentoo allow the packager to easily make a minimum build of a program on Redox, it's important because some optional dependencies can use APIs from the Linux kernel not present on Redox.
Thus the best approach is to know the minimum necessary to make the program work on Redox and expand from that.
Build Tools
Add missing recipe build tools in the podman/redox-base-containerfile file (for Podman builds) or install them on your system (for Native builds).
The podman/redox-base-containerfile file and native_bootstrap.sh script covers the build tools required by recipes on the demo.toml filesystem configuration.
Feature Flags
The program/library build systems offer flags to enable/disable features, it will increase the chance to make them work on Redox by disabling Linux-specific or unsupported features/libraries.
Sometimes you need to read the build system configuration to find important or all flags that weren't documented by the program.
Cargo
You can find the feature flags below the [features] section in the Cargo.toml file.
GNU Autotools
You can find the feature flags in the INSTALL or configure files.
CMake
You can find the feature flags in the CMakeLists.txt file.
Meson
You can find the feature flags in the meson_options file.
FreeBSD Reference
If you can't find the program build system flags the FreeBSD port Makefiles are the best reference for feature flags to Redox as they tend to disable Linux-specific features and are adapted to cross-compilation, increasing the program/library compatiblity with non-Linux systems.
(You need to disable the program/library's build system tests to make cross-compilation work)
(Use the "Go to file" button to search for the software name)
Building/Testing The Program
Tip: If you want to avoid problems not related to Redox install the program dependencies and build to your system first (if packages for your Unix-like distribution aren't available search for Debian/Ubuntu equivalents).
To build your recipe, run:
make r.recipe-name
If you get an error read the log and determine if it is one of the following problems:
- Missing build tools
- Cross-compilation configuration problem
- Lack of Redox patches
- Missing C, POSIX or Linux library functions in relibc
Use this command to log any possible errors on your terminal output:
make r.recipe-name 2>&1 | tee recipe-name.log
If the compilation was successful the recipe can be installed in the QEMU image and tested inside of Redox to find possible runtime errors or crashes.
- To temporarily install the recipe to your QEMU image run
make p.recipe-name - To permanently install the recipe to your QEMU image add your recipe name (
recipe-name = {}) below the last item in the[packages]section of your TOML config atconfig/your-cpu-arch/your-config.tomland runmake image
To test your recipe inside of Redox with Orbital, run:
make qemu
If you only want to test in the Redox terminal interface, run:
make qemu gpu=no
Update crates
Sometimes the Cargo.toml and Cargo.lock of some Rust programs can hold a crate versions lacking Redox support or a broken Redox code path (changes on code that make the target OS fail), this will give you an error during the recipe compilation.
- The reason of fixed crate versions is explained on the Cargo FAQ.
To fix this you will need to update the crates of your recipe after the first compilation and build it again, see the ways to do it below.
(Bump a crate version on Cargo.toml can break some part of the source code, on this case the program needs a source code patch to use the updated API of the crate)
One or more crates
In maintained Rust programs you just need to update some crates to have Redox support (because they frequently update the crate versions), this will avoid random breaks on the dependency chain of the program (due to ABI changes) thus you can update one or more crates to reduce the chance of breaks.
We recommend that you do this based on the errors you get during the compilation, this method is recommended for maintained programs.
- Expose the Redox build system environment variables to the current shell, go to the
sourcefolder of your recipe and update the crates, example:
make env
cd cookbook/recipes/your-category/recipe-name/source
cargo update -p crate1 crate2
cd -
make r.recipe-name
If you still get the error, run:
make cr.recipe-name
All crates
Most unmaintained Rust programs carry very old crate versions with lacking/broken Redox support, this method will update all crates of the dependency chain to the latest possible version based on the Cargo.toml configuration.
Be aware that some crates break the API stability frequently and make the programs stop to work, that's why you must try the "One crate" method first.
- This method can fix locked crate versions on the dependency tree, if these locked crate versions don't change you need to bump the version of the crates locking the crate version, you will edit them in the
Cargo.tomland runcargo updateagain (API breaks are expected).
(Also good to test the latest improvements of the libraries)
- Expose the Redox build system environment variables to the current shell, go to the
sourcefolder of your recipe and update the crates, example:
make env
cd cookbook/recipes/your-category/recipe-name/source
cargo update
cd -
make r.recipe-name
If you still get the error, run:
make cr.recipe-name
Verify the dependency tree
If you use the above methods but the program is still using old crate versions, see this section:
Patch crates
Redox forks
It's possible that some not ported crate have a Redox fork with patches, you can search the crate name on the Redox GitLab, generally the Redox patches stay in the redox branch or redox-version branch that follow the crate version.
To use this Redox fork on your Rust program, add this text on the end of the Cargo.toml in the program source code:
[patch.crates-io]
crate-name = { git = "repository-link", branch = "redox" }
It will make Cargo replace the patched crate in the entire dependency chain, after that, run:
make r.recipe-name
Or (if the above doesn't work)
make cr.recipe-name
Or
make env
cd cookbook/recipes/your-category/recipe-name/source
cargo update -p crate-name
cd -
make r.recipe-name
If you still get the error, run:
make cr.recipe-name
Local patches
If you want to patch some crate offline with your patches, add this text on the Cargo.toml of the program:
[patch.crates-io]
crate-name = { path = "patched-crate-folder" }
It will make Cargo replace the crate based on this folder in the program source code - cookbook/recipes/your-category/your-recipe/source/patched-crate-folder (you don't need to manually create this folder if you git clone the crate source code on the program source directory)
Inside this folder you will apply the patches on the crate source and rebuild the recipe.
Cleanup
If you have some problems (outdated recipe), try to run these commands:
- This command will delete your old recipe binary/source.
make c.recipe-name u.recipe-name
- This command will delete your recipe binary/source and build (fresh build).
make ucr.recipe-name
Search Text on Recipes
To speed up your porting workflow you can use the grep tool to search the recipe configuration:
cd cookbook/recipes
grep -rnwi "text" --include "recipe.toml"
This command will search all match texts in the recipe.toml files of each recipe folder.
Search for functions on relibc
Sometimes your program is not building because relibc lack the necessary functions, to verify if they are implemented run the following commands:
cd relibc
grep -nrw "function-name" --include "*.rs"
You will insert the function name in function-name
Create a BLAKE3 hash for your recipe
You need to create a BLAKE3 hash of your recipe tarball if you want to merge it on upstream, to do this you can use the b3sum tool that can be installed from crates.io with the cargo install b3sum command.
After the first run of the make r.recipe-name command, run these commands:
b3sum cookbook/recipes/your-category/recipe-name/source.tar
It will print the generated BLAKE3 hash, copy and paste on the blake3 = field of your recipe.toml
Verify the size of your package
To verify the size of your package use this command:
ls -1sh cookbook/recipes/your-category/recipe-name/target/your-target
See the size of the stage.pkgar and stage.tar.gz files.
Submitting MRs
If you want to add your recipe on Cookbook to become a Redox package on the build server, read the package policy.
After this you can submit your merge request with proper category, dependencies and comments.
Porting Case Study
As a non-trivial example of porting a Rust app, let's look at what was done to port gitoxide. This port was already done, so it is now much simpler, but perhaps some of these steps will apply to you.
The goal when porting is to capture all the necessary configuration in recipes and scripts, and to avoid requiring a fork of the repo or upstreaming changes. This is not always feasible, but forking/upstreaming should be avoided when it can be.
We are using full pathnames for clarity, you don't need to.
Build on Linux
Before we start, we need to build the software for our Linux system and make sure it works. This is not part of the porting, it's just to make sure our problems are not coming from the Linux version of the software. We follow the normal build instructions for the software we are porting.
cd ~
git clone https://github.com/Byron/gitoxide.git
cd gitoxide
cargo run --bin ein
Set up the working tree
We start with a fresh clone of the Redox repository. In a Terminal/Console/Command window:
mkdir -p ~/redox-gitoxide
cd ~/redox-gitoxide
git clone git@gitlab.redox-os.org:redox-os/redox.git --origin upstream --recursive
The new recipe will be part of the cookbook repository, so we need to fork then branch it. To fork the cookbook repository:
- In the browser, go to Cookbook
- Click the
Forkbutton in the upper right part of the page - Create a
publicfork under your gitlab user name (it's the only option that's enabled)
Then we need to set up our local cookbook repository and create the branch. cookbook was cloned when we cloned redox, so we will just tweak that. In the Terminal window:
cd ~/redox-gitoxide/redox/cookbook
git remote rename origin upstream
git rebase upstream master
git remote add origin git@gitlab.redox-os.org:MY_USERNAME/cookbook.git
git checkout -b gitoxide-port
Create a Recipe
To create a recipe, we need to make a new directory in cookbook/recipes with the name the package will have, in this case gitoxide, and create a recipe.toml file with a first-draft recipe.
mkdir -p ~/redox-gitoxide/redox/cookbook/recipes/gitoxide
cd ~/redox-gitoxide/redox/cookbook/recipes/gitoxide
nano recipe.toml
Start with the following content in the recipe.toml file.
[source]
git = "https://github.com/Byron/gitoxide.git"
[build]
template = "cargo"
First Attempt
Next we attempt to build the recipe. Note that the first attempt may require the Redox toolchain to be updated, so we run make prefix, which may take quite a while.
cd ~/redox-gitoxide/redox
make prefix
make r.gitoxide |& tee gitoxide.log
We get our first round of errors (among other messages):
error[E0425]: cannot find value `POLLRDNORM` in crate `libc`
error[E0425]: cannot find value `POLLWRBAND` in crate `libc`
Make a Local Copy of libc
We suspect the problem is that these items have not been defined in the Redox edition of libc.
libc is not a Redox crate, it is a rust-lang crate, but it has parts that are Redox-specific.
We need to work with a local copy of libc, and then later ask someone with authority to upstream the required changes.
First, clone libc into our gitoxide directory.
cd ~/redox-gitoxide/redox/cookbook/recipes/gitoxide
git clone https://github.com/rust-lang/libc.git
Try to find the missing constants.
cd ~/redox-gitoxide/redox/cookbook/recipes/gitoxide/libc
grep -nrw "POLLRDNORM" --include "*.rs"
grep -nrw "POLLWRBAND" --include "*.rs"
Looks like the value is not defined for the Redox version of libc. Let's see if it's in relibc.
cd ~/redox-gitoxide/redox/relibc
grep -nrw "POLLRDNORM" --include "*.rs"
grep -nrw "POLLWRBAND" --include "*.rs"
Yes, both are already defined in relibc, and after a bit of poking around, it looks like they have an implementation.
They just need to get published in libc. Let's do that.
Make Changes to libc
Let's add our constants to our local libc. We are not going to bother with git because these changes are just for debugging purposes.
Copy the constant declarations from relibc, and paste them in the appropriate sections of libc/src/unix/redox/mod.rs.
In addition to copying the constants, we have to change the type c_short to ::c_short to conform to libc style.
cd ~/redox-gitoxide/redox/cookbook/recipes/gitoxide
nano libc/src/unix/redox/mod.rs
We add the following lines to mod.rs:
#![allow(unused)]
fn main() {
pub const POLLRDNORM: ::c_short = 0x040;
pub const POLLRDBAND: ::c_short = 0x080;
pub const POLLWRNORM: ::c_short = 0x100;
pub const POLLWRBAND: ::c_short = 0x200;
}
In order to test our changes, we will have to modify our gitoxide clone for now.
Once the changes to libc are upstreamed, we won't need a modified gitoxide clone.
To avoid overwriting our work, we want to turn off future fetches of the gitoxide source during build, so change recipe.toml to comment out the source section: nano recipe.toml.
#[source]
#git = "https://github.com/Byron/gitoxide.git"
[build]
template = "cargo"
We edit gitoxide's Cargo.toml so we use our libc.
nano ~/redox-gitoxide/cookbook/recipes/gitoxide/source/Cargo.toml
After the [dependencies] section, but before the [profile] sections, add the following to Cargo.toml:
[patch.crates-io]
libc = { path = "../libc" }
Bump the version number on our libc, so it will take priority.
nano ~/redox-gitoxide/cookbook/recipes/gitoxide/libc/Cargo.toml
version = "0.2.143"
Update gitoxide's Cargo.lock.
cd ~/redox-gitoxide/redox/cookbook/recipes/gitoxide/source
cargo update
Make sure we have saved all the files we just edited, and let's try building.
cd ~/redox-gitoxide/redox
make r.gitoxide
Our libc errors are solved! Remember, these changes will need to upstreamed by someone with the authority to make changes to libc.
Post a request on the chat's Redox OS/MRs room to add the constants to libc.
Creating a Custom Recipe
In looking at what is included in gitoxide, we see that it uses OpenSSL, which has some custom build instructions described in the docs.
There is already a Redox fork of openssl to add Redox as a target, so we will set up our environment to use that.
In order to do this, we are going to need a custom recipe. Let's start with a simple custom recipe, just to get us going.
Edit our previously created recipe, cookbook/recipes/gitoxide/recipe.toml, changing it to look like this.
#[source]
#git = "https://github.com/Byron/gitoxide.git"
[build]
template = "custom"
script = """
printenv
"""
In this version of our recipe, we are just going to print the environment variables during cook,
so we can see what we might make use of in our custom script.
We are not actually attempting to build gitoxide.
Now, when we run make r.gitoxide in ~/redox-gitoxide/redox, we see some useful variables such as TARGET and COOKBOOK_ROOT.
Two key shell functions are provided by the custom script mechanism, cookbook_cargo and cookbook_configure.
If you need a custom script for building a Rust program, your script should set up the environment, then call cookbook_cargo, which calls Redox's version of cargo.
If you need a custom script for using a Makefile, your script should set up the environment, then call cookbook_configure.
If you have a custom build process, or you have a patch-and-build script, you can just include that in the script section and not use either of the above functions.
If you are interested in looking at the code that runs custom scripts, see the function build() in cookbook's cook.rs.
Adding a dependency on openssl ensures that the build of openssl will happen before attempting to build gitoxide, so we can trust that the library contents are in the target directory of the ssl package.
And we need to set the environment variables as described in the OpenSSL bindings crate docs.
Our recipe now looks like this:
#[source]
#git = "https://github.com/Byron/gitoxide.git"
[build]
dependencies = [
    "openssl",
]
template = "custom"
script = """
export OPENSSL_DIR="${COOKBOOK_SYSROOT}"
export OPENSSL_STATIC="true"
cookbook_cargo
"""
Linker Errors
Now we get to the point where the linker is trying to statically link the program and libraries into the executable. This program, called ld, will report errors if there are any undefined functions or missing static variable definitions.
undefined reference to `tzset'
undefined reference to `cfmakeraw'
In our case we find we are missing tzset, which is a timezone function. We are also missing cfmakeraw from termios. Both of these functions are normally part of libc. In our case, they are defined in the libc crate, but they are not implemented by Redox's version of libc, which is called relibc. We need to add these functions.
Add Missing Functions to relibc
Let's set up to modify relibc. As with cookbook, we need a fork of relibc. Click on the Fork button and add a public fork. Then update our local relibc repo and branch.
cd ~/redox-gitoxide/redox/relibc
git remote rename origin upstream
git rebase upstream master
git remote add origin git@gitlab.redox-os.org:MY_USERNAME/relibc.git
git checkout -b gitoxide-port
Now we need to make our changes to relibc...
After a fair bit of work, which we omit here, the functions tzset and cfmakeraw are implemented in relibc. An important note is that in order to publish the functions, they need to be preceded with:
#[no_mangle]
extern "C" fn tzset() ...
Now let's build the system. The command touch relibc changes the timestamp on the relibc directory, which will cause the library to be updated. We then clean and rebuild gitoxide.
cd ~/redox-gitoxide/redox
cd relibc
cargo update
cd ..
touch relibc
make prefix
make cr.gitoxide
Testing in QEMU
Now we need to build a full Redox image and run it in QEMU. Let's make a configuration file.
cd ~/redox-gitoxide/redox/config/x86_64
cp desktop.toml my_desktop.toml
nano my_desktop.toml
Note that the prefix "my_" at the beginning of the config file name means that it is gitignore'd, so it is preferred that you prefix your config name with "my_".
In my_desktop.toml, at the end of the list of packages, after uutils = {}, add
gitoxide = {}
Now let's tell make about our new config definition, build the system, and test our new command.
cd ~/redox-gitoxide/redox
echo "CONFIG_NAME?=my_desktop" >> .config
make rebuild
make qemu
Log in to Redox as user with no password, and type:
gix clone https://gitlab.redox-os.org/redox-os/website.git
We get some errors, but we are making progress.
Submitting the MRs
- Before committing our new recipe, we need to uncomment the
[source]section. Edit~/redox-gitoxide/redox/cookbook/recipes/gitoxide/recipe.tomlto remove the#from the start of the first two lines. - We commit our changes to
cookbookto include the newgitoxiderecipe and submit an MR, following the instructions Creating Proper Pull Requests. - We commit our changes to
relibc. We need to rebuild the system and test it thoroughly in QEMU, checking anything that might be affected by our changes. Once we are confident in our changes, we can submit the MR. - We post links to both MRs on the Redox OS/MRs room to ensure they get reviewed.
- After making our changes to
libcand testing them, we need to request to have those changes upstreamed by posting a message on the Redox OS/MRs room. If the changes are complex, please create an issue on the build system repository and include a link to it in your post.
Quick Workflow
This page contains the most quick testing/development workflow for people that want an direct list to do things.
You need to fully understand the build system to use this workflow, as it don't give a detailed explanation of each command to save time and space
- Install Rust Nightly
- Update Rust
- Download a new build system copy without the bootstrap script
- Install the required dependencies for the build system
- Download and run the "podman_bootstrap.sh" script
- Build the system
- Update the build system and its submodules
- Update the toolchain and relibc
- Update recipes and Redox image
- Update everything
- Wipe the toolchain and download again
- Wipe the toolchain/recipe binaries and download/build them again
- Wipe toolchain/recipe binaries and Podman container, update build system source and rebuild the system
- Wipe all recipe sources/binaries and download/build them again
- Use the "myfiles" recipe to insert your files on Redox image
- Disable a recipe on the filesystem configuration
- Create logs
- Temporarily build the toolchain from source
- Build some filesystem configuration for some CPU architecture
- Build some filesystem configuration for some CPU architecture (using pre-built packages from the build server)
- Boot Redox on QEMU from a NVMe device
- Boot Redox on QEMU from a NVMe device with a custom number of CPU threads
- Boot Redox on QEMU from a NVMe device, a custom number of CPU threads and memory
Install Rust Nightly
curl https://sh.rustup.rs -sSf | sh -s -- --default-toolchain nightly
Use Case: Configure the host system without the build system bootstrap scripts.
Update Rust
rustup update
Use Case: Try to fix Rust problems.
Download a new build system copy without the bootstrap script
git clone https://gitlab.redox-os.org/redox-os/redox.git --origin upstream --recursive
Use Case: Commonly used when a big build system breakage was not prevented before an update or wipe leftovers.
Install the required dependencies for the build system
curl -sf https://gitlab.redox-os.org/redox-os/redox/raw/master/podman_bootstrap.sh -o podman_bootstrap.sh
bash -e podman_bootstrap.sh -d
Use Case: Install new build tools or update the existing ones.
Download and run the "podman_bootstrap.sh" script
curl -sf https://gitlab.redox-os.org/redox-os/redox/raw/master/podman_bootstrap.sh -o podman_bootstrap.sh
bash -e podman_bootstrap.sh
Use Case: Commonly used when a big build system breakage was not prevented before an update and install new build tools or update the existing ones.
Build the system
cd redox
make all
Use Case: Build the system from a clean build system copy.
Update the build system and its submodules
make pull
Use Case: Keep the build system up-to-date.
Update the toolchain and relibc
touch relibc
make prefix
Use Case: Keep the toolchain up-to-date.
Update recipes and Redox image
make rebuild
Use Case: Keep the Redox image up-to-date.
Update everything
Install the topgrade tool to update your system packages (you can install it with cargo install topgrade)
topgrade
make pull
touch relibc
make prefix rebuild
Use Case: Try to fix most problems caused by outdated recipes, toolchain and build system configuration.
Wipe the toolchain and download again
rm -rf prefix
make prefix
Use Case: Commonly used to fix problems.
Wipe the toolchain/recipe binaries and download/build them again
make clean all
Use Case: Commonly used to fix breaking changes on recipes.
Wipe toolchain/recipe binaries and Podman container, update build system source and rebuild the system
make clean container_clean pull all
Use Case: Full build system binary cleanup and update to avoid most configuration breaking changes
Wipe all recipe sources/binaries and download/build them again
make distclean all
Use Case: Commonly used to fix source/binary breaking changes on recipes or save space.
Use the "myfiles" recipe to insert your files on Redox image
mkdir cookbook/recipes/other/myfiles/source
nano config/your-cpu-arch/your-config.toml
[packages]
myfiles = {}
make rp.myfiles
Use Case: Quickly insert files on the Redox image or keep files between rebuilds.
Disable a recipe on the filesystem configuration
nano config/your-cpu-arch/your-config.toml
#recipe-name = {}
Use Case: Mostly used if some default recipe is broken.
Create logs
make some-command 2>&1 | tee file-name.log
Use Case: Report errors.
Temporarily build the toolchain from source
make prefix PREFIX_BINARY=0
Use Case: Test toolchain fixes.
Build some filesystem configuration for some CPU architecture
make all CONFIG_NAME=your-config ARCH=your-cpu-arch
Use Case: Quickly build Redox variants without manual intervention on configuration files.
Build some filesystem configuration for some CPU architecture (using pre-built packages from the build server)
(Much faster than the option above)
make all REPO_BINARY=1 CONFIG_NAME=your-config ARCH=your-cpu-arch
Use Case: Quickly build Redox variants without system compilation and manual intervention on configuration files.
Boot Redox on QEMU from a NVMe device
make qemu disk=nvme
Boot Redox on QEMU from a NVMe device with a custom number of CPU threads
make qemu disk=nvme QEMU_SMP=number
Boot Redox on QEMU from a NVMe device, a custom number of CPU threads and memory
make qemu disk=nvme QEMU_SMP=number QEMU_MEM=number-in-mb
Libraries and APIs
This page covers the context of the libraries and APIs on Redox.
Terms
| Interface | Explanation |
|---|---|
| API | The interface of the library source code (the programs use the API to obtain the library functions) |
| ABI | The interface of the program binary and system services (normally the system call interface) |
Versions
The Redox crates follow the SemVer model from Cargo for version numbers (except redox_syscall), you can read more about it below:
Redox
This section covers the versioning system of Redox and important components.
- Redox OS:
x.y.z
x is ABI version, y is API updates with backward compatibility and z is fixes with backward compatiblity.
-
libredox: Currently it don't follow the SemVer model but will in the future
-
redox_syscall:
x.y.z
x is the ABI version (it will remain 0 for a while), y is the API updates and z is fixes (no backward compatibility).
Providing a Stable ABI
The implementation of a stable ABI is important to avoid frequent recompilation when an operating system is under heavy development, thus improving the development speed.
A stable ABI typically reduces development speed for the ABI provider (because it needs to uphold backward compatibility), whereas it improves development speed for the ABI user. Because relibc will be smaller than the rest of Redox, this is a good tradeoff, and improves development speed in general
It also offer backward compatibility for binaries compiled with old API versions.
Currently only libredox will have a stable ABI, relibc will be unstable only as long as it's under heavy development and redox_syscall will remain unstable even after the 1.0 version of Redox.
Our final goal is to keep the Redox ABI stable in all 1.x versions, if an ABI break happens, the next versions will be 2.x
A program compiled with an old API version will continue to work with a new API version, in most cases statically linked library updates or program updates will require recompilation, while in others a new ABI version will add performance and security improvements that would recommend a recompilation of the program.
If the dynamic linker can't resolve the references of the program binary, a recompilation is required.
Interfaces
Redox uses different mechanisms, compared to Linux, to implement system capabilities.
relibc
relibc is an implementation of the C Standard Library (libc) and POSIX in Rust.
relibc knows if it's compiled for Linux or Redox ahead-of-time (if the target is Redox relibc calls functions in libredox), the goal is to organize platform-specific functionality into clean modules.
Since Redox and Linux executables look so similar and can accidentally be executed on the other platform, it checks that it's running on the same platform it was compiled for, at runtime.
libredox
libredox is a system library for Redox components and Rust programs/libraries, it will allow Rust programs to limit their need to use C-style APIs (the relibc API and ABI).
It's both a crate (calling the ABI functions) and an ABI, the ABI is provided from relibc while the crate (library) is a wrapper above the libredox ABI.
(Redox components, Rust programs and libraries use this library)
You can see Rust crates using it on the Reverse Dependencies category.
redox_syscall
redox_syscall contain the system call numbers and Rust API wrappers for the inline Assembly code of system calls to be used with low-level components and libraries.
(redox_syscall should not be used directly by programs, use libredox instead)
Crates
Some Redox projects have crates on crates.io thus they use a version-based SemVer development, if some change is sent to their repository they need to release a new version on crates.io
- libredox
- redox_syscall
- redox-path
- redox-scheme
- redoxfs
- redoxer
- redox_installer
- redox-kprofiling
- redox-users
- redox-buffer-pool
- redox_log
- redox_termios
- redox-daemon
- redox_event
- redox_event_update
- redox_pkgutils
- redox_uefi
- redox_uefi_alloc
- redox_dmi
- redox_hwio
- redox_intelflash
- redox_liner
- redox_uefi_std
- ralloc
- orbclient
- orbclient_window_shortcuts
- orbfont
- orbimage
- orbterm
- orbutils
- slint_orbclient
- ralloc_shim
- ransid
- gitrepoman
- pkgar
- pkgar-core
- pkgar-repo
- termion
- reagent
- gdb-protocol
- orbtk
- orbtk_orbclient
- orbtk-render
- orbtk-shell
- orbtk-tinyskia
Manual Patching
If you don't want to wait a new release on crates.io, you can patch the crate temporarily by fetching the version you need from GitLab and changing the crate version in Cargo.toml to crate-name = { path = "path/to/crate" }
Code Porting
Rust std crate
Most Rust programs include the std (libstd) crate, In addition to implementing standard Rust abstractions, this crate provides a safe Rust interface to system functionality in libc, which it invokes via a FFI to libc.
std has mechanisms to enable operating system variants of certain parts of the library, the file sys/mod.rs selects the appropriate variant to include, programs use the std:: prefix to call this crate.
To ensure portability of programs, Redox supports the Rust std crate, for Redox, std::sys refers to std::sys::unix
Redox-specific code can be found on the std source tree.
For most functionality, Redox uses #[cfg(unix)] and sys/unix.
Some Redox-specific functionality is enabled by #[cfg(target_os = "redox")]
Compiling for Redox
The Redox toolchain automatically links programs with relibc in place of the libc you would find on Linux.
Porting Method
You can use #[cfg(unix)] and #[cfg(target_os = "redox")] to guard platform specific code.
Developer FAQ
The General FAQ have questions and answers of newcomers and end-users, while this FAQ will cover organization, technical questions and answers of developers and testers, feel free to suggest new questions.
(If all else fails, join us on Chat)
- General Questions
- Build System Questions
- What is the correct way to update the build system?
- How can I verify if my build system is up-to-date?
- What is a recipe?
- When I should rebuild the build system or recipes from scratch?
- How can I test my changes on real hardware?
- How can I insert files to the Redox image?
- How can I change my Redox variant?
- How can I increase the filesystem size of my QEMU image?
- How can I change the CPU architecture of my build system?
- How can I cross-compile to ARM64 from a x86-64 computer?
- How can I use a recipe in my build system?
- I only made a small change to my program. What's the quickest way to test it in QEMU?
- How can I skip building all recipes?
- How can I skip building all recipes except a specific recipe?
- How can I install the packages needed by recipes without a new download of the build system?
- How can I build the toolchain from source?
- Porting Questions
- How to determine if some program is portable to Redox?
- How to determine the dependencies of some program?
- How can I configure the build system of the recipe?
- How can I search for functions on relibc?
- Which are the upstream requirements to accept my recipe?
- What are the possible problems when porting programs and libraries?
- Why C/C++ programs and libraries are hard and time consuming to port?
- Scheme Questions
- What is a scheme?
- When does a regular program need to use a scheme?
- When would I write a program to implement a scheme?
- How do I use a scheme for sandboxing a program?
- How can I see all userspace schemes?
- How can I see all kernel schemes?
- What is the difference between kernel and userspace schemes?
- How does a userspace daemon provide file-like services?
- How the system calls are used by userspace daemons?
- GitLab Questions
- Documentation Questions
- Troubleshooting Questions
- Scripts
- Build System
- Recipes
- I had a compilation error with a recipe, how can I fix that?
- I tried all methods of the "Troubleshooting the Build" page and my recipe doesn't build, what can I do?
- When I run "make r.recipe" I get a syntax error, how can I fix that?
- When I run "cargo update" on some recipe source it call Rustup to install other Rust toolchain version, how can I fix that?
- I added the dependency of my program on the "recipe.toml" file but the program build system doesn't detect it, then I installed the program dependency on my Linux distribution and it detected, why?
- QEMU
- Real Hardware
General Questions
Why does Redox have unsafe Rust code?
In some cases we must use unsafe, for example at certain points in the kernel and drivers, these unsafe parts are generally wrapped with a safe interface.
These are the cases where unsafe Rust is mandatory:
- Implementing a foreign function interface (FFI) (for example the relibc API)
- Working with system calls directly (You should use Rust libstd library or relibc instead)
- Creating or managing processes and threads
- Working with memory mapping and stack allocation
- Working with hardware devices
It is an important goal for Redox to minimize the amount of unsafe Rust code. If you want to use unsafe Rust code on Redox anywhere other than interfacing with system calls, ask for Jeremy Soller's approval before.
Unsafe Rust still has most of the compiler verification (thus more safe than C and C++).
Read the following pages to learn more about Unsafe Rust:
- https://doc.rust-lang.org/book/ch20-01-unsafe-rust.html
- https://doc.rust-lang.org/nomicon/meet-safe-and-unsafe.html
Why does Redox have Assembly code?
Assembly is the core of low-level because it's a CPU-specific language and deal with things that aren't possible or feasible to do in high-level languages like Rust.
Sometimes required or preferred for accessing hardware, or for carefully optimized hot spots.
Reasons to use Assembly instead of Rust:
- Deal with low-level things (those that can't be handled by Rust)
- Writing constant time algorithms for cryptography
- Optimizations
Places where Assembly is used:
kernel- Interrupt and system call entry routines, context switching, special CPU instructions and registers.drivers- Port IO need special instructions (x86-64).relibc- Some parts of the C runtime.
Why does Redox do cross-compilation?
Read some of the reasons below:
- When developing a new operating system you can't build programs inside of it because the system interfaces are premature. Thus you build the programs from your host system to the new OS and transfer the binaries to the filesystem of the new OS.
- Cross-compilation reduces the porting requirements because you don't need to support the compiler of the program's programming language, the program's build system and build tools. You just need to port the programming language standard library (if used), program libraries or the program source code (dependency-free).
- Some developers prefer to develop from other operating systems like Linux, MacOSX or FreeBSD, the same applies for Linux where some developers write code on MacOSX and test their kernel builds in a virtual machine (mostly QEMU) or real hardware.
(To run interpreted programs and scripts the programming language's interpreter needs to be ported to Redox)
Does Redox support OpenGL and Vulkan?
- Read the Software Rendering section.
How can I port a program?
- Read the Porting Applications using Recipes page.
How can I write a driver?
- Read the drivers repository README.
How can I debug?
- Read the Debug Methods section.
Build System Questions
What is the correct way to update the build system?
- Read the Update The Build System section.
How can I verify if my build system is up-to-date?
- After the
make pullcommand, run thegit rev-parse HEADcommand on the build system folders to see if they match the latest commit hash on GitLab.
What is a recipe?
- A recipe is a software port on Redox.
When I should rebuild the build system or recipes from scratch?
Sometimes run the make pull rebuild command is not enough to update the build system and recipes because of breaking changes, learn what to do on the following changes:
- New relibc functions and fixes (run the
make prefix clean allcommand after thetouch relibccommand to update relibc in all recipes or themake prefix cr.recipe-namecommand to update one recipe) - Dependency changes on recipes (run the
make cr.recipe-namecommand) - Configuration changes on recipes (run the
make cr.recipe-namecommand) - Source code changes on recipes (run the
make ucr.recipe-namecommand) - Changes on the location of the build system artifacts (run the
make clean pull allcommand to not cause conflicts with the previous artifacts locations, if the previous location of the build artifacts had contents you can try to fix manually or download the build system again to avoid confusion or fix hard conflicts)
How can I test my changes on real hardware?
- Read the Testing on Real Hardware section.
How can I insert files to the Redox image?
- If you use a recipe your changes will persist after the
make imagecommand, but you can also mount the Redox filesystem to insert them directly.
How can I change my Redox variant?
- Insert the
CONFIG_NAME?=your-config-nameenvironment variable to your.configfile, read the config section for more details.
How can I increase the filesystem size of my QEMU image?
- Change the
filesystem_sizefield of your build configuration (config/ARCH/your-config.toml) and runmake image, read the Filesystem Size section for more details.
How can I change the CPU architecture of my build system?
- Insert the
ARCH?=your-cpu-archenvironment variable on your.configfile and run themake allcommand, read the config section for more details.
How can I cross-compile to ARM64 from a x86-64 computer?
- Insert the
ARCH?=aarch64environment variable on your.configfile and runmake all.
How can I use a recipe in my build system?
- Go to your filesystem configuration and add the recipe:
nano config/your-cpu-arch/your-config.toml
[packages]
...
recipe-name = {}
...
- Build the recipe
make r.recipe-name
- Rebuild the Redox image to add the recipe
make image
I only made a small change to my program. What's the quickest way to test it in QEMU?
- Build the recipe, image and launch QEMU:
make r.recipe-name image qemu
How can I skip building all recipes?
- Insert the
REPO_BINARY=1environment variable to your.configfile, it will download pre-compiled recipe binaries from the build server if available.
How can I skip building all recipes except a specific recipe?
- After inserting the
REPO_BINARY=1environment variable to your.configfile, go to your Cookbook configuration and add the source-based variant of the recipe.
nano config/your-cpu-arch/your-config.toml
[packages]
...
recipe-name = "source"
...
- Make sure to download the recipe package before rebuilding the image.
make r.recipe-name
- Rebuild the Redox image to install the recipe package
make image
How can I install the packages needed by recipes without a new download of the build system?
- Download the
native_bootstrap.shscript and run:
./native_bootstrap.sh -d
(If you are using Podman this process is automatic)
How can I build the toolchain from source?
- Disable the
PREFIX_BINARYenvironment variable inside of your.configfile.
nano .config
PREFIX_BINARY?=0
- Wipe the old toolchain binaries and build a new one.
rm -rf prefix
make prefix
- Wipe the old recipe binaries and build again with the new toolchain.
make clean all
Porting Questions
How to determine if some program is portable to Redox?
- The source code of the program must be available
- The program should use cross-platform libraries (if not, more porting effort is required)
- The program's build system should support cross-compilation (if not, more porting effort is required)
- The program shouldn't directly use the Linux kernel API on its code (if not, more porting effort is required)
Some APIs of the Linux kernel can be ported, while others not because they require a complete Linux kernel.
How to determine the dependencies of some program?
- Read the Dependencies section.
How can I configure the build system of the recipe?
- Read the Templates section.
How can I search for functions on relibc?
- Read the Search For Functions on Relibc section.
Which are the upstream requirements to accept my recipe?
- Read the Package Policy section.
What are the possible problems when porting programs and libraries?
- Missing build tools
- Cross-compilation configuration problem
- Lack of Redox patches
- Missing C, POSIX or Linux library functions in relibc
- Runtime error or crashes
Why C/C++ programs and libraries are hard and time consuming to port?
- C/C++ don't have an official, advanced and automatic dependency manager and build system which force programs and libraries to select competing build systems with different configurations (GNU Make, GNU Autotools, CMake, Meson and others), projects like Conan and vcpkg tried to solve this problem but weren't adopted by most programs/libraries and lack many libraries
- Programs and libraries need to manually manage the library versions, to workaround this some programs use bundled libraries which can difficult patching when needed
- Some build systems lack a good cross-compilation support which require more tweaks and sometimes hacks
- As libraries are manually managed programs with many dependencies can take hours to port depending on available library documentation/configuration and developer experience
- Some programs and libraries have bad or lacking documentation about build instructions and configuration
Scheme Questions
What is a scheme?
Read the Schemes and Resources page.
When does a regular program need to use a scheme?
Most schemes are used internally by the system or by relibc, you don't need to access them directly. One exception is the pseudoterminal for your command window, which is accessed using the value of $TTY, which might have a value of e.g. pty:18. Some low-level graphics programming might require you to access your display, which might have a value of e.g. display:3
When would I write a program to implement a scheme?
If you are implementing a service daemon or a device driver, you will need to implement a scheme.
How do I use a scheme for sandboxing a program?
The contain program provides a partial implementation of sandboxing using schemes and namespaces.
How can I see all userspace schemes?
Read the Userspace Schemes section.
How can I see all kernel schemes?
Read the Kernel Schemes section.
What is the difference between kernel and userspace schemes?
Read the Kernel vs Userspace Schemes section.
How does a userspace daemon provide file-like services?
When a regular program calls open, read, write, etc. on a file-like resource, the kernel translates that to a message of type syscall::data::Packet, describing the file operation, and makes it available for reading on the appropriate daemon's scheme file descriptor. See the Providing A Scheme section for more information.
How the system calls are used by userspace daemons?
All userspace daemons use the system calls through relibc like any normal program.
GitLab Questions
How to properly review MRs?
It's recommended to use code suggestions for normal text and code to help and save time for developers, that way they can quickly improve or apply the text or code.
You can start a code suggestion by clicking on the file icon with the + symbol when you click to comment in some line of a file.
I have a merge request with many commits, should I squash them after merge?
Yes.
Should I delete my branch after merge?
Yes.
How can I have an anonymous account?
During the account creation process you can add a fake name on the "First Name" and "Last Name" fields and change it later after your account approval (single name field is supported).
Documentation Questions
How can I write code documentation properly?
Read the following pages:
How can I insert commands and code correctly?
Commands and code should be inserted inside code blocks (using 3 backticks above and below the line of the command), for example:
your command or code
- Multiple commands should use an unique code block for each command to allow them to be copied with one cursor click
- If you can't use a code block due to incompatible wording in the explanation, you can use the simple code highlighting using 1 backtick before and after the command on the same line
How can I create diagrams?
The GitLab Markdown has support for some diagram syntaxes, read this article to learn how to use them.
Troubleshooting Questions
Scripts
I can't download the build system bootstrap scripts, how can I fix this?
Verify if you have curl installed or download the script from your web browser.
I tried to run the "podman_bootstrap.sh" and "native_bootstrap.sh" scripts but got an error, how to fix this?
- Verify if you have the GNU Bash shell installed on your system.
- Verify if Podman is supported on your operating system.
- Verify if your operating system is supported on the
native_bootstrap.shscript
Build System
I ran "make all" but it show a "rustup can't be found" message, how can I fix this?
- Run this command:
source ~/.cargo/env
(If you installed Rustup before the first podman_bootstrap.sh execution, this error doesn't happen)
I tried all troubleshooting methods but my build system is still broken, how can I fix that?
If the make clean pull all command doesn't work download a fresh build system or wait for an upstream fix.
Recipes
I had a compilation error with a recipe, how can I fix that?
Read the Solving Compilation Problems section.
I tried all methods of the "Troubleshooting the Build" page and my recipe doesn't build, what it can be?
- Missing dependencies
- Environment leakage (when the recipe build system use the Linux environment instead of Redox environment)
- Misconfigured cross-compilation
- The recipe needs to be ported to Redox
When I run "make r.recipe" I get a syntax error, how can I fix that?
Verify if your recipe.toml file has some typo.
When I run "cargo update" on some recipe source it call Rustup to install other Rust toolchain version, how can I fix that?
It happens because Cargo is not using the Redox fork of the Rust compiler, to fix that run make env from the Redox build system root.
It will import the Redox Makefile environment variables to your active shell (it already does that when you run other make commands from the Redox build system root).
I added the dependency of my program on the "recipe.toml" file but the program build system doesn't detect it, then I installed the program dependency on my Linux distribution and it detected, why?
Read the Environment Leakage section.
QEMU
How can I kill the QEMU process if Redox freezes or get a kernel panic?
Read the Kill A Frozen Redox VM section.
Real Hardware
I got a kernel panic, what can I do?
Read the Kernel Panic section.
Some driver is not working with my hardware, what can I do?
Read the Debug Methods section and ask us for instructions in the Matrix chat.
References
This page contain a list of references for Rust programming, OS development, ideas, porting and computer science to help developers.
Rust
- Rust Book - The most important source of information on the Rust programming language.
- Rust By Example - Learn Rust with examples.
- Rustlings - Learn Rust with exercises.
- Awesome Rust - Curated list of Rust programs, libraries and resources.
- No Boilerplate - Rust playlist - Amazing short documentaries about special things on Rust.
- Developer Roadmaps - Rust - A guide to learn Rust.
- rust-learning - A list with articles and videos to learn Rust.
- Rust Playground - Test your Rust code on the web browser.
- This Week in Rust - Weekly updates on the Rust ecosystem, it covers language improvements, organization updates, community updates and articles.
- The Coded Message - Rust articles
- fasterthanlime - Rust articles
- Learn Rust With Entirely Too Many Linked Lists - How to implement a linked list in Rust.
- Rust Design Patterns - About idioms, design patterns, and anti-pattern in Rust.
- Rust Reference Book - References for people with background familiarity with Rust.
- Rustonomicon - To learn about unsafe Rust.
- Rust 101 - Exercises - A Rust university course (but lacking answers for exercises).
- teach-rs - An university course to learn Rust.
- Rust Security Handbook - Helpful security related practices when coding in Rust.
Porting
If you don't know how to port some program or library, you can see the build system documentation or software ports of other operating systems.
- Cargo - The project and dependency manager of the Rust programming language.
- GNU Autotools - The GNU build system, used by most old POSIX programs.
- Meson - A build system used by many Linux/POSIX programs.
- GNU Make - The GNU's command runner, used to build projects with many source code files.
- FreeBSD - Software Ports (cgit) - The official web interface for the software ports of FreeBSD.
- FreeBSD - Software Ports (GitHub mirror) - GitHub mirror for the software ports of FreeBSD.
- NetBSD - Software Ports (GitHub mirror) - GitHub mirror for the software ports of NetBSD.
- Gentoo Packages - It contain advanced information about the port configuration.
- Nix Packages
- Guix Packages
OS development
- OSDev Wiki - The best wiki about OS development of the world.
- Writing an OS in Rust - Blog series to write an operating system in Rust.
- Rust OSDev - Monthly reports with updates on the Rust low-level ecosystem libraries and operating systems.
Ideas
- Linux - The Linux kernel contain lots of ideas that improved the Unix design (POSIX) and system engineering.
- Android - Android created many ideas to improve the system security and power efficiency.
- FreeBSD - Ideas - The future ideas of FreeBSD.
- FreeBSD - Documentation
- Fedora - Change Proposals - For years the Fedora Linux distribution tested and implemented new technologies for the Linux ecosystem.
Manual Pages
- FreeBSD Manual Pages - Powerful source for Unix/BSD documentation.
- Linux Manual Pages (man7) - Very popular source for Linux documentation.
- Linux Manual Pages (die.net) - Another popular source for Linux documentation.
- OpenGroup Specification (POSIX and C Standard Library) - This is important to improve the support with Linux/BSD programs written in C/C++.
Source Code
If you want to implement something (drivers, hardware interfaces, fix bugs, etc) but the documentation is not good or not available, you can verify the implementation of other operating systems.
- Linux - cgit - Official web interface for the Linux kernel source code.
- Linux - GitHub mirror - GitHub mirror for the Linux kernel source code, it contain more features to read the files.
- FreeBSD - cgit - Official web interface for the FreeBSD source code.
- FreeBSD - GitHub mirror - GitHub mirror for the FreeBSD source code.
- NetBSD - CVSWeb - Official web interface for the NetBSD source code.
- NetBSD - GitHub mirror - GitHub mirror for the NetBSD source code.
- OpenBSD - CVSWeb - Official web interface for the OpenBSD source code.
- OpenBSD - GitHub mirror - GitHub mirror for the OpenBSD source code.
- Minix - Official web interface for the Minix source code.
Computer Science
- Putting the "You" in CPU - This website explains how a program works, from the system call to the CPU.
- GeeksforGeeks - A computer science portal with many articles for several areas and tasks.
- computer-science - A list for computer science education.
- Developer Roadmaps - Computer Science - A guide to learn computer science.
- Minix - On the Minix website you can find great papers and articles about the microkernel architecture and reliable systems.
- Plan 9 - On the Plan 9 website you can find papers and documentation about distributed systems.
- seL4 - On the seL4 website you can find papers and documentation about a secure and fast microkernel design.
- The Coded Message - Computing/Programming articles
Continuous Integration
The continuous integration helps developers to automated the program testing as the code evolves, it detects broken things or regressions.
The developer add a configuration file on the Git repository root with the commands to test the things.
Most known as "CI", it's provided by a Git service (like GitHub and GitLab) in most cases.
In Redox we use the Redoxer program to setup our GitLab CI configuration file, it downloads our toolchain, build the program to the Redox target using Cargo and run the program inside a Redox virtual machine.
Configure Your Repository
To setup your CI runner with Redoxer you need to add these commands to your CI configuration file:
- Install Redoxer
cargo install redoxer
- Install the Redox toolchain on Redoxer
redoxer toolchain
- Build your program or library to Redox
redoxer build
You need to customize Redoxer for your needs (test types of your CI jobs)
Performance
Kernel Profiling
You can create a flamegraph showing the kernel's most frequent operations, using time-based sampling.
One CPU core is allocated for capturing the profiling data. The instruction pointers of the other cores are copied at regular intervals. If the sampled core is in supervisor mode, the instruction address is added to the profile data. If it is in user mode, it is ignored. The profiled daemon copies the captured profile data to a file.
This is an example flamegraph. If you open the image in a new tab, there is useful mouse-over behavior.

The steps below are for profiling on x86_64, running in QEMU. It is possible to run the tests on real hardware, although retrieving the data may be challenging.
Setup
-
Open a terminal window in the
redoxdirectory. -
Install tools:
cargo install redox-kprofiling
cargo install inferno
-
Make sure you have the kernel source by running
make f.kernel. -
Open a second terminal window in the directory
cookbook/recipes/core/kernel. -
Edit
recipe.tomlin thekerneldirectory. First, comment out the[source]section so the build process does not try to fetch the source again.
# [source]
# git = "https://gitlab.redox-os.org/redox-os/kernel.git"
- You need to enable the
profilingfeature for the kernel. This can be done two ways, either inrecipe.tomlor insource/Cargo.toml. Forrecipe.toml, add the line--features profiling \to thecargocommand. (The backslash is needed to continue the command.)
cargo rustc \
    --bin kernel \
    --features profiling \ <- Add this line
    ...
If you prefer to modify source/Cargo.toml, then you can add profiling to the default features. (This also helps if you are using an IDE.)
[features]
default = ["profiling", ...]
-
(Optional) In the
kerneldirectory, editsource/src/profiling.rs: setHARDCODED_CPU_COUNTto the number of CPU cores on the machine that will be profiled, minus one (one core is dedicated to profiling). Also consider changing the size of the buffers used for recording profile data,const N: usize, depending on how much RAM is available. 64MiB is a reasonable minimum, but if you have the memory available, you can increase it to 256MiB. -
The profiling code is written primarily for QEMU, but for real hardware, consider commenting out the
serio_commandcode inprofiling.rs, which is to enable or disable profiling. -
In your first terminal window, from the
redoxdirectory, create the filesystem configconfig/x86_64/my_profiler.tomlwith the following content.
include = [ "minimal.toml" ]

# General settings
[general]
# Filesystem size in MiB
filesystem_size = 1024

# Package settings
[packages]
# This is the profiling daemon
profiled = {}
# Add any other packages you need for testing here

# Init script to start the profile daemon
# The sequence number "01" ensures it will be started right after the drivers
[[files]]
path = "/usr/lib/init.d/01_profile"
data = """
profiled
"""

[[files]]
path = "/usr/bin/perf_tests.sh"
data = """
dd bs=4k count=100000 < /scheme/zero > /scheme/null
"""

# Script to perform performance tests - add your tests here
# If you will be testing manually, you don't need this section
[[files]]
path = "/usr/lib/init.d/99_tests"
data = """
echo Waiting for startup to complete...
sleep 5
echo
echo Running tests...
ion -x /usr/bin/perf_tests.sh
echo Shutting down...
shutdown
"""
- In the
redoxdirectory, create the file.configwith the following content.
# This needs to match the name of your filesystem config file
CONFIG_NAME=my_profiler
# Core count; this needs to be HARDCODED_CPU_COUNT+1
QEMU_SMP=5
# Memory size in MiB; 8GiB is the minimum, larger is better
QEMU_MEM=8192
# Don't use the display
gpu=no
- In the
redoxterminal window,make r.kernel image(ormake rebuildif needed).
Profiling
-
In your
redoxterminal window, runmake qemuor your preferred VM command, and perform your testing. You will see console messages indicating that profile data is being logged. Exit QEMU or your VM before proceeding, if it did not exit automatically. -
In the
redoxdirectory, run the following commands.
# Create a directory for your data
mkdir my_profiler_data
# Make the Redox filesystem accessible at the path based on CONFIG_NAME
make mount
# Copy the profiling data from the Redox image to your directory
cp build/x86_64/my_profiler/filesystem/root/profiling.txt my_profiler_data
# Important - unmount the Redox filesystem
make unmount
cdinto the new directory and generate a symbol table for the kernel.
cd my_profiler_data
nm -CS ../cookbook/recipes/core/kernel/target/x86_64-unknown-redox/build/kernel > kernel_syms.txt
-
The next step is to determine the TSC frequency. tl;dr - just use your CPU clock rate in GHz. The TSC is a counter that tracks the clock cycles since the system was powered on. The TSC frequency can vary based when power saving is enabled, but Redox does not implement this yet, so CPU GHz should work fine.
-
Determine what formatting options you want for your flamegraph - 'i' for relaxed checking of function length, 'o' for reporting function plus offset rather than just function, 'x' for both grouping by function and with offset.
-
In the directory
my_profiler_data, generate the flamegraph.
redox-kprofiling profiling.txt kernel_syms.txt x 2.2 | inferno-collapse-perf | inferno-flamegraph > kernel_flamegraph.svg
Replace the x with your preferred formatting options. Replace the 2.2 with your TSC/CPU Clock frequency in GHz.
Then view your flamegraph in a browser.
firefox kernel_flamegraph.svg
Real Hardware (untested)
-
You need to set
HARDCODED_CPU_COUNTto the number of actual CPU cores - 1, and there must be at least 512 MiB reserved per core. -
Boot the system, and when you're done profiling, kill
profiledand extract/root/profiling.txt(Details TBD)
Benchmarks
This section give some commands to benchmark Redox.
- RAM benchmark
dd bs=1M count=1024 if=/scheme/zero of=/scheme/null
- Filesystem read speed benchmark
(Add the neverball recipe on your filesystem image, you can also install it with the sudo pkg install neverball command)
dd bs=1M count=256 if=/usr/games/neverball/neverball of=/scheme/null conv=fdatasync
- Filesystem write speed benchmark
(Add the neverball recipe on your filesystem image, you can also install it with the sudo pkg install neverball command)
dd bs=1M count=256 if=/usr/games/neverball/neverball of=fs_write_speed_bench conv=fdatasync
System Call Tracing
If you want to monitor what system calls are being made by a program, to investigate behavior, bugs or performance, there is a mechanism set up to do this.
You will learn how to configure the kernel to print a trace of system calls.
Modifying the Kernel
You will be modifying the kernel, but you won't be making extensive changes, so you don't need to bother with GitLab stuff, unless you intend to do this frequently. This description assumes you will look after that yourself.
- The kernel source is in the directory
cookbook/recipes/core/kernel/source - If the directory is missing, go to your
redoxdirectory and runmake f.kernel
Once you have fetched the kernel source into its "source" directory, you should disable the [source] section of the kernel recipe, so the build system doesn't try to update the kernel code.
- In the file
cookbook/recipes/core/kernel/recipe.toml, comment out the lines in the source section:
# [source]
# git = "https://gitlab.redox-os.org/redox-os/kernel.git"
feature "syscall_debug"
In order to configure printing out of system calls, you will need to enable the feature "syscall_debug" for the kernel.
- In the file
cookbook/recipes/core/kernel/source/Cargo.toml, scroll down to the default features list (maybe around line 50), and add the feature "syscall_debug":
default = [
  "acpi",
  "multi_core",
  "graphical_debug",
  "serial_debug",
  "self_modifying",
  "x86_kvm_pv",
  "syscall_debug", <---- Like this
]
Modify the "debug.rs" file
The file src/syscall/debug.rs contains the code to print out the system calls that match a particular set of conditions.
In the function debug_start (maybe around line 228), the boolean do_debug determines if the system calls should be printed.
It looks like this right now:
pub fn debug_start([a, b, c, d, e, f]: [usize; 6]) {
    let do_debug = if false && crate::context::current().read().name.contains("acpid") {
        if a == SYS_CLOCK_GETTIME || a == SYS_YIELD || a == SYS_FUTEX {
            false
        } else if (a == SYS_WRITE || a == SYS_FSYNC) && (b == 1 || b == 2) {
            false
        } else {
            true
        }
    } else {
        false
    };
Obviously, the condition false && whatever will evaluate to false, so remove the first bit (it's to prevent accidentally turning tracing on)
The program name is read from the context, and compared with the string you specify. The name from the context normally has the full path, so we just use the contains({name}) test.
But if your program is called "ls" for example, you will get a system call trace for any program that contains the letters "ls", so you could try something like ends_with("/ls").
You can modify the boolean expression however you want, assuming you are not publishing the code. You will need something a little fancier if you want messages for more than one program, for example.
If you want to hold onto the lock for the context a little longer, you will have to rework the expression a bit.
Next, there are some system calls that we skip because they are very frequent and not usually interesting. But if you want to get that level of detail, feel free to modify which system calls are filtered, gettime, yield and futex are typically ignored.
Also, writes to file descriptors 1 and 2 (stdout and stderr) are typically not reported so it doesn't interfere with output and debug code from your program as much.
A message will be printed at the start of the system call, and a message will be printed when the system call completes.
(A flag is set so the kernel knows to print the result.)
Building The Changes
To include these changes in your Redox image, run the following command:
make r.kernel image
Where Do The Messages Go
The kernel will print the messages on the console, if you are running make qemu the messages will appear in that terminal.
- Consider to run the following command to capture the output:
make qemu |& tee my_log.txt
If you are doing the testing on real hardware you should probably use the server variant and run commands from the console.
Contributing
Now that you are ready to contribute to Redox, read our CONTRIBUTING document to guide you.
Please follow our guidelines for Using Redox GitLab and our Best Practices.
If you are contributing to Redox, it's important to join us on Chat. Merge Requests are only reviewed if you post a link in the MRs room on Chat. It's also important to join so you can align with our current efforts and avoid unnecessary work.
Chat
The best way to communicate with the Redox team is on Matrix Chat, to join our chat, you must request an invitation in the Join Requests room (this room acts as a guard against spam and bots)
When your invitation is sent, you will receive a notification on Matrix.
After you accept the invitation, you can open the Redox Matrix space and see the rooms that are available.
These rooms are English-only, we cannot offer support in other languages because the maintainers will not be able to verify the correctness of your responses. But if you post translator-generated messages, we will do our best to understand them.
About Matrix
Matrix is an open chat protocol and has several different clients. Element is a commonly used choice, it works on web browsers, Linux, MacOSX, Windows, Android and iOS.
Rules
We follow the Rust Code Of Conduct as rules of the chat rooms.
Threads
- If you want to have a big discussion in our Matrix space you should use a thread.
- A thread is a list of messages, like a forum topic.
- A thread is linked to the original message, but displayed to the side to help improve the visibility of new questions in the main message area.
Not all Matrix clients support threads, so if you are not able to see threads in your client, try a different client.
If you are unable to use a client that supports threads, let us know when you ask a question, and we will try to accommodate you as best we can.
- To start a thread on Element, hover your mouse cursor over the desired message and click on the button with the message icon (a rectangular speech bubble).
- To see all threads in a room click on the top-right button with a message icon.
We mostly use Element threads but there are other Matrix clients with threads support, like nheko.
The Redox Space
All rooms available on the Redox space:
- #redox-join:matrix.org - A room to be invited to Redox space.
- #redox-announcements:matrix.org - A room for important announcements.
- #redox-general:matrix.org - A room for Redox-related discussions (questions, suggestions, porting, etc).
- #redox-dev:matrix.org - A room for the development, here you can talk about anything development-related (code, proposals, achievements, styling, bugs, etc).
- #redox-gitlab-updates:matrix.org - GitLab activity notifications room
- #redox-rfcs:matrix.org - A room for system architecture design discussions and brainstorming for RFCs.
- #redox-support:matrix.org - A room for testing and building support (problems, errors, questions).
- #redox-mrs:matrix.org - A room to send all ready merge requests without conflicts (if you have a ready MR to merge, send there).
- #redox-gitlab:matrix.org - A room to send new GitLab accounts for approval.
- #redox-soc:matrix.org - A room for the Redox Summer Of Code program.
- #redox-board:matrix.org - A room for meetings of the Board of Directors.
- #redox-voip:matrix.org - A room for voice chat discussions.
- #redox-random:matrix.org - A room for off-topic discussions.
- #redox-memes:matrix.org - A room for memes.
Troubleshooting
If you don't to deal with the Element problems, try Nheko or Fractal.
If you have connection problems see this website to see if the matrix.org homeserver is normal.
Element
-
Threads on Element have some bugs, typically marking messages as still unread, even after you have read them.
-
Element in the web browser does not show new messages in a thread as part of its new message count. It only shows a green or red dot over the Threads icon on the lower left of the display. A red dot means that the message is a reply to you. Click the Threads icon to see which rooms have new thread messages.
-
To display all threads in a room on Element in the web browser, click on the Threads icon on the top right of the display.
-
If the Threads button on the top right has a dot, you may have unread messages on some thread, but this could be wrong.
-
If a thread has a dot to the right, you have unread messages in that thread. Click on the thread to read it.
-
When entering a room where you have previously received replies in a thread, you may hear a notification bell, even though there is no new message.
-
Due to bugs, a thread you have previously read can show a dot and possibly count as unread messages. Click on the thread and make sure you have read it, and to clear it. If it is still not cleared, click on the "Thread options"
...button on the top right and select "Show in room". This will often clear it.
You can also mark an entire room as "Read" by mousing over the room name and selecting "Mark as read" from the "Room options" ... button.
-
After doing the steps above, if you still have problems, try reloading the page.
-
Element uses a cache, but clearing the cache sometimes causes problems, if you have encrypted rooms, like DM rooms, save your encryption keys before clearing your cache or you may lose the room history.
Read the Element documentation to learn more about encryption keys.
Best Practices and Guidelines
These are a set of best practices to keep in mind when making a contribution to Redox. As always, rules are made to be broken, but these rules in particular play a part in deciding whether to merge your contribution (or not). So do try to follow them.
Literate programming
Literate programming is an approach to programming where the source code serves equally as:
- The complete description of the program, that a computer can understand
- The program's manual for the human, that an average human can understand
Literate programs are written in such a way that humans can read them from front to back, and understand the entire purpose and operation of the program without preexisting knowledge about the programming language used, the architecture of the program's components, or the intended use of the program. As such, literate programs tend to have lots of clear and well-written comments. In extreme cases of literate programming, the lines of "code" intended for humans far outnumbers the lines of code that actually gets compiled!
Tools can be used to generate documentation for human use only based on the original source code of a program. The rustdoc tool is a good example of such a tool. In particular, rustdoc uses comments with three slashes ///, with special sections like # Examples and code blocks bounded by three backticks. The code blocks can be used to writeout examples or unit tests inside of comments. You can read more about rustdoc on the Rust documentation.
Writing Documentation Correctly (TM)
Documentation for Redox appears in two places:
- In the source code
- On the website (the Redox Book and online API documentation)
Redox functions and modules should use rustdoc annotations where possible, as they can be used to generate online API documentation - this ensures uniform documentation between those two halves. In particular, this is more strictly required for public APIs; internal functions can generally eschew them (though having explanations for any code can still help newcomers to understand the codebase). When in doubt, making code more literate is better, so long as it doesn't negatively affect the functionality. Run rustdoc against any added documentation of this type before submitting them to check for correctness, errors, or odd formatting.
Documentation for the Redox Book generally should not include API documentation directly, but rather cover higher-level overviews of the entire codebase, project, and community. It is better to have information in the Book than not to have it, so long as it is accurate, relevant, and well-written. When writing documentation for the Book, be sure to run mdbook against any changes to test the results before submitting them.
Rust Style
Since Rust is a relatively small and new language compared to others like C, there's really only one standard. Just follow the official Rust standards for formatting, and maybe run rustfmt on your changes, until we setup the CI system to do it automatically.
Rusting Properly
Some general guidelines:
- Use
std::mem::replaceandstd::mem::swapwhen you can. - Use
.into()and.to_owned()over.to_string(). - Prefer passing references to the data over owned data. (Don't take
String, take&str. Don't takeVec<T>take&[T]). - Use generics, traits, and other abstractions Rust provides.
- Avoid using lossy conversions (for example: don't do
my_u32 as u16 == my_u16, prefermy_u32 == my_u16 as u32). - Prefer in place (
boxkeyword) when doing heap allocations. - Prefer platform independently sized integer over pointer sized integer (
u32overusize, for example). - Follow the usual idioms of programming, such as "composition over inheritance", "let your program be divided in smaller pieces", and "resource acquisition is initialization".
- When
unsafeis unnecessary, don't use it. 10 lines longer safe code is better than more compact unsafe code! - Be sure to mark parts that need work with
TODO,FIXME,BUG,UNOPTIMIZED,REWRITEME,DOCME, andPRETTYFYME. - Use the compiler hint attributes, such as
#[inline],#[cold], etc. when it makes sense to do so. - Try to banish
unwrap()andexpect()from your code in order to manage errors properly. Panicking must indicate a bug in the program (not an error you didn't want to manage). If you cannot recover from an error, print a nice error to stderr and exit. Check Rust's book about Error Handling.
Avoiding Panics
Panics should be avoided in kernel, and should only occur in drivers and other services when correct operation is not possible, in which case it should be a call to panic!().
Please also read the kernel README for kernel-specific suggestions.
Testing Practices
-
It's always better to test boot (
make qemu) every time you make a change, because it is important to see how the OS boots and works after it compiles. -
Even though Rust is a safety-oriented language, something as unstable and low-level as a work-in-progress operating system will almost certainly have problems in many cases and may completely break on even the slightest critical change.
-
Also, make sure you verified how the unmodified version runs on your machine before making any changes. Else, you won't have anything to compare to, and it will generally just lead to confusion. TLDR: Rebuild and test boot often.
Using Redox GitLab
The Redox project is hosted here: Redox GitLab. You can download or clone the Redox source from there. However, if you wish to contribute, you will need a Redox Gitlab account.
This chapter provides an overview of Redox GitLab, how to get access, and how to use it as a Redox contributor.
Signing in to GitLab
Joining Redox GitLab
You don't need to join our GitLab to build Redox, but you will if you want to contribute. Obtaining a Redox account requires approval from a GitLab administrator, because of the high number of spam accounts (bots) that are created on this type of project. To join, first, go to Redox GitLab and click the Sign In/Register button. Create your User ID and Password. Then, send an message to the GitLab Approvals room indicating your GitLab User ID and requesting that your account be approved. Please give a brief statement about what you intend to use the account for. This is mainly to ensure that you are a genuine user.
The approval of your GitLab account may take some minutes or hours, in the meantime, join us on the chat and let us know what you are working on.
Setting up 2FA
Your new GitLab account will not require 2 Factor Authentication at the beginning, but it will eventually insist. Some details and options are described in detail below.
Using SSH for your Repo
When using git commands such as git push, git may ask you to provide a password. Because this happens frequently, you might wish to use SSH authentication, which will bypass the password step. Please follow the instructions for using SSH on the GitLab documentation. ED25519 is a good choice. Once SSH is set up, always use the SSH version of the URL for your origin and remote. e.g.
- HTTPS:
git clone https://gitlab.redox-os.org/redox-os/redox.git --origin upstream --recursive
- SSH:
git clone git@gitlab.redox-os.org:redox-os/redox.git --origin upstream --recursive
2FA Apps
Requirements Before Logging Into GitLab
Before logging-in, you'll need:
- your web browser open at Redox GitLab
- your phone
- your 2FA App installed on your phone.
- to add https://gitlab.redox-os.org/redox-os/ as a site in your 2FA App. Once added and the site listed, underneath you'll see 2 sets of 3 digits, 6 digits in all. i.e. 258 687. That's the 2FA Verification Code. It changes every so often around every minute.
Available 2FA Apps for Android
On Android, you may use:
- Aegis Authenticator - F-Droid/Play Store
- Google Authenticator
Available 2FA Apps for iPhone
On iPhone iOS, you may use:
Logging-In With An Android Phone
Here are the steps:
- From your computer web browser, open the Redox GitLab
- Click the Sign In button
- Enter your username/email
- Enter your password
- Click the Submit button
- Finally you will be prompted for a 2FA verification code from your phone. Go to your Android phone, go to Google/Aegis Authenticator, find the site gitlab redox and underneith those 6 digits in looking something like 258 687 that's your 2FA code. Enter those 6 digits into the prompt on your computer. Click Verify. Done. You're logged into Gitlab.
Logging-In With An iPhone
Here are the steps:
- From your computer web browser, open the Redox GitLab
- Click the Sign In button
- Enter your username/email
- Enter your password
- Click the Submit button
- Finally you will be prompted for a 2FA verification code from your phone. Go to your iPhone, go to 2stable/Tofu Authenticator or to your Settings->Passwords for iOS Authenticator, find the site gitlab redox and underneath those 6 digits in looking something like 258 687 that's your 2FA code. Enter those 6 digits into the prompt on your computer. Click Verify. Done. You're logged into Gitlab.
Repository Structure
Redox GitLab consists of a large number of Projects and Subprojects. The difference between a Project and a Subproject is somewhat blurred in Redox GitLab, so we generally refer to the redox project as the main project and the others as subprojects. On the Redox GitLab website, you will find the projects organized as a very large, flat alphabetical list. This is not indicative of the role or importance of the various projects.
The Redox Project
The redox project is actually just the root of the build system. It does not contain any of the code that the final Redox image will include. It includes the Makefiles, configuration files, and a few scripts to simplify setup and building. The redox project can be found on the GitLab repository.
Doing a git clone of redox.git with --recursive fetches the full build system, as described in the .gitmodules file. The submodules are referred to using a SHA hash to identify what commit to use, so it's possible that your fetched subprojects do not have the latest from their master branch. Once the latest SHA reference is merged into redox, you can update to get the latest version of the subproject.
Recipes
The many recipes that are added into the Redox image are built from the corresponding subprojects. The name of a Redox package almost always matches the name of its subproject, although this is not enforced.
The recipe contains the instructions to download and build a program, for its inclusion in the Redox image. The recipe is stored with the Cookbook.
Cookbook
The cookbook subproject contains the mechanism for building the Redox recipes. If a recipe is modified, it is updated in the cookbook subproject. In order for the updated recipe to get included in your downloaded cookbook, the redox project needs to be updated with the new cookbook SHA commit hash. Connect with us on the chat if a recipe is not getting updated.
Crates
Some subprojects are built as Rust crates, and included in Redox recipes using Cargo's dependency management system. Updates to a crate subproject must be pushed to the crate repository in order for it to be included in your build.
Forks, Tarballs and Other Sources
Some recipes obtain their source code from places other than Redox GitLab. The Cookbook mechanism can pull in source from any Git repository URL. It can also obtain tarballs which is most used by C/C++ programs.
In some cases, the Redox GitLab has a fork of another repository, in order to add Redox-specific patches. Where possible, we try to push these changes upstream, but there are many reasons why this might not be feasible.
Personal Forks
When you are contributing to Redox, you are expected to make your changes in a Personal Fork of the relevant project, then create a Merge Request (PR) to have your changes pulled from your fork into the master. Note that your personal fork is required to have public visibility.
In some rare situations, e.g. for experimental features or projects with licensing that is not compatible with Redox, a recipe may pull in sources located in a personal repository. Before using one of these recipes, please check with us on the chat to understand why the project is set up this way, and do not commit a Redox config file containing such a recipe without permission.
Creating Proper Bug Reports
If you identify a problem with the system that has not been identified previously, please create a GitLab Issue. In general, we prefer that you are able to reproduce your problem with the latest build of the system.
- Make sure the code you are seeing the issue with is up to date with
upstream/master. This helps to weed out reports for bugs that have already been addressed. - Search Redox Issues to see if a similar problem has been reported before. Then search outstanding merge requests to see if a fix is pending.
- Make sure the issue is reproducible (trigger it several times). Try to identify the minimum number of steps to reproduce it. If the issue happens inconsistently, it may still be worth filing a bug report for it, but indicate approximately how often the bug occurs.
- Explain if your problem happens in a virtual machine, real hardware or both. Also say your configuration (default options or customized), if you had the problem on real hardware say your computer model.
- If it is a significant problem, join us on the chat and ask if it is a known problem, or if someone plans to address it in the short term.
- Identify the recipe that is causing the issue. If a particular command is the source of the problem, look for a repository on Redox GitLab with the same name. Or, for certain programs such as
gamesor command line utilities, you can search for the package containing the command withgrep -rnw COMMAND --include Cargo.toml, whereCOMMANDis the name of the command causing the problem. The location of theCargo.tomlfile can help indicate which recipe contains the command. This is where you should expect to report the issue. - If the problem involves multiple recipes, kernel interactions with other programs, or general build problems, then you should plan to log the issue against the
redoxrepository. - If the problem occurs during build, record the build log using
scriptortee, e.g.
make r.recipe-name 2>&1 | tee recipe-name.log
If the problem occurs while using the Redox command line, use script in combination with your Terminal window.
tee qemu.log
make qemu
- Wait for Redox to start, then in this window:
redox login: user
- Execute the commands to demonstrate the bug
- Terminate QEMU
sudo shutdown
- If shutdown does not work (there are known bugs) then
- Use the QEMU menu to quit
- Then exit the shell created by script
exit
-
Join us in the chat.
-
Record build information like:
- The rust toolchain you used to build Redox
rustc -Vand/orrustup showfrom your Redox project folder
- The commit hash of the code you used
git rev-parse HEAD
- The environment you are running Redox in (the "target")
qemu-system-x86_64 -versionor your current hardware configuration, if applicable
- The operating system you used to build Redox
uname -aor an alternative format
- The rust toolchain you used to build Redox
-
Format your log on the message in Markdown syntax to avoid a flood on the chat, you can see how to do it on the GitHub documentation.
-
Make sure that your bug doesn't already have an issue on GitLab. Feel free to ask in the Redox Chat if you're uncertain as to whether your issue is new.
-
Create a GitLab issue following the template. Non-bug report issues may ignore this template.
-
Once you create the issue don't forget to post the link on the Dev or Support rooms of the chat, because the GitLab email notifications have distractions (service messages or spam) and most developers don't left their GitLab pages open to receive desktop notifications from the web browser (which require a custom setting to receive issue notifications).
By doing this you help us to pay attention to your issues and avoid them to be accidentally forgotten.
- Watch the issue and be available for questions.
Creating Proper Pull Requests
In order for changes you have made to be added to Redox, or other related projects, it is necessary to have someone review your changes, and merge them into the official repository.
This is done by preparing a feature branch, and submitting a merge request.
For small changes, it is sufficient to just submit a pull request. For larger changes, which may require planning or more extensive review, it is better to start by creating an issue. This provides a shared reference for proposed changes, and a place to collect discussion and feedback related to it.
The steps given below are for the main Redox project repository - submodules and other projects may vary, though most of the approach is the same.
Please note:
- Once you have marked your MR as ready, don't add new commits.
- If you need to add new commits mark the MR as draft again.
Preparing your branch
- In an appropriate directory, e.g.
~/tryredox, clone the Redox repository to your computer using one of the following commands:
-
HTTPS:
git clone https://gitlab.redox-os.org/redox-os/redox.git --origin upstream --recursive -
SSH:
git clone git@gitlab.redox-os.org:redox-os/redox.git --origin upstream --recursive -
Use HTTPS if you don't know which one to use. (Recommended: learn about SSH if you don't want to have to login every time you push/pull!)
-
If you used
bootstrap.sh(see the Building Redox page), thegit clonewas done for you and you can skip this step.
-
Change to the newly created redox directory and rebase to ensure you're using the latest changes:
cd redoxgit rebase upstream master -
You should have a fork of the repository on GitLab and a local copy on your computer. The local copy should have two remotes;
upstreamandorigin,upstreamshould be set to the main repository andoriginshould be your fork. Log into Redox Gitlab and fork the Repository - look for the button in the upper right. -
Add your fork to your list of git remotes with
-
HTTPS:
git remote add origin https://gitlab.redox-os.org/MY_USERNAME/redox.git -
SSH:
git remote add origin git@gitlab.redox-os.org:MY_USERNAME/redox.git -
Note: If you made an error in your
git remotecommand, usegit remote remove originand try again.
-
Alternatively, if you already have a fork and copy of the repo, you can simply check to make sure you're up-to-date. Fetch the upstream, rebase with local commits, and update the submodules:
git fetch upstream mastergit rebase upstream/mastergit submodule update --recursive --initUsually, when syncing your local copy with the master branch, you will want to rebase instead of merge. This is because it will create duplicate commits that don't actually do anything when merged into the master branch.
-
Before you start to make changes, you will want to create a separate branch, and keep the
masterbranch of your fork identical to the main repository, so that you can compare your changes with the main branch and test out a more stable build if you need to. Create a separate branch:git checkout -b MY_BRANCH -
Make your changes and test them.
-
Commit:
git add . --allgit commit -m "COMMIT MESSAGE"Commit messages should describe their changes in present-tense, e.g. "
Add stuff to file.ext" instead of "added stuff to file.ext". Try to remove duplicate/merge commits from PRs as these clutter up history, and may make it hard to read. -
Optionally run rustfmt on the files you changed and commit again if it did anything (check with
git difffirst). -
Test your changes with
make qemuormake virtualbox. -
Pull from upstream:
git fetch upstreamgit rebase upstream/master
- Note: try not to use
git pull, it is equivalent to doinggit fetch upstream; git merge master upstream/master.
-
Repeat step 10 to make sure the rebase still builds and starts.
-
Push your changes to your fork:
git push origin MY_BRANCH
Submitting a merge request
- On Redox GitLab, create a Merge Request, following the template. Explain your changes in the title in an easy way and write a short statement in the description if you did multiple changes. Submit!
- Once your merge request is ready, notify reviewers by sending the link to the Redox Merge Requests room.
Incorporating feedback
Sometimes a reviewer will request modifications. If changes are required:
-
Reply or add a thread to the original merge request notification in the Redox Merge Requests room indicating that you intend to make additional changes.
Note: It's best to avoid making large changes or additions to a merge request branch, but if necessary, please indicate in chat that you will be making significant changes.
-
Mark the merge request as "Draft" before pushing any changes to the branch being reviewed.
-
Make any necessary changes.
-
Reply on the same thread in the Redox Merge Requests room that your merge request is now ready.
-
Mark the merge request as "Ready"
This process communicates that the branch may be changing, and prevents reviewers from expending time and effort reviewing changes that are still in progress.
Using GitLab web interface
- Open the repository that you want and click in "Web IDE".
- Make your changes on repository files and click on "Source Control" button on the left side.
- Name your commits and apply them to specific branches (each new branch will be based on the current master branch, that way you don't need to create forks and update them, just send the proper commits to the proper branches, it's recommended that each new branch is a different change, more easy to review and merge).
- After the new branch creation a pop-up window will appear suggesting to create a MR, if you are ready, click on the "Create MR" button.
- If you want to make more changes, finish them, return to the repository page and click on the "Branches" link.
- Each branch will have a "Create merge request" button, click on the branches that you want to merge.
- Name your MR and create (you can squash your commits after merge to not flood the upstream with commits)
- If your merge request is ready, send the link on Redox Merge Requests room.
- Remember that if you use forks on GitLab web interface you will need to update your forks manually in web interface (delete the fork/create a new fork if the upstream repository push commits from other contributors, if you don't do this, there's a chance that your merged commits will come in the next MR).
GitLab Issues
GitLab issues are a formal way to communicate with Redox developers. They are best used to document and discuss specific features or to provide detailed bug reports. This communication is preserved and available for later reference.
For problems that can be quickly resolved, or require a quick response, using the chat is probably better.
Once you create an issue don't forget to post the link on the Dev or Support rooms of the chat, because the GitLab email notifications have distractions (service messages or spam) and most developers don't left their GitLab pages open to receive desktop notifications from the web browser (which require a custom setting to receive issue notifications).
By doing this you help us to pay attention to your issues and avoid them to be accidentally forgotten.
If you haven't joined the chat yet, you should (if at all interested in contributing)!
Please follow the Guidelines for your issues, if applicable. You will need a Redox GitLab account. See Signing in to GitLab.