The Orbital Widget Toolkit

by Florian Blasius, with contributions from the Rust Community
annotated and documented by Ralf Zerres and all contributers
This version of the text assumes you’re using OrbTk v0.3.1 or later in
conjuction with Rust v1.41.0 or later. Cargo.toml should define
edition="2018". That enables and uses Rust 2018 Edition idioms in
all derived projects.
See the “Installation” section of Chapter 1 to install or update OrbTk.
The 2020 Edition of this book is the initial release. It will be released with the OrbTk version 0.3.1.
- Appendix A “Keywords”, explains the new raw identifiers.
- Appendix D “Translations”, is work in progress. We will release instances of this book in the target language once they are translated.
For online reading, a HTML rendered version is available at Orbtk
book_en. Alternatively you might want to have it handy
for offline usage. Either you downlaod a rendered pdf or
ebookversion or go ahead and download the source. Then kick on
mdbook (the definition of the target location is optional).
mdbook build --dest-dir doc/book_en --open
Foreword
This book fully embraces the potential of Rust for develpers creating modern, fast and extendable user interfaces. Since all component of OrbTk are coded in Rust itself, it inherits all the benefits of this extraorenary programming infrastructure. The minimalistic resource consumption, memory safety and a condensed, well structured modular source code are key factors that makes OrbTk a promising basis for your future multiplatform GUI projects.
Back in the 80’th runtime environments like Java pioniered the idea of a “programming once, run everywhere” toolchain. Rust in combination with OrbTk offers the opportunity to fullfill this goal while providing speed, safety and multithreading. You are free to lavarage the capabilities of modern hardware: Take advantage of multicore CPUs in microcomputers, single board computers or the diversity of cloud infrastructures. Rust let you compile native binary-code and OrbTk will offer the needed crates, to produce software that matches user demands: running fast, secure and reliable applications.
Its users will enjoy the friendly and approachable text, that is intended to help you level up not just your knowledge towards GUI development, but will also improve your understanding of Rust code. Dive in, get ready to be a member of the OrbTk and Rust community!
— Ralf Zerres
Introduction

Welcome to The Orbital Widget Toolkit, an introductory book about OrbTk.
The Rust programming language helps you write faster and reliable software.
OrbTk contribute the needed crates, to develop modern graphical user interfaces.
It offers a single code base that compiles to native binary code that is executed
on your target platform.
Features
- Modern lightweight API
- Cross platform
- Modular crates
- Based on Entity Component System library DCES
- Flexible event system
- Integrated widget library
- Custom widgets
- Custom theming engine
- Dynamic theme switching
- Integrated debugging tools
- Localization
Supported Platforms
- Redox OS (native)
- Linux (native | cargo-node)
- macOS (native | cargo-node)
- Windows (native | cargo-node)
- openBSD (not tested, but should work)
- Web (cargo-node)
- Android (native planned | cargo-node)
- iOS (native planned | cargo-node planned)
- Ubuntu Touch (native planned | cargo-node planned)
Who OrbTk Is For
OrbTk is ideal for programmers that like to take advantage of the Rust programming
language. No need to transform data structures and types: OrbTk itself is coded in
Rust. It naturally adopts all the structural advantages and provides the needed GUI
elements to code your application. Let’s look at a few of
the most important groups.
Teams of Developers
Rust is proving to be a productive tool for collaborating among large teams of developers with varying levels of systems programming knowledge. Have a look at the Rust book that elaborates the fundamental principles that enables you to produce more secure code.
OrbTk reuses the Rust toolchain as much as possible. Contemporary developer
that have passed the learning curve will take advantage of:
- Cargo, the included dependency manager and build tool, makes adding, compiling, and managing dependencies painless and consistent across the Rust ecosystem.
- Rustfmt ensures a consistent coding style across developers.
- The Rust Language Server powers Integrated Development Environment (IDE) integration for code completion and inline error messages.
Students
Rust is for students and those who are interested in learning about systems concepts. Using Rust, many people have learned about topics like operating systems development. The community is very welcoming and happy to answer student questions. Through efforts such as this book, the Rust teams want to make systems concepts more accessible to more people, especially those new to programming.
Companies
Hundreds of companies, large and small, use Rust in production for a variety of tasks. Those tasks include command line tools, web services, DevOps tooling, embedded devices, audio and video analysis and transcoding, cryptocurrencies, bioinformatics, search engines, Internet of Things applications, machine learning, and even major parts of the Firefox web browser.
Open Source Developers
OrbTk is for people who want to build with the Rust programming language,
its community, its developer tools, and libraries. We’d love to have you
contribute to its crates and entities.
Who This Book Is For
This book assumes that you’ve written code in another programming language and other GUI toolkits. We do not make any assumptions about which specific one. We’ve tried to make the material broadly accessible to those from a wide variety of development backgrounds. We don’t spend a lot of time talking about what programming is or how to think about it. If you’re entirely new to programming, you would be better served by reading a book that specifically provides an introduction to programming.
How to Use This Book
In general, this book assumes that you’re reading it in sequence from front to back. Later chapters build on concepts in earlier chapters, and earlier chapters might not delve into details on a topic; we typically revisit the topic in a later chapter.
You’ll find two kinds of chapters in this book: concept chapters and project
chapters. In concept chapters, you’ll learn about an aspect of OrbTk. In project
chapters, we’ll build small programs together, applying what you’ve learned so
far.
Chapter 1 explains how to install Rust and OrbTk, how to write a minimal program, and how to use Cargo, Rust’s package manager and build tool.
Finally, some appendixes contain useful information about the in a more reference-like format. Appendix A covers OrbTk’s keywords, Appendix B covers OrbTk’s derivable traits and crates.
There is no wrong way to read this book: if you want to skip ahead, go for it! You might have to jump back to earlier chapters if you experience any confusion. But do whatever works for you.
An important part of the process of learning OrbTk is learning how to read the
error messages the compiler displays: these will guide you toward working code.
As such, we’ll provide many examples that don’t compile along with the error
message the compiler will show you in each situation. Know that if you enter
and run a random example, it may not compile! Make sure you read the
surrounding text to see whether the example you’re trying to run is meant to
error. Ferris will also help you distinguish code that isn’t meant to work:
| Ferris | Meaning |
|---|---|
 | |
| This code does not compile! | |
 | |
| This code panics! | |
 | |
| This code block contains unsafe code. | |
 | |
| This code does not produce the desired behavior. |
In most situations, we’ll lead you to the correct version of any code that doesn’t compile.
Source Code
The source files from which this book is generated can be found on the Homepage at Orbtk book (en).
Getting Started
Let’s start your OrbTk journey! There’s a lot to learn, but every journey starts somewhere. In this chapter, we’ll discuss:
- Installing OrbTk on Linux, Bsd, macOS, and Windows.
- Writing a basic OrtTK application that opens a windows placing
Hello OrbTk!in its center. - Using
cargo, Rust’s package manager and build system.
Installation
The first step is to install Rust. This is described in depth following Rust book Chapter 1
When creating a OrbTk application, we define the needed dependencies to the OrbTk crates in the Cargo.toml file of our project. The complile process will resolve the references and download the source as needed.
Command Line Notation
In this chapter and throughout the book, we’ll show some commands used in the terminal. Lines that you should enter in a terminal all start with
$. You don’t need to type in the$character; it indicates the start of each command. Lines that don’t start with$typically show the output of the previous command. Additionally, PowerShell-specific examples will use>rather than$.
Troubleshooting
WIP: What are the most common culprits? Can we provide some general, basic solutions
Local Documentation
OrbTk offers the option to install its documentation locally, so you can read it offline.
Any time a type, a function, a method or a crate is reference by the toolkit and you’re not sure what it does or how to use it, have a look at its application programming interface API documentation to find out!
Install Rust on Linux or macOS
If you are using Linux or macOS open up an terminal and copy and paste the text below and hit the enter key on your keyboard:
curl https://sh.rustup.rs -sSf | sh
Install Rust on Windows
Download and run the Rust windows installer from https://www.rust-lang.org/tools/install.
Install Redoxer (Redox OS)
If you want build and run your Rust application on a KVM capable OS for Redox you can use redoxer.
To install Redoxer you have to first install the rust toolchain. After that open up an terminal and copy and paste the text below and hit the enter key on your keyboard:
cargo +nightly install redoxer
To compile and run your application on Redox OS you should check the Redox OS Book.
Editor and IDE integration
A wide range of editors and IDE’s are providing support for Rust code like
- like syntax-highlighting
- auto-completion
- linting
- lsp support
VS Code
There is a big community that rely on the visualstudio implementation
to handle their code base. Following are the steps needed to expand
your installation to support VS Code for Rust development:
- Download VS Code from.
- Install Rust Language Server plugin (the Rust Language Server).
Alternative Editors and IDEs
If you perefer other solution, you will find in depth help inside the context of this inclomplete links:
Hello OrbTk!
Now that you’ve installed the needed building blocks, let’s write your first
OrbTk program. It’s traditional when learning a new language to write a little
program that outputs the text Hello, world!. So we’ll do the same here. We
create a minimal app, that creates a window, position this window at the given
coordinate of your screen. The text will be placed in the center of this
widget.
Note: This book assumes basic familiarity with the command line. Rust makes no specific demands about your editing or tooling or where your code lives, so if you prefer to use an integrated development environment (IDE) instead of the command line, feel free to use your favorite IDE. Many IDEs now have some degree of Rust support; check the IDEs documentation for details. Recently, the Rust team has been focusing on enabling great IDE support, and progress has been made rapidly on that front!
Creating a Project Directory
You’ll start by making a directory to store your OrbTk code. It doesn’t matter to Rust and OrbTk where your code lives, but for the exercises and projects in this book, we suggest making a projects directory in your home directory and keeping all your projects there.
Open a terminal and enter the following commands to make up the projects structure.
For Linux, BSD, macOS, and Power-Shell on Windows:
$ mkdir -p ~/orbtk-book/projects
$ cd ~/orbtk/projects
For Windows CMD:
> mkdir "%USERPROFILE%\orbtk-book"
> cd /d "%USERPROFILE%\orbtk-book"
> mkdir projects
> cd projects
Writing and Running a OrbTk Application
Next, we make a new project using Cargo. With its .toml file we allow Rust to declare the various dependencies and metadata. That ensures that you’ll always get a repeatable output of the build.
Go ahead like so:
$ cargo new orbtk_hello
$ cd orbtk_hello
The first command, cargo new, takes the name of the project
(”orbtk_hello“) as the first argument. The second command changes to
the new project’s directory.
Look at the generated Cargo.toml file:
Filename: Cargo.toml
[package]
name = "orbtk_hello_example"
version = "0.1.0"
authors = ["Your Name <you@example.com>"]
edition = "2018"

# See more keys and their definitions at https://doc.rust-lang.org/cargo/reference/manifest.html

[dependencies]
Listing 1-1: Default metadata “orbtk_hello”
With cargo new, a default project structure is created. Maybe the
author information is already exchanged if Cargo could obtain a definition
from your environment. Cargo also generated source code for a “Hello, world!”
program. Let’s Check out the corresponding src/main.rs file:
Filename: src/main.rs
fn main() {
    println!("Hello, world!");
}
Listing 1-2: Default source file “main.rs”
No need to compile that stage with cargo run, since we are going to
exchange the project metadata, as well as the orbtk source code right
away.
Update Cargo.toml
First reopen the Cargo.toml file and enter the Code in Listing 1-1 into Cargo.toml
Filename: Cargo.toml
[package]
name = "orbtk_hello"
version = "0.3.1-alpha4"
authors = [
	"Florian Blasius <flovanpt@posteo.de>",
	"Ralf Zerres <ralf.zerres.de@gmail.com>",
]
description = "The Orbital Widget Toolkit - Training project"
documentation = "https://docs.rs/orbtk"
repository = "https://github.com/redox-os/orbtk"
readme = "README.md"
license = "MIT"
keywords = [
	"orbital",
	"widget",
	"ui",
]
edition = "2018"

[profile.dev]
opt-level = 1

[dependencies]
orbtk = { git = "https://github.com/redox-os/orbtk.git", branch = "develop" }
#orbtk = { path = "../../../orbtk", branch="next" }

[[bin]]
name = "orbtk_hello"
path = "src/main.rs"
Listing 1-1: Project metadata “orbtk_hello”
You may wonder, why the name property inside the Cargo.toml is
formatted like hello_orbtk.
name = "orbtk_hello"
It is a good habit to follow rusts
naming convention, that encourages you to use snake_case
naming. While expanding the OrbTk example sources, we will keep
the grouping prefix orbtk. That way we end up to call our first target
binary orbtk_hello.
Update main.rs
All of the OrbTk specific code that is needed to build our first example “Hello OrbTk!” is shown in Listing 1-2. It goes to src/main.rs.
Filename: src/main.rs
use orbtk::prelude::*;

fn main() {
    // use this only if you want to run it as web application.
    orbtk::initialize();

    Application::new()
        .window(|ctx| {
            Window::new()
                .title("OrbTk-Book - Chapter 1.2")
                .position((100.0, 100.0))
                .size(420.0, 140.0)
                .child(
                    TextBlock::new()
                        .font_size(28)
                        .h_align("center")
                        .text("Hey OrbTk!")
                        .v_align("center")
                        .build(ctx)
                )
                .build(ctx)
        })
        .run();
}
Listing 1-2: Code that creates a Window and prints “Hey OrbTk!”
Save the file and go back to your terminal window. Enter the following commands to compile and run the file:
$ cargo run --release orbtk_hello
Note: Perhaps the OS requires you to install the development version of SDL2 via the distribution package-manager (e.g. for Ubuntu: libsdl2-dev).
Regardless of your operating system, a window should be placed on the screen
that prints the string Hey OrbTk! in its center.
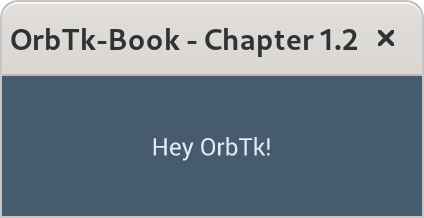
Image 1-2: Application window and Hey OrbTk
If something is preventing to position the window, refer back to the
“Troubleshooting” part of the Installation section for ways to get help.
If your enjoy the rendered output of your Hey OrbTk! app,
congratulations! You’ve written your first OrbTk application.
That makes you a OrbTk programmer — welcome!
Anatomy of an OrbTk Application
Let’s have a closer look at the code structure of this first “Hey OrbTk!” application.
For now it should be sufficient to disenchant the first puzzle pieces. If you like to understand the structure in a more generic way, in Chapter Workspace we are going to provide the details.
use orbtk::prelude::*;

fn main() {
    // use this only if you want to run it as web application.
    orbtk::initialize();

    Application::new()
        .window(|ctx| {
            Window::new()
                .title("OrbTk-Book - Chapter 1.2")
                .position((100.0, 100.0))
                .size(420.0, 140.0)
                .child(
                    TextBlock::new()
                        .font_size(28)
                        .h_align("center")
                        .text("Hey OrbTk!")
                        .v_align("center")
                        .build(ctx)
                )
                .build(ctx)
        })
        .run();
}
The first line is introducing a use declaration. A use declaration is used to shorten the path required to refer to rust module items. The prelude is a convenient way to a list of things, that rust will automatically import to you program. Here, we bind the path orbtk::prelude. All default items defined in this path (referenced with ::) are now accessible in your source using their shorthand name. No need to type in their common prefix (orbtk::prelude::)
use orbtk::prelude::*;

fn main() {
    // use this only if you want to run it as web application.
    orbtk::initialize();

    Application::new()
        .window(|ctx| {
            Window::new()
                .title("OrbTk-Book - Chapter 1.2")
                .position((100.0, 100.0))
                .size(420.0, 140.0)
                .child(
                    TextBlock::new()
                        .font_size(28)
                        .h_align("center")
                        .text("Hey OrbTk!")
                        .v_align("center")
                        .build(ctx)
                )
                .build(ctx)
        })
        .run();
}
the third line define a function in Rust. The main function is special: it is
always the first code that runs in every executable Rust program. The first
line declares a function named main that has no parameters and returns
nothing. If there were parameters, they would go inside the parentheses, ().
Also, note that the function body is wrapped in curly brackets, {}. Rust
requires these around all function bodies. It’s good style to place the opening
curly bracket on the same line as the function declaration, adding one space in
between.
An automatic formatter tool called rustfmt will help you to stick to a
standard style across Rust projects. OrbTk is following this guidance.
rustfmt will format your code in a particular style. Depending on the version
of your rust toolchain, it is probably already installed on your computer!
Check the online documentation for more details.
Inside the main function is the following code:
use orbtk::prelude::*;

fn main() {
    // use this only if you want to run it as web application.
    orbtk::initialize();

    Application::new()
        .window(|ctx| {
            Window::new()
                .title("OrbTk-Book - Chapter 1.2")
                .position((100.0, 100.0))
                .size(420.0, 140.0)
                .child(
                    TextBlock::new()
                        .font_size(28)
                        .h_align("center")
                        .text("Hey OrbTk!")
                        .v_align("center")
                        .build(ctx)
                )
                .build(ctx)
        })
        .run();
}
Here are some important details to notice.
- First, Rust style is to indent with four spaces, not a tab.
- Second, the method
orbkt::initializedoes all the hard work to initialize the orbtk environment.
use orbtk::prelude::*;

fn main() {
    // use this only if you want to run it as web application.
    orbtk::initialize();

    Application::new()
        .window(|ctx| {
            Window::new()
                .title("OrbTk-Book - Chapter 1.2")
                .position((100.0, 100.0))
                .size(420.0, 140.0)
                .child(
                    TextBlock::new()
                        .font_size(28)
                        .h_align("center")
                        .text("Hey OrbTk!")
                        .v_align("center")
                        .build(ctx)
                )
                .build(ctx)
        })
        .run();
}
- Third, the method
Application::newcreates a new entity in the entity component system (DECS). DECS is an OrbTk dependency that will create and organize all OrbTk entities. If OrbTk methods change attributes to the widget elements, the corresponding DECS object will store this attributes as components to the given entity.
We’ll discuss OrbTk macros and methods in more detail in Chapter <WIP: chapter>.
For now, you just need to know that using a ::new() means that you’re calling
the creation method of a given widget (here: Application).
Let’s explain the next lines:
use orbtk::prelude::*;

fn main() {
    // use this only if you want to run it as web application.
    orbtk::initialize();

    Application::new()
        .window(|ctx| {
            Window::new()
                .title("OrbTk-Book - Chapter 1.2")
                .position((100.0, 100.0))
                .size(420.0, 140.0)
                .child(
                    TextBlock::new()
                        .font_size(28)
                        .h_align("center")
                        .text("Hey OrbTk!")
                        .v_align("center")
                        .build(ctx)
                )
                .build(ctx)
        })
        .run();
}
Inside the Application method, we pipe in further instructions. Please notice
the important details:
- First, Rust style is to indent with another four spaces, not a tab.
- Second, The piping is encoded using a
dotfollowed by a new method name (herewindow). - Third, the
windowsmethod takes a Rust closure as its argument.
If you are not familiar with the concept of
closures,
go ahead and consult the Rust book reference for a deep dive. For now,
you just need to know that a closure can be used as a language
shortcut for a function. When the closure |ctx| {} is executed, the
result will be captured inside a return variable (ctx). The curly
braces define the body, with the code that is executed inside the
closure.
Let’s examine this body code of our closure:
- First, we call a method to create a new window entity.
(
Windows::new). - Second, we define attributes attached to this entity (
title,position,size). - Third, inside the defined windows, we create a new child entity
(
child).
use orbtk::prelude::*;

fn main() {
    // use this only if you want to run it as web application.
    orbtk::initialize();

    Application::new()
        .window(|ctx| {
            Window::new()
                .title("OrbTk-Book - Chapter 1.2")
                .position((100.0, 100.0))
                .size(420.0, 140.0)
                .child(
                    TextBlock::new()
                        .font_size(28)
                        .h_align("center")
                        .text("Hey OrbTk!")
                        .v_align("center")
                        .build(ctx)
                )
                .build(ctx)
        })
        .run();
}
- Forth, the child method takes arguments. We create a new text block
entity (
Textblock::new). The text block is extended with the attributes (text,h_align,v_align). The text attribute takes the desired string. Its positioning is controlled with the attribution of the horizontal and vertical alignment. By choosing “center”, we do advise the renderer to place the entity centered within its parent entity, which is the window.
use orbtk::prelude::*;

fn main() {
    // use this only if you want to run it as web application.
    orbtk::initialize();

    Application::new()
        .window(|ctx| {
            Window::new()
                .title("OrbTk-Book - Chapter 1.2")
                .position((100.0, 100.0))
                .size(420.0, 140.0)
                .child(
                    TextBlock::new()
                        .font_size(28)
                        .h_align("center")
                        .text("Hey OrbTk!")
                        .v_align("center")
                        .build(ctx)
                )
                .build(ctx)
        })
        .run();
}
OrbTk is as lazy as possible. We need to call the build method (build(ctx)),
that will instantiate our methods and let the renderer do its work.
use orbtk::prelude::*;

fn main() {
    // use this only if you want to run it as web application.
    orbtk::initialize();

    Application::new()
        .window(|ctx| {
            Window::new()
                .title("OrbTk-Book - Chapter 1.2")
                .position((100.0, 100.0))
                .size(420.0, 140.0)
                .child(
                    TextBlock::new()
                        .font_size(28)
                        .h_align("center")
                        .text("Hey OrbTk!")
                        .v_align("center")
                        .build(ctx)
                )
                .build(ctx)
        })
        .run();
}
With the last statement, we finally call the method that will activate the
Application and draw the Widget on our screen (run).
Most lines of Rust code are finalized with a semicolon (;), to indicates that this
expression is finished and the next one is ready to begin.
Compiling and Running Are Separate Steps
Before running an OrbTk application, you must compile its source code. A typical OrbTk project will generate the executable binary code using cargo and place the result in the target subfolder of the project.
Profiles may be used to configure compiler options such as optimization levels
and debug settings. By default the dev or test profiles are used. If the
--release flag is given, then the release or bench profiles are used.
$ cargo build --release --bin orbtk_hello.rs
$ ../target/release/hello_orbtk
On Windows, you need to use backslash as a path delimiter:
> cargo build --release --bin orbtk-hello.rs
> ..\target\release\orbtk_hello.exe
If you like to get debug feedback you can call the build process like this
$ cargo build --features debug --bin hello_orbtk.rs
The Ingredients
OrbTk provides an interactive functional
reactive API. It depends on the rust
DCES crate, that provides an Entity Component
System. Interaction with DCES is managed via the Entity Component Manager(ECM), a wrapper API, that transparently maps OrbTk widgets
to ECM entities and OrbTk properties to ECM components.
The widget view
graph TD;
	View-->Widget-Container_1;
	View-->Widget-Container_2;
	Widget-Container_1-->Child-Widget1_1;
	Widget-Container_1-->Child-Widget1_2;
	Widget-Container_1-->Child-Widget1_n;
	Widget-Container_2-->Child-Widget2_1;
	Widget-Container_2-->Child-Widget2_2;
	Widget-Container_2-->Child-Widget2_n;
Workflow 1-1: View handling methods
When you construct an OrbTk application, you are essentially combining
widgets. Widgets are the building blocks of user interfaces in
OrbTk, dedicated to a given task. The given model is dynamically
structured. You are free to implement your own widget type or consume
the predefined implementations.
To make up a widget-tree, you may construct a ListView, that
instantiates a child TextBox that itself instantiates a child
Button. You end up with an ordered user interface (the view), the
visible part of your app. Each widget-tree is stacked into a uniquely
addressable widget-container.
Widget trait
Each widget need to implement the Widget trait. It is generated by the
widget!(); macro.
A widget consists of a name (eg. Button) that is bound to a list of
properties (eg. text: String, background: Brush or count: u32). When the build method of a widget is called inside the
widget-tree, that widget is added to the Entity Component System with
a unique Entity (index) that holds corresponding Components (property
names). The struct of the widget-container serves as its builder pattern.
Widget Template
Each widget has to implement the Template trait. The template defines
the default values of a widget’s properties as well as its
structure. E.g. a Button consists of a Container widget, a StackPanel
widget and a TextBox widget.
Separating the view as the descriptive nature of a widget tree from
the code that reacts and handles user input (it’s state), is an
essential conceptual decision. It is key to enable the fast, flexible
and extendable structure of OrbTk.
The widget state
graph TD;
	State-->init;
	State-->update;
	State-->cleanup;
	update-->message;
	message-->layout;
	layout-->update_post_layout;
Workflow 1-2: State handling methods
Widgets make use of traits, that come in handy to provide
interactivity. We call them the widget state. Inside the state
routines, we declare the processing and controlling code dedicated to
a given task. The given model is dynamically structured. You are free
to implement your own widget type or consume the predefined
implementations.
It is not required to define a state for a widget. But if you
don’t, you cut of the possibility to adapt properties during
runtime. The view of the widget will stay static.
When defining a state of a widget, it inherits the values of its
associated properties (current values), as well as the implemented
system. To gain access, each state has to derive or implement the
[Default] and the [AsAny] traits. You are free to implement
associated functions to the state, that react on triggered events or
adapt current values. The properties are stored via ECM. They are
organized in a tree (parent, children or level entities).
GUI Elements
- Layouts
- Events
- Behaviors
- Messages
Layouts
Layouts are addressing the problem, that each widget inside the UI needs individual placement. This requires a dynamic calculation of its space requirements coupled with is target specific positioning when interacting with the display device.
Why do we need layouts?
Well, lets take an obvious example that meets every modern application: You have to support multiple language variants! Changing the selected localization should be possible at runtime. We do expect, that each needed idiom inside our application will for sure differ in their label length, as well as the sizes of used glyphs in the selected fonts. What would happen, if we would size the entities statically? We would code e.g a button with a given size. How to react on content changes of its child entity (e.g. a label that is expected to be centered inside the button frame)?
Pugh, you as the programmer would need to adapt the GUI views for every supported language and react on pragmatically on any of this size changes. A nightmare! This is nonsense. We have to define and render the stuff the other way around!
Our solution
OrbTk uses a layout system. This system support the ability to
determine the natural size of the content elements. It allows a dynamic
approach to layout all entities inside the toolkit. No matter if the
application logic requires to add or subdivide other entities inside
the widget tree. Or if contents is changed through theme adaption or
user interaction: all involved entities are processed and resized as
needed, respecting their individual constraints.
Constraints are defined via entity properties that are
stored as components inside the DCES. The concept follows a two
phase model. It will process the entity tree in two passes:
MeasuringpassArrangementpass
This is the reason, we call it a functional_reactive Toolkit.
Measuring
The Measuring pass allows us to determine the desired size of a
boxed entity. A desired size is a structure, that holds the maximum
values for the width and height of the entity in question. This values
are stored inside DCES. If computation recognizes a size change of
the desired size, which means the stored and the current value of
its property differs, the dirty flag is set. The measuring will
result in an update of the associated bound values inside the DECS
entity (structure desired size).
Arrangement
The Arrangement is following in a separate run. It will trigger the
2D rendering task. This task walks down the element tree and consume
the bounds of each entry. A bound describes the finalized
alignment position of an entity (height, width) and is stored inside
the DCES. Computation tasks are only triggered, if the values of
a tree element have changed, which will be indicated via the dirty
flag. All referenced elements that are affected by this changed values
need to be rearranged. Their positions are recomputed with the
appropriate values inside the render buffer, since the active state
was marked dirty.
After the arrangement pass, the dirty flag is cleaned, which will omit any further computational needs. Once the state of an entity is marked as dirty again, the pass runs are triggered as desired.
Layout Methods
OrbTk supports a number of dedicated layout methods, that are
designed to handle the specific demands of a given widget type:
- Absolute
- Fixed size
- Grid
- Padding
- Popup
- Stack
You can find the relevant code inside the orbtk_core workspace. The methods are inside the sub-directory layout.
Further information towards this methods are discussed in Chapter: Ortk_core.
Events
- bottom-up
If the events traverse from a leaf entity up to the root entity.
- top-down
If the events traverse from the root entity down to the leaf entities.
Behaviours
Specialized event handling that reacts on signals. Signals may be fired from ether input devices (e.g. mouse, keyboard) or inside the functional logic (e.g. changing focus, text, etc).
Messages
An intelligent messaging infrastructure that instantiates subs. The concept enables the toolkit to send and receive messages between the linked entities (m senders -> n receivers).
Framework Elements
The elements are organised as sub-modules inside the API sub-tree.
OrbTk workspace structure
While developing OrbTk, we try to take care of some basic principles
- modularity
- extensibility
- multiplatfom awareness
Within the Rust ecosystem, workspaces are a natural way to distinct
code blocks, that define a logical entity. That allow you to split one
big crate into multiple smaller ones. Beside the ordering factor this
code-splitting is great for avoiding repetitive compilation of the
code, because only crates with changes have to be recompiled. The
result may reduce the compile time by an order of magnitude. Obviously
OrbTk is using such a structure.
We do provide to following workspaces:
- orbtk
- orbtk_core
- orbtk_orbclient
- orbtk_tinyskia
- orbtk_widgets
- proc_macros
- utils
The components and relations within the code base will be discussed step by step in the following chapters.
Workspace OrbTk
This workspace is the entry point into the framework code. If you are familiar with Rust code, we are following best practice.
Lets have a quick look at the src sub-directory. As usual you will
find a lib.rs source file.
Obviously here the code starts to define the crates type “lib”. The
next lines define an outer documentation block, which serves as a
short introduction. Outer documentation lines are encoded with two
slashes followed by an exclamation mark (//!).
A very strong feature of the Rust toolchain is the availability of an
inline documentation subsystem. We do use this feature extensively
within OrbTk, to document every public accessible code module,
public functions, structure or enumeration. Inner documentation blocks conventionally start with three slashes (///).
To render the documentation lines, a simple
cargo doc
will generate the online documentation, corresponding to the downloaded release version. We will timely upload negotiated versions to Docs.rs.
Back to our structure. To keep the code tight and clear, Rust supports the concept of modules. Like in most other higher programming languages this allows to subdivide your code into related, condense function blocks. This resolves to increased clarity and readability. To put the needed modules or crates into scope, take advantage of the use statement.
Both principles helps quite a bit to keep a lean structure beside a
nice developer experience. Ease of use is one main goal, so we
prepare prelude modules, that will take care to present the most
needed peaces accessible in your code. Using short and pregnant
descriptors should be enough to consume the offered OrbTk modules
and functions in your code.
Workspace orbtk_core
Application
The application crate provides the base api inside an OrbTk application.
Its elements are consumed via dedicated modules organized in the other sub-crates.
The ContextProvider
This structure is a temporary solution to share dependencies inside an
OrbTk application. Right now, if the app is started, a new
ContextProvider object is created. The interconnection between
sender and receiver are handled using asynchronous channels with
sender/receiver halves (mpsc).
-
window_sender A
WindowRequestis used to send the given request to the named window. -
shell_sender A
ShellRequestis used to send the given request to the application shell. The application shell is aware of the handled windows. They are differenciated via individualWindowAdapterobjects.
In the given version this module isn’t thread save. It will be refactored in the next upcoming release.
The WindowAdapter
Each WindowAdapter handles its unique tree, event pipiline and
shell. They are dynamically stored in the undelying DCES via ECM
methods.
The shell will react on UI events. The code for dedicated events are organized in explicit modules that will trigger their handlers:
- activation events
- clipboard updates
- drop events
- focus events
- key events
- mouse events
- text input events
- window resize events
- window scroll events
- window system events (like
quit)
The EventAdapter provides a thread safe way to push events to the
widget tree of a window.
The Overlay widget
The Overlay widget allows the handling of children at the top of the
tree. Thus its children will be presented on top of all other widgets
grouped in the widget-tree.
Layout
A layout is used to dynamically order the children of a
widget. Before we can arrange the components on screen, their sizes,
bounds and constraints have to be measured. The ordering process
will result in a parent / child relation (tree), that is represented
and handled in the ECM. In a next step, the tree components are
arranged. The result is rendered into an output buffer. Last not
least the updated areas are signaled to the output screen.
To measure components, the code will provide suitable defaults for
each property as well as a desired_size. The desired_size will
resolve the height and width property of the child element.
This values can either be overwritten with an explicit component
property inside your rust code, or while referencing to definitions
using a style property. Please take into account, that a given
style definition will take precedence over all explicitly defined
property elements inside the code. OrbTk will not respect a mixture of
both declarations.
The absolute placement
Only components with a visibility property that is labeled with a
Collapsed or Visible option will be taken into account, when
calculating bounds and constraints of a child. The resulting bounds are
points, with absolute x and y positions on the screen (floating point values).
New rendering of the child will only occur, if any of its properties is
marked dirty.
The fixed size
A fixed sized layout is defined by fixed bounds for its child. Think of images that have to be rendered with a given size, or a minimum size of a text box.
Grid layout
The grid layout is a specialized case of the default alignment layout. If you declare rows and columns, the child blocks are calculated suming up each individual block bounds inside the corresponding row or column.
You may stretch the blocks to the choosen dimension (horizontal vs. vertical). As a result, if you resize the window of the running app, that grid element will consume the extra size available because of your interactive change. Vice versa, the elements will shrink down until the grid child will reach the defined minimum bound.
Padding layout
Padding may be needed, as a property of a broad range of
components. The measurement cycle will calculate the padding value (a
floating point value) as a constraint that is added to the space
requirements of the associated content component. You may think of the
padding as a surrounding with a given thickness, that is placed
arround your content.
The following image visualizes the dependencies.
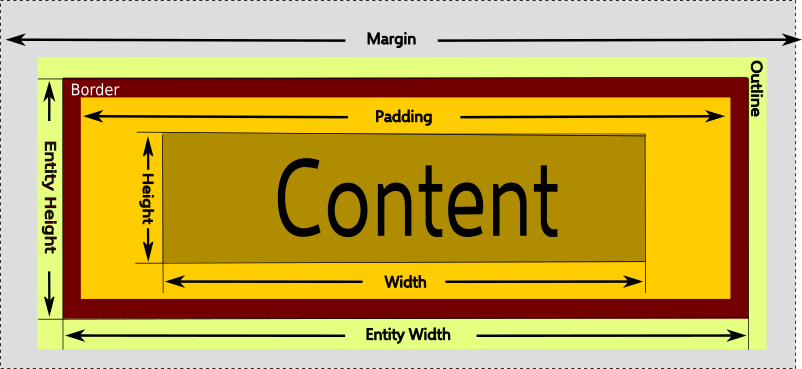
Image 2-2: Layout constraints
Popup layout
The popup layout is a specialized case of the default alignment layout. A popup is typically needed to render content, that is related to a given target widget. That includes the position of the popup itself, as well as its dynamic created content.
You can find a common use case of a popup if you study the OrbTk code
of a list box. The list box elements are collected in a stack
widget. The stack itself is placed in a popup widget. And the
popup widget is placed right below the text block that offers a
drop-down selection arrow.
Stack layout
The stack layout is a specialized case of the default alignment
layout. A stack offers a use case, where you want to place other
widgets in a congruent horizontal or vertical order. You may
define a spacing property. This given floating point value is used
as a seperator between each stack member.
Localization
Localization is a research task by itself, if you want to resolve all syntactic rules that are found when writing prose in different languages. OrbTk’s localization crate isn’t ready to resolve all this complexity, but this may improve in further releases.
Starting with the given implementation, localization can offer methods, that
are able to match and replace text strings. The usage of the localization crate is
optional. If you don’t need any multi lingual adaptions inside your widgets, simply
do not include the localization sugar.
The building blocks of localization
If you want to enable the users to select and change the desired display language of the GUI at runtime, the toolkit needs to match up a requested text strings (the key) that should be presented inside the view and substitute it with the corresponding translation string (the target value). Dictionaries are used to organize the keys as word lists.
OrbTk’s localization implementation has choosen to persitently store
the translation strings inside a RON file. When introducing
the new syntax structure used inside a RON filetype, it was one goal
of the authors to easily match rust types to ron types. That is
exactly the development goal from the RON authors:
“RON is a simple readable data serialization format that looks similar to Rust syntax. It’s designed to support all of Serde’s data model, so structs, enums, tuples, arrays, generic maps, and primitive values.”
You can save each supported language in its individual ron file. The language
files need to be distinctable. A natural way to implement this requirement
is the usage of unique language ids. Most *operating systems take advantage
of a locale subsystem, and save the identification of the active language in
the lang enviroment variable. It’s good practice to include the language id in
the corresponding ron file name.
When you include the localization functionality in your OrbTk code, you
should define constants for each supported language id, that will reference the
ron file in question.
When calling the RonLocalization methods addressing the combination of a language
id and the corresponding dictionary you are able to store the result in language
variable. The crate methods will handle all the heavy lifting to substitute the
source values of the text attributes inside the views with their matching translation
strings in the addressed dictionary.
The ron file structure
In OrbTk, the structure RonLocalizationBuilder is defined to take values for
the following parameters
- language: a String
- dictionaries: a HashMap
The ron filename representing a language localization should include the language identifier to ease its distiction from another.
Dictionaries itself are stored The dictionary is represended by a key value pair
A class Dictionary will include a map named words.
The ron type map is like a type struct, but keys are also values instead of
just beenig identifiers.
- using a ron file
Activation of the localization crate inside your source code boils
down to this short example code.
#![allow(unused)]
fn main() {
static LOCALIZATION_ES_ES: &str = include_str!("../assets/localization/dictionary_es_ES.ron");
}
We do define two language identifiers:
- _de_de: referencing a ron file with german translation strings
- _es_es: referencing a ron file with spanish translation strings
#![allow(unused)]
fn main() {
    Application::new()
        .localization(es_es)
}
When creating the Application block, we do pipe in the localization property. To keep this example simple, a hardcoded de_DE is choosen. The showcase example inside the orbtk source code implements a tab widget, that offers a dropdown list, to dynamically change the active language variant.
#![allow(unused)]
fn main() {
    let es_es = RonLocalization::create()
        .language("es_ES")
        .dictionary("es_ES", LOCALIZATION_ES_ES)
        .build();
    /* disabled german translation file
     * let _de_de = RonLocalization::create()
     *    .language("de_DE")
     *    .dictionary("de_DE", LOCALIZATION_DE_DE)
     *    .build();
     */
}
To compile this example code, go ahead and enter the following comand in your terminal window:
$ cargo run --release orbtk_localization
Your screen should present an application window showing the translated spanish strings.
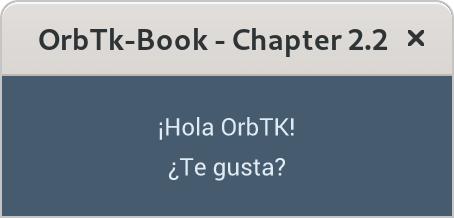
Image 2-2: Application window with spanish localization strings
Sure, this code isn’t elegant nor will it suite the real application
demands. What it does show is the logic, to bind a ron file (storing
the translations of a given language) to a const. When calling
RonLocalization, the text method will resolve text attributes
inside a view or any rust primitive with the translation text resolved
in the language dictionary.
Properties
Every entity that is managed via the provided ECM methods (in most cases this will
be widgets) will have associated components. If we are
talking about components inside the toolkit, we name them properties
of a given object.
Layout
Our aim is a dynamic ordering of objects inside the render buffer. This ordering needs to respect the specific properties of each object making up the object tree. All properties declared for the addressed objects will sum up the constraints that need to be respected within their layout.
Logical units of properties ease the measurement and assignment process of the given object tree.
Blocks
Inside OrbTk the BlockBuilder method handles a block. A block is a
term that defines an object inside the render surface. A legacy form of
the API was using the idiom row or column to define the position
of a block inside a grid widget. We moved on to use blocks as a
generic term that can be used in all widgets. Blocks will inherit
default properties:
- a block size
- its minumum size
- its maximum size
- its current size
If we measure a block size, we can choose from an enumeration of valid expressions:
- Auto: The largest child will be used to measure the block size.
- Stretch: The block will be expanded and consume all of the available size.
- Size: An explicit floading point value.
ScrollViewerMode
To describe the vertical and horizontal scroll behavior of a widget,
we do make use of the ScrollViewerMode. The ScrollViewerMode will
evaluate a valid enumeration value of the ScrollMode. Per default it
will automatically assign the Auto value. That will take care
that the layout logic is able to automatically adjust and manage scroll
movements of associated widget elements (e.g. in ListViews, SelectionViews or TextBoxes).
You may want to handle this scroll movements via your own dedicated
code. Just adapt the mode property horizontal and vertical to your needs and select
ScrollMode::Custom. To completely disable any scrolling logic select
ScrollMode::Disabled.
Widget
FocusState
To offer natural interactivity with the implemented UI, we should
respect workflow standards. E.g a user is expecting the cursor and the
possibility to change a widget element at the next logical
position. Imagine a form, where the UI offers a layout to enter some
address fields. When you activate such a form, you do expect the
cursor position on the first element of the form. Thus, we need the
concept of a Focus that enable the state logic to preset UI
interaction onto a specified element. The FocusState offers methods
to control the state information of widget elements:
- Request the focus for an entity.
- Remove the focus from an entity.
- Reference the current focused entity.
- Check the focus state of an entity.
KeyboardState
The keyboard state tracks which keys are currently pressed. The active state is stored in a lazy-loaded HashMap.
Beside common key activities, you may need to react on generic
modifier keys (Alt, Ctrl, Hyper, Shift). Helper functions
offer several convenience methods to handle such keyboard events. A
generic method comes in handy, if you don’t care which modifier key is
down (Shift-left or Shift-right => Shift). The example section
will also tackle the case, where a combined event (Ctrl+S) keyboard
state is handled.
Render Objects
Services
System
Theming
Tree
The Widget base
Workspace orbtk_client
WIP: The OrbTk GUI client modules
Workspace orbtk_tinyskia

Rendering is a key component of the toolkit. Everybody is expecting state of the art presentation of implemented widgets. User interaction that will result in layout and entity changes inside the GUI should be updated as soon as possible. A comfortable user experience is mainly influenced by fast rendering tasks. New rendering of layouts should only take place, if constraint changes will need to do so. Entities and their attributes will only require new rendering if a user interaction changes their state to be dirty.
Lets summarize the main goals of OrbTk rendering infrastructure:
-
API encapsulated access to all renderer functions
This design decision is taken to keep freedom for further development of OrbTk when it comes to support different renderers. We are able to support
- different versions of a given renderer
- support different renderer for different target platforms
-
2D rendering
We need a fast and complete implementation of all rendering functions that are supported in the OrbTk toolkit. The following summary is a list of
tiny-skiaprovided functions:- Pixmaps
- Canvas
- Path
- geometry primitives
- Blending modes
- Path filling
- Anti-aliased Path filling
- Path stroking
- Path hairline stroking
- Anti-aliased Path hairline stroking
- Stroke dashing
- Gradients (linear and radial)
- Pixmaps blending (image on image rendering)
- Patterns
- Fill rect
- Stroke rect
- Rectangular clipping
- Clipping
- Anti-aliased clipping
- Analytical anti-aliased Path filling
- Dithering
- Blending modes
We are looking forward to a Rust native ecosystem that handles text rendering. This is a complex task and by the time of writing a
complete library addressing this issue isn’t available.
The Rust community has developed building blocks, like
- Font parser: ttf-parser.
- Text shaper: rustybuzz or all-sorts.
- Font database: fontdb (supporting a font fallback mechanism).
The missing peace, beside the glue code to use the components inside
orbtk_tinyskia is a high-quality glyph rasterization library. Preferably it will offer a FreeType level of
quality. ab_glyph_rasterizer or fontdue might evolve to fill this
gap.
Workspace orbtk_widgets
As a UI developer consuming OrbTk, you most probably will get in
touch with the widget sub-crate. If you get comfortable with the
terminology of views and their states, it’s quite easy to
implement even complex structures. The GUI components are declarative
and you will code them inside the view blocks. All callbacks that
will handle the functional processing are coded inside the state
blocks. User input (e.g. mouse events, keyboard input) as well as
event handler generated feedback is handled and processed from methods
of the associated state blocks.
The behavior modules are separated to handle specialized cases. If
an event is emitted that belongs to a behavior class, the associated
action is handled by a behavior method. In particular you will
recognize modules for the following behaviors:
- focus
- mouse
- selection
- text
Views
When you create a view block inside an OrbTk application, it is
required to insert definitions that declare what elements are going to
be present inside the user interface.
What is a View
If you take the Rust code that makes a view in a structural way, it
will answer to the following questions:
- Which entities are used?
- What is the entities tree formed?
- What attributes are coupled with the given entity?
- What handlers should take care when a given event is emitted?
What is the code structure of a View
First, the inside the source code that takes your view needs to call
the widget! macro. This macro automatically implements the Widget
trait. When instantiated, it will inherit all default properties from
a base widget, which gets you started with consistent preset values.
The syntax of this macro call will require you to select
- the desired
view-name(e.g: “NavigationView”) - optional: the name of the associated
state-structure(e.g: ““)
If you like to assign property names inside the view, go ahead and introduce an extensible list of the property-variables. Each variable will take a name and define its associated type.
In a next step you enhance the Template trait with an implementation
of your new widget. You are required to code a function called
template. The syntax of this function will take the following
arguments
self, the implementation of your view-name- the
Idof the entity - the
Context, as a mutual reference to the BuildContext
All the widget structures you are going to use inside of template
will be coded as child’s of self.
States
When you create a state block inside an OrbTk application, it is
required to define the structures you want to work on in the State
implementation.
What is a State
The Rust code that makes a state is associated to the view block
of your widget. Go and ask yourself:
- What actions should be processed on a given event?
- How should we handle user input?
- What happens if an entity attribute is changed and gets dirty?
From a procedural point of view, states will provide methods that are processed depending of the event status inside the a widget.
graph TD;
	State-->init;
	State-->update;
	State-->cleanup;
	update-->message;
	message-->layout;
	layout-->update_post_layout;
Workflow 1-1: State handling methods
What is the structure of a State
First, inside the source code that takes your state, you will go and
declare its structure name. This name corresponds to the parameter
value you chose inside the widget! macro call of your widgets
view (e.g “NavigationState”).
In a next step you enhance the State trait with an implementation of
your state structure. Most probable, you create and adapt the
following functions:
The cleanup function
This function is called as a destructor, when a widget is removed or your application terminates.
The init function
This function is called to initialize the widget state. You can preset attributes before the view is activated and presented to the user.
The message function
The message subsystem is offering methods to chain events, that can
be interchanged and accessed from any defined state. You will code a
message function to take advantage of this functionality.
The syntax of this function will take the following arguments
self, the implementation of your message function- the mutable
messagesvariable, referencing the MessageReader - the
Context, as a mutual reference to the BuildContext
As already explained, you should define an action enumeration, (e.g
“NavigationAction”), that will code the values that are possible or
desired (e.g “SaveSettings”, “LoadSettings”). Inside the message
function you will loop through the messages and match the action
values you are interested in.
The update function
Whenever the attribute of an entity is changed, OrbTk will render it
dirty. The update function is taking care to react on any triggered
dirty state. You will probably define an Action enumeration that
will name and list all action states you are interested in. Now, if
you match an action in the update function, you can react on this
with all the Rust syntax flexibility.
The update_post_layout function
OrbTk will run this function after the rendering crate has processed the new layout for your view.
Workspace proc_macros
WIP: Precedural macros
Workspace utilities
WIP: OrbTk helper utilities
OrbTk Widget Templates
Template: Button
Template: Canvas
Template: CheckBox
Template: ComboBox
The following image visualize the structure elements of a ComboBox widget.
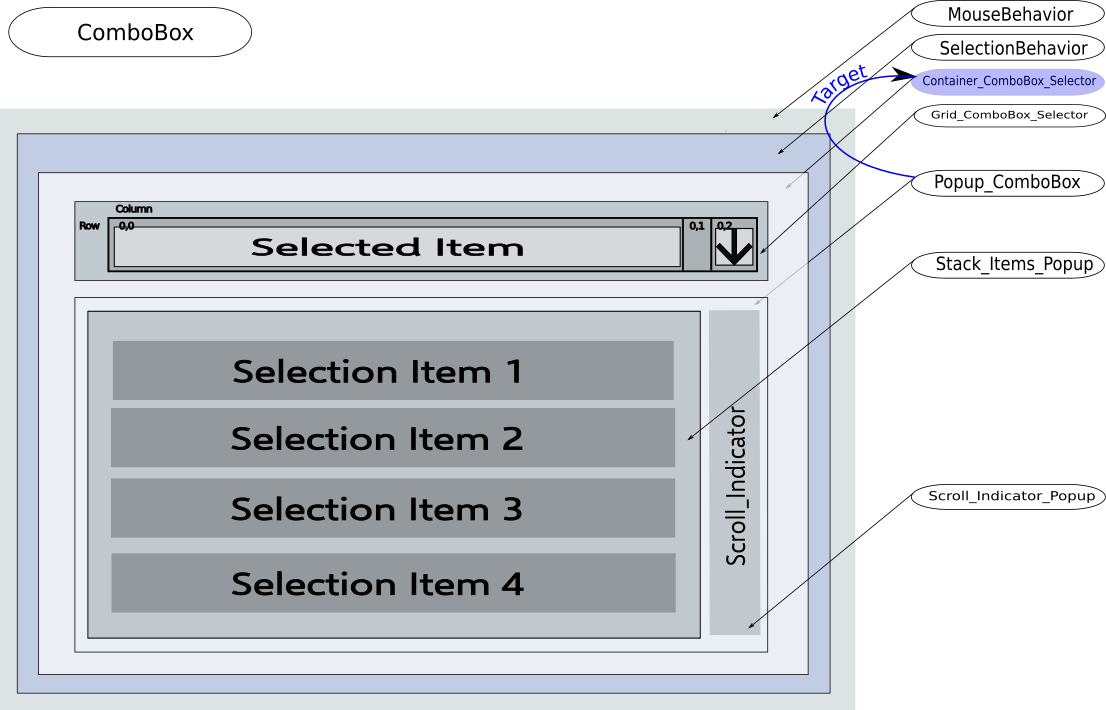
Image 03-04: Structure ComboBox widget
WIP: Explain the structure
Template: Container
Template: Cursor
Template: FontIconBlock
Template: Grid
Template: Image-widget
Template: ListView
Template: MasterDetail
Template: NumericBox
Template: Pager
Template: PasswordBox
Template: Popup
Template: ProgressBar
Template: ScrollBar
Template: ScrollIndicator
Template: ScrollViewer
Template: Slider
Template: Stack
Template: Switch
Template: TabWidget
Template: TextBlock
The following image visualize the structure elements of a TextBlock widget.
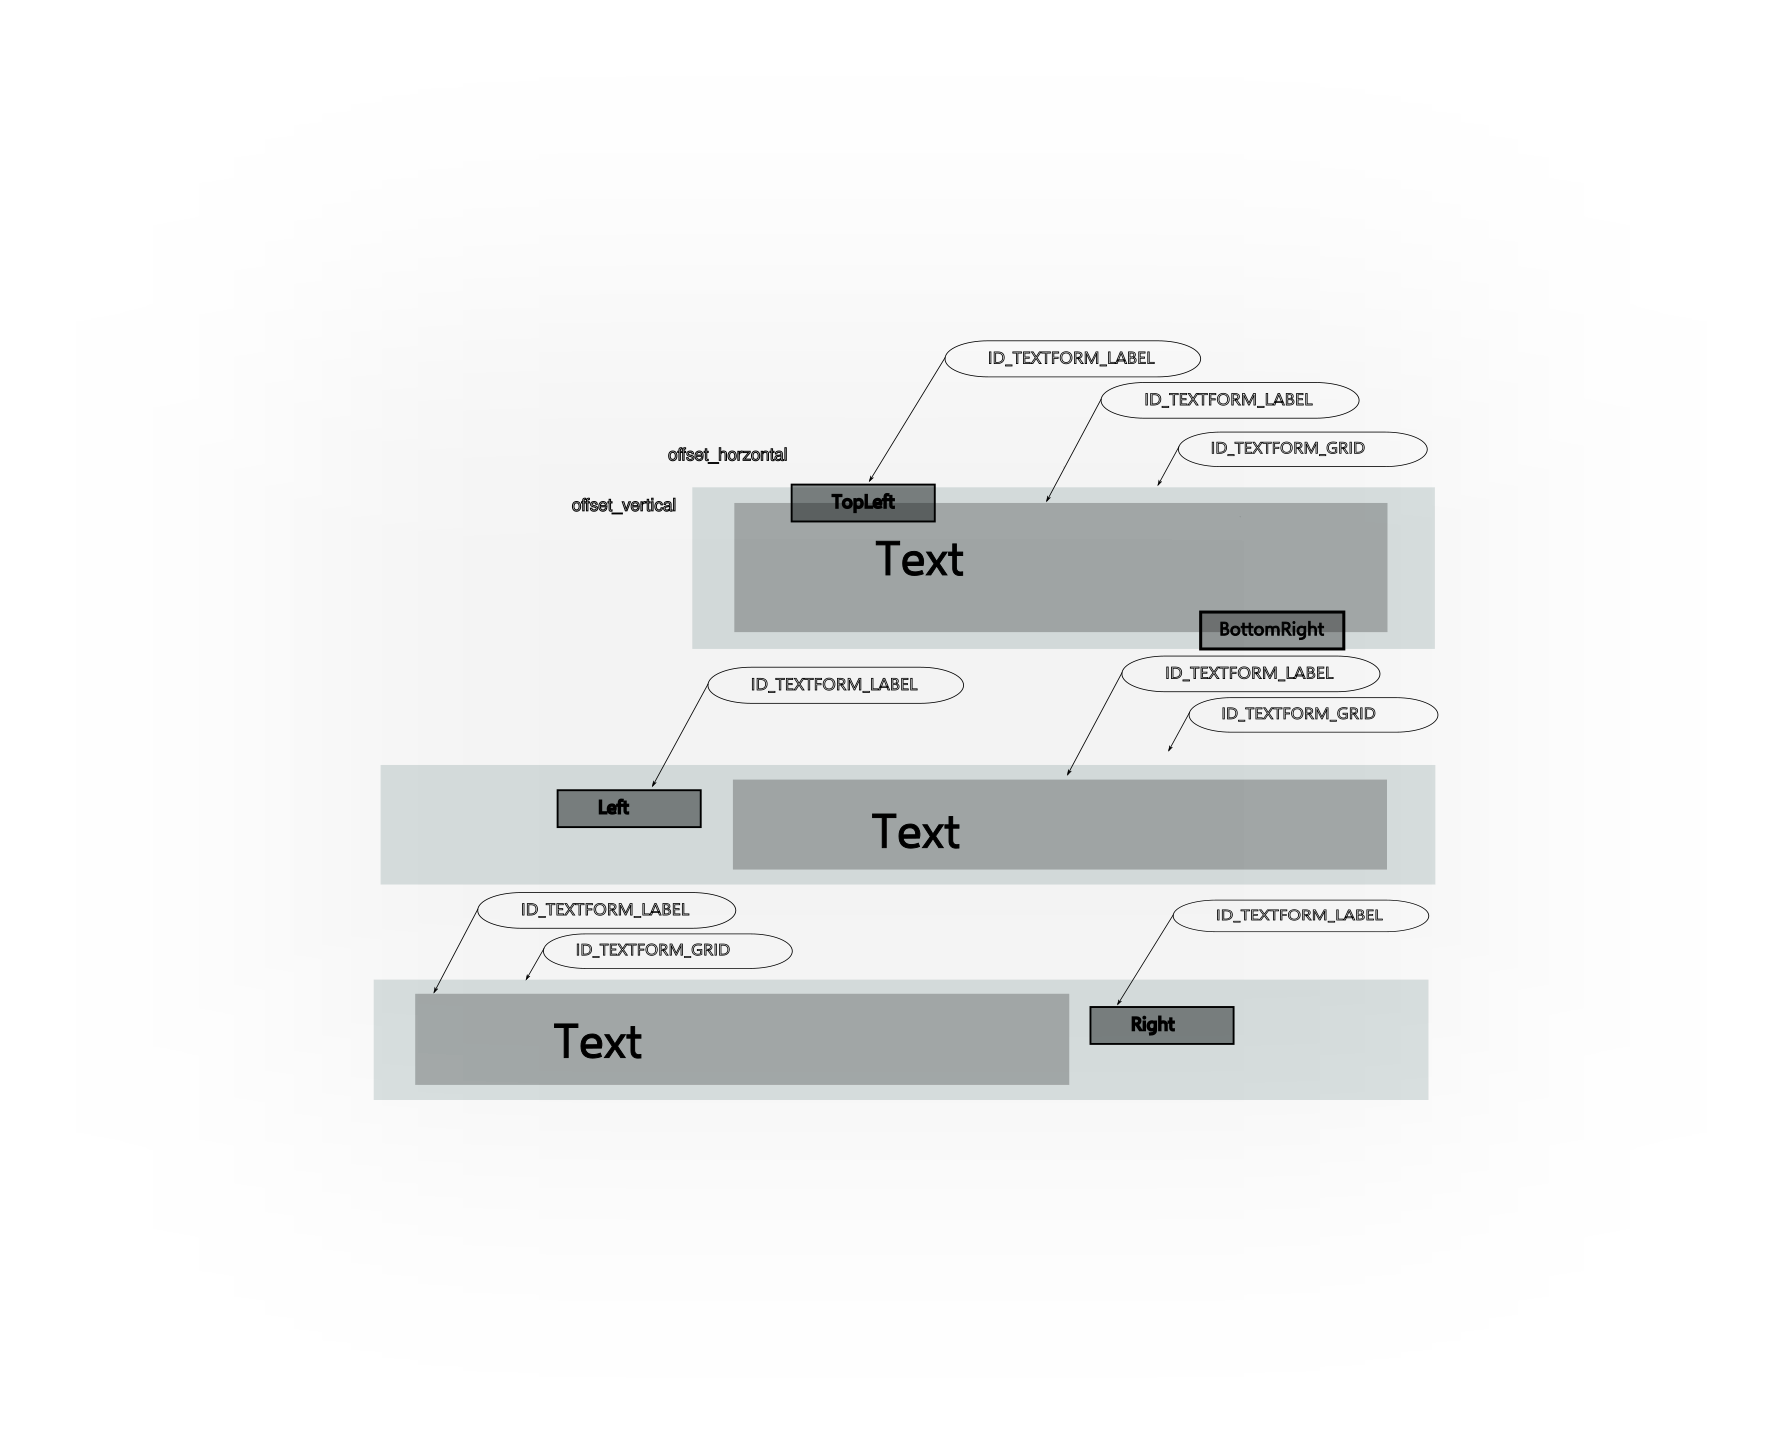
Image 03-24: Structure TextForm widget
WIP: Explain the structure
Template: TextBox
Template: Togglebutton
Template: Window
OrbTk Example Applications
This is WIP
Hello OrbTk!
We have introduced this example in Chapter 01. Since it is the first example, it is listed here for completeness. Go ahead like so:
The project root
Change to your project root directory. If you didn’t already create the app in the first place, go ahead and type the following in your console:
$ cd ~/orbtk-book/examples
Create the source code
Next we will use cargo to create the app. All boilerplate tasks are handled using cargo’s inherited template handling.
$ cargo new orbtk_hello
$ cd orbtk_hello
The first command, cargo new, takes the name of the project
(”orbtk_hello“) as the first argument. The second command changes to
the new project’s directory.
Look at the generated Cargo.toml file:
Filename: Cargo.toml
[package]
name = "orbtk_hello_example"
version = "0.1.0"
authors = ["Your Name <you@example.com>"]
edition = "2018"

# See more keys and their definitions at https://doc.rust-lang.org/cargo/reference/manifest.html

[dependencies]
Listing 1-1: Default metadata “orbtk_hello”
With cargo new, a default project structure is created. Maybe the
author information is already exchanged if Cargo could obtain a definition
from your environment. Cargo also generated source code for a “Hello, world!”
program. Let’s Check out the corresponding src/main.rs file:
Filename: src/main.rs
fn main() {
    println!("Hello, world!");
}
Listing 1-2: Default source file “main.rs”
No need to compile that stage with cargo run, since we are going to
exchange the project metadata, as well as the orbtk source code right
away.
Update Cargo.toml
First reopen the Cargo.toml file and enter the Code in Listing 1-1 into Cargo.toml
Filename: Cargo.toml
[package]
name = "orbtk_hello"
version = "0.3.1-alpha4"
authors = [
	"Florian Blasius <flovanpt@posteo.de>",
	"Ralf Zerres <ralf.zerres.de@gmail.com>",
]
description = "The Orbital Widget Toolkit - Training project"
documentation = "https://docs.rs/orbtk"
repository = "https://github.com/redox-os/orbtk"
readme = "README.md"
license = "MIT"
keywords = [
	"orbital",
	"widget",
	"ui",
]
edition = "2018"

[profile.dev]
opt-level = 1

[dependencies]
orbtk = { git = "https://github.com/redox-os/orbtk.git", branch = "develop" }
#orbtk = { path = "../../../orbtk", branch="next" }

[[bin]]
name = "orbtk_hello"
path = "src/main.rs"
Listing 1-1: Project metadata “orbtk_hello”
You may wonder, why the name property inside the Cargo.toml is
formatted like hello_orbtk.
name = "orbtk_hello"
It is a good habit to follow rusts
naming convention, that encourages you to use snake_case
naming. While expanding the OrbTk example sources, we will keep
the grouping prefix orbtk. That way we end up to call our first target
binary orbtk_hello.
Update main.rs
All of the OrbTk specific code that is needed to build our first example “Hello OrbTk!” is shown in Listing 1-2. It goes to src/main.rs.
Filename: src/main.rs
use orbtk::prelude::*;

fn main() {
    // use this only if you want to run it as web application.
    orbtk::initialize();

    Application::new()
        .window(|ctx| {
            Window::new()
                .title("OrbTk-Book - Chapter 1.2")
                .position((100.0, 100.0))
                .size(420.0, 140.0)
                .child(
                    TextBlock::new()
                        .font_size(28)
                        .h_align("center")
                        .text("Hey OrbTk!")
                        .v_align("center")
                        .build(ctx)
                )
                .build(ctx)
        })
        .run();
}
Listing 1-2: Code that creates a Window and prints “Hey OrbTk!”
Save the file and go back to your terminal window. Enter the following commands to compile and run the file:
$ cargo run --release --example orbtk_hello
Regardless of your operating system, a window should be placed on the screen
that prints the string Hey OrbTk! in its center.
Image 1-2: Application window and Hey OrbTk
If something is preventing to position the window, refer back to the
“Troubleshooting” part of the Installation section for ways to get help.
If your enjoy the rendered output of your Hey OrbTk! app,
congratulations! You’ve written your first OrbTk application.
That makes you a OrbTk programmer — welcome!
Recap and annotation
The anatomy of an OrbTk application
Let’s review in detail what just happened in your “Hey OrbTk!” application. Here’s the first piece of the puzzle:
use orbtk::prelude::*;

fn main() {
    // use this only if you want to run it as web application.
    orbtk::initialize();

    Application::new()
        .window(|ctx| {
            Window::new()
                .title("OrbTk-Book - Chapter 1.2")
                .position((100.0, 100.0))
                .size(420.0, 140.0)
                .child(
                    TextBlock::new()
                        .font_size(28)
                        .h_align("center")
                        .text("Hey OrbTk!")
                        .v_align("center")
                        .build(ctx)
                )
                .build(ctx)
        })
        .run();
}
The first line is introducing a use declaration. A use declaration is used to shorten the path required to refer to rust module items. The prelude is a convenient way to a list of things, that rust will automatically import to you program. Here, we bind the path orbtk::prelude. All default items defined in this path (referenced with ::) are now accessible in your source using their shorthand name. No need to type in their common prefix (orbtk::prelude::)
use orbtk::prelude::*;

fn main() {
    // use this only if you want to run it as web application.
    orbtk::initialize();

    Application::new()
        .window(|ctx| {
            Window::new()
                .title("OrbTk-Book - Chapter 1.2")
                .position((100.0, 100.0))
                .size(420.0, 140.0)
                .child(
                    TextBlock::new()
                        .font_size(28)
                        .h_align("center")
                        .text("Hey OrbTk!")
                        .v_align("center")
                        .build(ctx)
                )
                .build(ctx)
        })
        .run();
}
the third line define a function in Rust. The main function is special: it is
always the first code that runs in every executable Rust program. The first
line declares a function named main that has no parameters and returns
nothing. If there were parameters, they would go inside the parentheses, ().
Also, note that the function body is wrapped in curly brackets, {}. Rust
requires these around all function bodies. It’s good style to place the opening
curly bracket on the same line as the function declaration, adding one space in
between.
An automatic formatter tool called rustfmt will help you to stick to a
standard style across Rust projects. OrbTk is following this guidance.
rustfmt will format your code in a particular style. Depending on the version
of your rust toolchain, it is probably already installed on your computer!
Check the online documentation for more details.
Inside the main function is the following code:
use orbtk::prelude::*;

fn main() {
    // use this only if you want to run it as web application.
    orbtk::initialize();

    Application::new()
        .window(|ctx| {
            Window::new()
                .title("OrbTk-Book - Chapter 1.2")
                .position((100.0, 100.0))
                .size(420.0, 140.0)
                .child(
                    TextBlock::new()
                        .font_size(28)
                        .h_align("center")
                        .text("Hey OrbTk!")
                        .v_align("center")
                        .build(ctx)
                )
                .build(ctx)
        })
        .run();
}
Here are some important details to notice.
- First, Rust style is to indent with four spaces, not a tab.
- Second, the method
orbkt::initializedoes all the hard work to initialize the orbtk environment.
use orbtk::prelude::*;

fn main() {
    // use this only if you want to run it as web application.
    orbtk::initialize();

    Application::new()
        .window(|ctx| {
            Window::new()
                .title("OrbTk-Book - Chapter 1.2")
                .position((100.0, 100.0))
                .size(420.0, 140.0)
                .child(
                    TextBlock::new()
                        .font_size(28)
                        .h_align("center")
                        .text("Hey OrbTk!")
                        .v_align("center")
                        .build(ctx)
                )
                .build(ctx)
        })
        .run();
}
- Third, the method
Application::newcreates a new entity in the entity component system (DECS). DECS is an OrbTk dependency that will create and organize all OrbTk entities. If OrbTk methods change attributes to the widget elements, the corresponding DECS object will store this attributes as components to the given entity.
We’ll discuss OrbTk macros and methods in more detail in Chapter <WIP: chapter>.
For now, you just need to know that using a ::new() means that you’re calling
the creation method of a given widget (here: Application).
Let’s explain the next lines:
use orbtk::prelude::*;

fn main() {
    // use this only if you want to run it as web application.
    orbtk::initialize();

    Application::new()
        .window(|ctx| {
            Window::new()
                .title("OrbTk-Book - Chapter 1.2")
                .position((100.0, 100.0))
                .size(420.0, 140.0)
                .child(
                    TextBlock::new()
                        .font_size(28)
                        .h_align("center")
                        .text("Hey OrbTk!")
                        .v_align("center")
                        .build(ctx)
                )
                .build(ctx)
        })
        .run();
}
Inside the Application method, we pipe in further instructions. Please notice
the important details:
- First, Rust style is to indent with another four spaces, not a tab.
- Second, The piping is encoded using a
dotfollowed by a new method name (herewindow). - Third, the
windowsmethod takes a Rust closure as its argument.
If you are not familiar with the concept of
closures,
go ahead and consult the Rust book reference for a deep dive. For now,
you just need to know that a closure can be used as a language
shortcut for a function. When the closure |ctx| {} is executed, the
result will be captured inside a return variable (ctx). The curly
braces define the body, with the code that is executed inside the
closure.
Let’s examine this body code of our closure:
- First, we call a method to create a new window entity.
(
Windows::new). - Second, we define attributes attached to this entity (
title,position,size). - Third, inside the defined windows, we create a new child entity
(
child).
use orbtk::prelude::*;

fn main() {
    // use this only if you want to run it as web application.
    orbtk::initialize();

    Application::new()
        .window(|ctx| {
            Window::new()
                .title("OrbTk-Book - Chapter 1.2")
                .position((100.0, 100.0))
                .size(420.0, 140.0)
                .child(
                    TextBlock::new()
                        .font_size(28)
                        .h_align("center")
                        .text("Hey OrbTk!")
                        .v_align("center")
                        .build(ctx)
                )
                .build(ctx)
        })
        .run();
}
- Forth, the child method takes arguments. We create a new text block
entity (
Textblock::new). The text block is extended with the attributes (text,h_align,v_align). The text attribute takes the desired string. Its positioning is controlled with the attribution of the horizontal and vertical alignment. By choosing “center”, we do advise the renderer to place the entity centered within its parent entity, which is the window.
use orbtk::prelude::*;

fn main() {
    // use this only if you want to run it as web application.
    orbtk::initialize();

    Application::new()
        .window(|ctx| {
            Window::new()
                .title("OrbTk-Book - Chapter 1.2")
                .position((100.0, 100.0))
                .size(420.0, 140.0)
                .child(
                    TextBlock::new()
                        .font_size(28)
                        .h_align("center")
                        .text("Hey OrbTk!")
                        .v_align("center")
                        .build(ctx)
                )
                .build(ctx)
        })
        .run();
}
OrbTk is as lazy as possible. We need to call the build method (build(ctx)),
that will instantiate our methods and let the renderer do its work.
use orbtk::prelude::*;

fn main() {
    // use this only if you want to run it as web application.
    orbtk::initialize();

    Application::new()
        .window(|ctx| {
            Window::new()
                .title("OrbTk-Book - Chapter 1.2")
                .position((100.0, 100.0))
                .size(420.0, 140.0)
                .child(
                    TextBlock::new()
                        .font_size(28)
                        .h_align("center")
                        .text("Hey OrbTk!")
                        .v_align("center")
                        .build(ctx)
                )
                .build(ctx)
        })
        .run();
}
With the last statement, we finally call the method that will activate the
Application and draw the Widget on our screen (run).
Most lines of Rust code are finalized with a semicolon (;), to indicates that this
expression is finished and the next one is ready to begin.
Compiling and Running Are Separate Steps
Before running an OrbTk application, you must compile its source code. A typical OrbTk project will generate the executable binary code using cargo and place the result in the target subfolder of the project.
Profiles may be used to configure compiler options such as optimization levels
and debug settings. By default the dev or test profiles are used. If the
--release flag is given, then the release or bench profiles are used.
$ cargo build --release --bin orbtk_hello.rs
$ ../target/release/hello_orbtk
On Windows, you need to use backslash as a path delimiter:
> cargo build --release --bin orbtk-hello.rs
> ..\target\release\orbtk_hello.exe
If you like to get debug feedback you can call the build process like this
$ cargo build --features debug --bin hello_orbtk.rs
OrbTk Example Showcase
This is WIP
Please document the example application showcase.rs
OrbTk Appendix
This is WIP
OrbTk Appendix - Keywords
This is WIP
OrbTk Appendix - Operators
This is WIP
OrbTk Appendix - Derivable Traits
This is WIP
Appendix D: Translations of the Book
For resources in languages other than English. This is work in progress; see the Translations label to help or let us know about a new translation!